background image

Sure-Aire™ Flow Monitoring System

3

®

This instruction manual provides installation, operating, maintenance, and other information for the Sure-Aire™ 
series differential pressure electronics.

Receiving

Upon receiving the electronics, check to ensure all items are accounted for by referencing the packing list. Inspect 
each crate or carton for shipping damage before accepting delivery. Alert the carrier of any damage detected. The 
customer will make notification of damage (or shortage of items) on the packing list and all copies of the bill of lading 
which is countersigned by the delivering carrier. If damaged, immediately contact your local sales representative. 
Any physical damage to the unit after acceptance is not the responsibility of the manufacturer.

Unpacking

Verify that all required parts and the correct quantity of each item have been received. If any items are missing, 
report shortages to your local representative to arrange for obtaining missing parts. 

Storage

Electronics are protected against damage during shipment. If the electronics cannot be installed and operated 
immediately, precautions need to be taken to prevent deterioration during storage. The user assumes responsibility 
of the electronics and any accessories while in storage. The manufacturer will not be responsible for damage during 
storage. These suggestions are provided solely as a convenience to the user.
The ideal environment for the storage of electronics is indoors, above grade, in a low humidity atmosphere which 
is sealed to prevent the entry of blowing dust, rain or snow. Temperatures should be evenly maintained between 
30

°

 to 110

°

F (

-1° to 43°C

). Wide temperature swings may cause condensation and “sweating” of metal parts. All 

accessories must be stored indoors in a clean, dry atmosphere.

Removing from Storage

As electronics are removed from storage to be installed in their final location, they should be protected and 
maintained in a similar fashion until the control goes into operation. Environmental Operation Range: -4

°

 to 140

°

(

-20° to 60°C

).

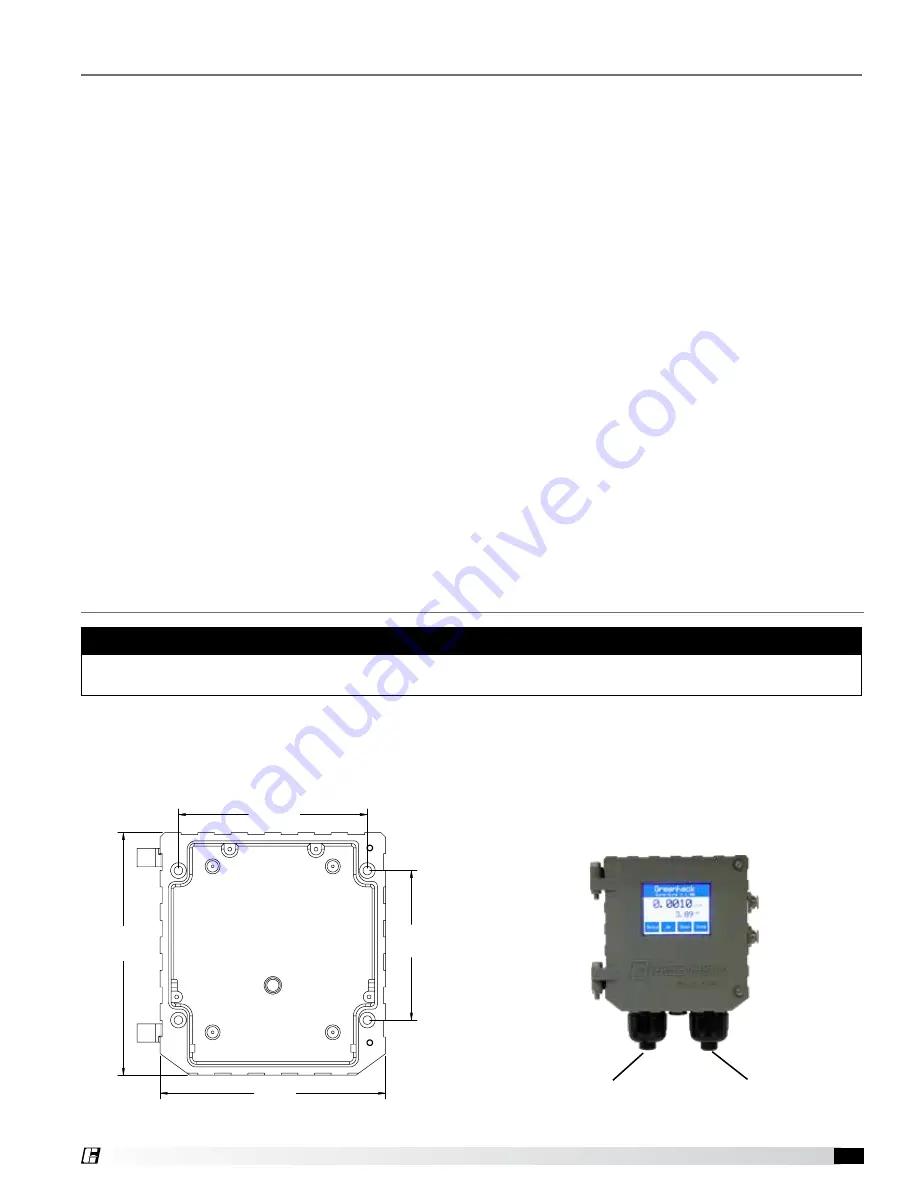
1.    Mount the electronics in the vertical plane using four (4) #8-32 screws, field supplied. Open the front cover by 

unscrewing the two captive thumb screws to gain access to the four mounting locations.


Note:

  Mount the Sure-Aire™ electronics within 75 feet of the termination plate on the fan.

WARNING

When wiring the electronics, you must follow industry standard practices for controls and protect against 
electrostatic discharge (ESD). Failure to exercise good ESD practices may cause damage to the electronics.

General Information

Installation and Setup

Incoming power 

High (H)

Low (L)

Communication 

and signal

4-5/32 in.

(105.6 mm)

5-3/8 in.

(136.5 mm)

3-9/32 in.

(83.3 mm)

5 in.

(127 mm)

Dimensions and Hole Mounting Pattern

2.    Use 1/4-inch nylon tubing to connect the 

corresponding High (H) and Low (L), 1/4-inch quick 
connect, pressure ports of the Sure-Aire electronics 
to the high and low pressure ports on the fan.

Содержание Sure-Aire

Страница 1: ...ty Remote duct temperature sensor Programmable elevation English or metric readings Hardware Required Four 4 8 32 screws 1 4 inch nylon tubing length dependent on distance between fan and Sure Aire electronics maximum 75 feet 23 m each line Sensor wiring for temperature sensor if temperature sensor is being used Pressure ranges reflect differential pressures between the fan inlet and inlet cone no...

Страница 2: ...dure 13 Temperature Sensor 14 Network Protocol Optional 14 Analog Output Signal Optional 15 Calculation Using Manual Pressure Gauge or Third Party Transducer 15 K Factors 16 Label Information Match the Tag Mark on the Sure Aire electronics tag to the Tag Mark on the fan nameplate Sure Aire electronics are supplied set up individually for a specific model and performance Contact factory if Sure Air...

Страница 3: ...s a convenience to the user The ideal environment for the storage of electronics is indoors above grade in a low humidity atmosphere which is sealed to prevent the entry of blowing dust rain or snow Temperatures should be evenly maintained between 30 to 110 F 1 to 43 C Wide temperature swings may cause condensation and sweating of metal parts All accessories must be stored indoors in a clean dry a...

Страница 4: ...page 9 6 Wire TB3 appropriately for the selected Output Signal in Step 5 Terminal Block TB3 Transmitter Temperature Sensor Pin 6 4 20 mA or 2 10 VDC output Note 4 to 20 mA requires a load resistor 200 900 ohms Pin 7 4 20 mA or 2 10 VDC output Pin 8 Shield Pin 9 Remote Temperature Sensor input Pin 10 Remote Temperature Sensor input 7 Select the desire network protocol of the electronics for the Bui...

Страница 5: ...Refer to Setup Menu Temperature Compensation page 9 10 When the above steps are completed make sure the front cover is properly aligned to the housing and the two captive thumbscrews are securely tightened Network Input Register Address Object Name Modbus BACnet 16 bit address 16 bit address K Factor 0 0 Elevation 1 1 Outlet Area 3 2 Flow Temperature 2 3 Pressure 4 4 Volume 5 5 Velocity 6 6 4 Wire...

Страница 6: ...e page 7 for parameter Setup menu Up Down Setup Air Density Air Flow Temperature Sensor Installed Electronics Temperature Differential Pressure Measurement Pressure Sensor Range K Factor Software Version Transmitter Output Type Units Elevation Main Menu ...

Страница 7: ...ns Yes default No Output Signal 4 20mA default 2 10 VDC Linearize By Flow default Pressure Protocol Baud Rate Network Address Device Instance Number Transmitter Min Max Value Display Brightness Load Factory Defaults Load Customer Defaults Save Customer Defaults Protocol BACnet default Modbus Baud Rate Network Address Device Instance Number Transmitter Calibration See manual for details Modbus 2400...

Страница 8: ...you are in i e Setup will change to Home and Home will change to Edit Home Screen To view display variables use the Up and Down buttons to scroll through the list To adjust parameters press Setup and scroll through the settings Air density Flow Temperature sensor installed Electronics temperature Differential pressure measurement Pressure sensor range K Factor Software version Transmitter output t...

Страница 9: ... standard temperature 70 F 21 C Output Signal Output Signal Press Edit to change Output Signal type Press Prev or Next to adjust then press Enter to store the value 4 20 mA default 2 10 VDC Linearize By Press Edit to change the linearization settings The electronics will linearize the transmitter output with respect to this setting Flow default Pressure Note The maximum measurable flow rate will a...

Страница 10: ...ss can be modified Device Instance Number BACnet only The instance number is an unsigned decimal number that can range from 0 to 4 194 302 Every device on a BACnet network gets an instance number and two devices must not have the same number Press Edit to adjust the Device Instance Number then press Enter to store the value 0 4 194 302 Transmitter Min Max Value Transmitter Min Value Press Edit to ...

Страница 11: ... Next to select Yes then press Enter No default Yes loads all customer default settings Greenheck Sure Aire V 2 00 Display Brightness 75 Exit Prev Next Edit Enter Greenheck Sure Aire V 2 00 Load Factory Defaults No Exit Prev Next Edit Enter Greenheck Sure Aire V 2 00 Load Customer Defaults No Exit Prev Next Edit Enter Save Customer Defaults Press Edit to save current electronics settings as the cu...

Страница 12: ...pply a vacuum to the Low Port and the 4 20 mA transmitter to track the span of the pressure range For example the Sure Aire electronics with a pressure sensor of 0 41 51 in wg installed 4 00 mA 0 in wg 20 00 mA 41 52 in wg WARNING Due to load resistance change from product to product it may be necessary to recalibrate the 4 20 mA transmitter 2 9 Keep pressing the Next button until you reach the Tr...

Страница 13: ...the Transmitter Min Value screen 2 8 Press Edit then Inc or Dec until the digital multimeter reads exactly 2 00 VDC 2 9 Press Enter to store the new value Greenheck Sure Aire V 2 00 Transmitter Min Value 1827 Exit Prev Next Edit Enter 2 10 Press Next 2 11 On the Transmitter Max Value screen press Enter then Inc or Dec until the digital multimeter reads exactly 10 00 mA 2 12 Press Enter to store th...

Страница 14: ...ies 3 Max Master Address 127 Max Info Frames 1 Modbus RTU Slave When the electronics is configured for Modbus it will expose a total of seven 7 registers on the network The Modbus RTU Slave settings and list of registers can be seen below Modbus RTU Slave Device Settings Setting Value Baud Rate Set to match BMS Parity No Parity 1 Stop Bit Timeout ms 0 Response Delay ms 0 BACnet MS TP Server Object...

Страница 15: ...inear to pressure the corresponding equations are used to calculate the flow Calculating flow for 2 10 VDC output signal Calculating flow for 4 20 mA output signal CFM K V 2 Pmax 8ρ CFM K mA 4 Pmax 16ρ Analog Output Signal Optional K Constant dependent on fan model and size see page 9 Pmax Maximum pressure of electronics in wg ρ Air density lb ft F 0 075 at 70 F and 0 ft elevation V Output voltage...

Страница 16: ...cable 450 536 10 not applicable not applicable 179 not applicable 179 202 not applicable 500 652 12 355 592 244 408 244 296 not applicable 560 847 13 not applicable 701 not applicable not applicable 296 351 not applicable 630 1053 15 355 861 366 603 366 not applicable 526 16 421 1062 not applicable 724 443 531 634 18 517 1083 542 897 542 787 20 617 1301 651 1088 651 not applicable 955 22 759 1610 ...

Отзывы: