background image

Pre-Installation Guidelines

The basic intent of a proper installation is to secure 
the AMD-xx-TD series damper into the opening in 
such a manner as to prevent distortion and disruption 
of damper operation . The following items will aid in 
completing the damper installation in a timely and 
effective manner .
1 .   Check your schedule for proper damper locations 

within the building . Visually inspect the damper for 
damage .

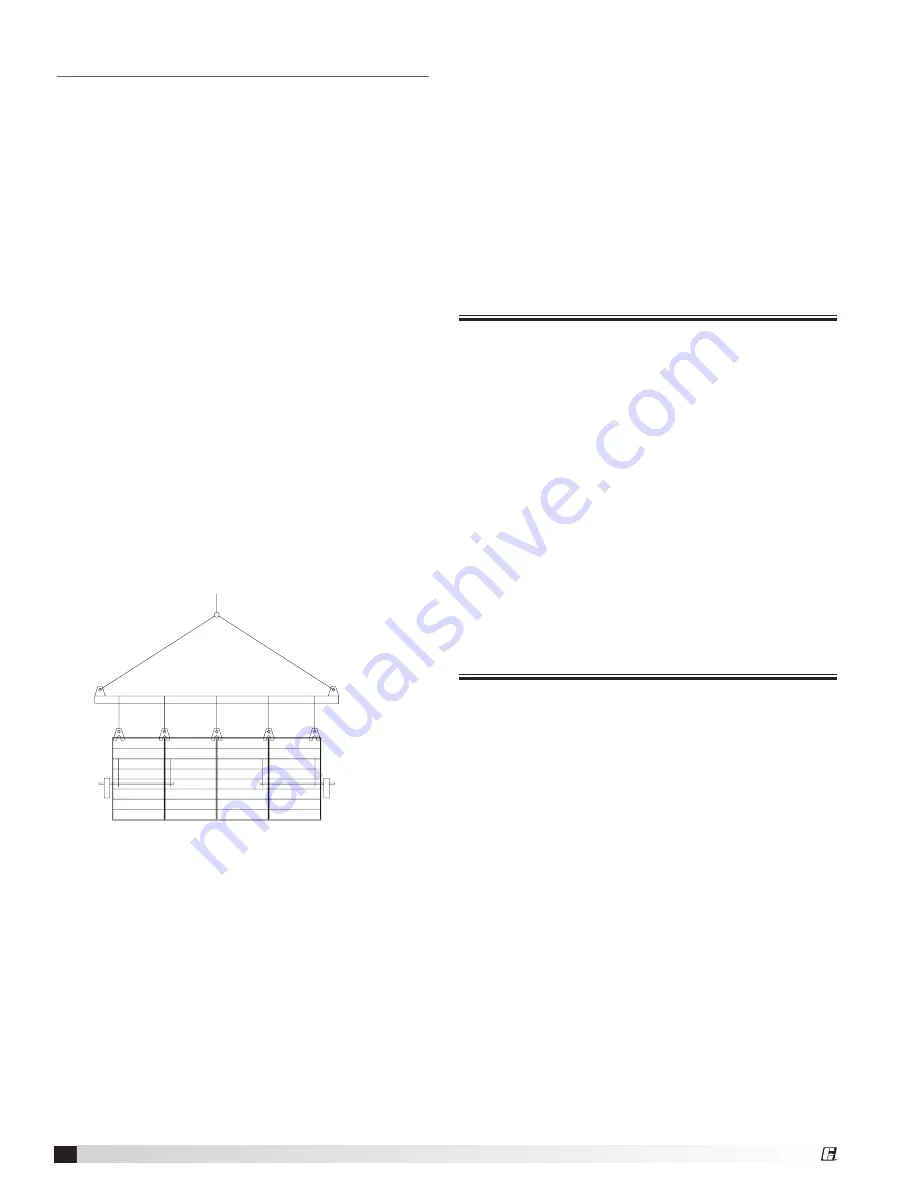
2 .   When you lift or handle the damper use the sleeve 

or frame . Do not lift damper using blades, linkage, 
actuators, probes, or jackshafting . When you handle 
multiple section assemblies, use sufficient support 
to evenly lift at each section mullion (see drawing) . 
Do not drag, step on, apply excessive bending, 
twisting, or racking .

3 .   Do not install screws in damper frame that will 

interfere with unexposed blade linkage and prevent 
damper blades from opening and/or closing .

4 .   Damper must be installed into duct or opening 

square and free of twist or other misalignment . 
Damper must not be squeezed or stretched into 
duct or opening . Out of square, racked, twisted 
or misaligned installations can cause excessive 
leakage and/or torque requirements to exceed 
damper/actuator design .

5 .   Damper, actuator, and transmitter must be kept 

clean, dry and protected from dirt, dust and other 
foreign materials prior to and after installation . 
Examples of such foreign materials include but are 
not limited to:


a)  Mortar dust 


b)  Drywall dust 


c)  Firesafing materials 


d)  Wall texture 


e)  Paint overspray

Spreader Bar

Attachments

Multi section dampers

6 .   Damper should be sufficiently covered as to prevent 

overspray if wall texturing or spray painting will 
be performed within 5 feet (1 .5m) of the damper . 
Excessive dirt or foreign material deposits on the 
damper can cause excessive leakage and/or torque 
requirements and inaccurate airflow measurement to 
exceed damper/actuator design .

7 .   ACCESS: Suitable access (actuators maintenance, 

etc .) must be provided for damper inspection 
and servicing . Where it is not possible to achieve 
sufficient size access, it will be necessary to install a 
removable section of duct . 

Electrical Guidelines

All wiring shall be done in accordance with the National 
Electrical Code ANSI/NFPA-70 latest edition, any local 
codes that may apply, and wiring diagrams developed 
in compliance with the job or project design and 
specifications .

Important!

Electrical in put may be needed for this equipment . This 
work should be performed by a qualified electrician . 
Verify power before wiring actuator . Greenheck is not 
responsible for any damage to, or failure of the unit 
caused by incorrect field wiring . To avoid causing death 
or serious bodily harm to building occupants, follow all 
instructions carefully . Dampers must close completely to 
preserve the integrity of the fire smoke separation .
Connect electrical connection to power strip as shown 
in drawings on pages 4 and 5 . 

2

Air Measuring Dampers: AMD-XX-TD Series

Содержание AMD-42-TD

Страница 1: ...ge If damage is found record all necessary information on the bill of lading and file a claim with the final carrier Check to be sure that all parts of the shipment including accessories are accounted for Dampers must be kept dry and clean Indoor storage and protection from dirt dust and the weather is ideal Do not store at temperatures in excess of 100 F 37 C 1 Air Measuring Dampers AMD xx TD Ser...

Страница 2: ...n materials include but are not limited to a Mortar dust b Drywall dust c Firesafing materials d Wall texture e Paint overspray Spreader Bar Attachments Multi section dampers 6 Damper should be sufficiently covered as to prevent overspray if wall texturing or spray painting will be performed within 5 feet 1 5m of the damper Excessive dirt or foreign material deposits on the damper can cause excess...

Страница 3: ...ners of each section 5 Damper blades axles and linkage must operate without binding Before system operation you can cycle dampers after installation to assure proper operation On multiple section assemblies all sections should open and close simultaneously Setup and Operation for AMD xx TD Series Damper All AMD xx TD s are supplied with a Vari Green airflow rate transmitter that is factory wired t...

Страница 4: ...ured Velocity Max Velocity Measured Voltage 10 Measured Velocity 2 000 3 5 10 Measured Velocity 700 fpm and Measured CFM Measured Velocity Area Measured CFM 700 fpm 4 ft2 Measured CFM 2 800 cfm AMD xx TD Series Ordered with a Factory Supplied Controller When you order a factory supplied controller it comes with a Greenheck exclusive VAF24 BAC GTD actuator which has the controller integrate inside ...

Страница 5: ...t it maintains a desired cfm setpoint The setpoint is established by the BACnetSetpoint datapoint Table 1 lists all of the BACnet datapoints The BACnet Setpoint is a percentage of the MaxCFMSetpoint datapoint which is set at the factory based on the maximum velocity which is selected at the time the unit is ordered Example 3 Determine the BACnet setpoint for a 24 in x 24 in AMD with a maximum velo...

Страница 6: ...tions Right click on the Local Area Connection and select Properties Access IP Address Settings 1 Select Internet Protocol Windows 7 or 8 Select Internet Protocol Version 4 TCP IPv4 the click on Properties Windows XP Select Internet Protocol TCP IP the select Properties 2 Change the IP Address to the value shown below Then hit the Tab key and the Subnet mask will populate Then click OK Access the ...

Страница 7: ...oint Source is set not set to BACnet this variable has no impact on controlling the damper SafetyStatus BI 1 C Represents the status of the safety circuit Inactive Open Failure Active Closed OK MaximumFPM MV 1 C Represents the maximum setpoint velocity in fpm The value this variable is set to corresponds to a 10 VDC input to the actuator This value is set at the factory based on maximum velocity t...

Страница 8: ...ress is done via the integrated web server BACnet Standard Device Profile BACnet Application Specific Controller B ASC BACnet Interoperability Building Blocks supported Data Sharing ReadProperty B DS RP B Data Sharing ReadPropertyMultiple B DS RPM B Data Sharing WriteProperty B DS WP B Device Management DynamicDeviceBinding B DM DDB B Device Management DynamicObjectBinding B DM DOB B Device Manage...

Страница 9: ...meout Number_Of_APDU_Retries Max_Master 2 Max_Info_Frames2 Multistate Input Description State_Text Multistate Value Description State_Text Relinquish_Default1 Priority_Array1 Present_Value Multistate Output Description State_Text Relinquish_Default1 Priority_Array1 Present_Value The properties Object_Name and Location of the Device Object support up to 255 characters all other character strings ar...

Страница 10: ...bow Without Vanes 1 2D 1D Round Sweep Elbow Optimal Placement for AMD xx TD Damper Series Fans 2D Centrifugal Fan Discharge 3 4D Centrifugal Fan Inlet 3D Vane Axial Fan Discharge 1D Vane Axial Fan Inlet 10 Air Measuring Dampers AMD XX TD Series ...

Страница 11: ...Series Takeoffs 1 5D Branch Takeoff 2 1D Branch Takeoff B1 Transitions 1 2D α α Transition 1 Bellmouth Inlets 1 2D α α Transition 3 Circular Duct D Duct Diameter 4 x Width x Height Rectangular Duct D 11 Air Measuring Dampers AMD XX TD Series ...

Страница 12: ...the linkage where required Minimum Installation Requirements When installing the AMD xx TD the installation should match as closely as possible to one othe examples shown on pages 10 and 11 Failure to match the installation examples may negatively affect the performance and accuracy of the AMD xx TD Avoid locating the AMD xx TD where they will be exposed to condensing moisture such as downstream o...

Отзывы: