background image


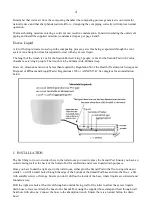
Drill a suitable hole in the wall to allow the vent pipe to traverse through the wall. Suggested installation 

drawing below. After the vent system has been installed, seal wall hole with silicone. 


Vent Pipe Installation 

The ventilation pipe should rise perpendicularly with as few curves and elbows as possible, the vent cowl 
placed on top. Don’t use pipe cement – the push fittings should be tight enough for this purpose, and this allows 
you to dismantle and service the vent system as required. 


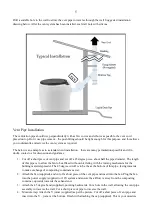
The below is an example as to a standard vent installation – there are many permutations possible and if in 
doubt, contact us for discussion and guidance: 

1.


Cut off a short piece of vent pipe and cut off a 45 degree piece, about half the pipe diameter. The length 
of this pipe is to allow the fan to be affixed without interfering with the turning mechanism for the 
bulking material spreader. The 45 degree cut off is to be the at the bottom of this pipe, facing inwards, 
to make exchange of composting containers easier. 

2.


Attach the fan (supplied), and cut off a short piece of the vent pipe and insert into the fan. Plug the fan 
into the power supply (supplied) or 12V system and ensure the airflow is away from the composting 
container, upwards towards the exhaust end. 

3.


Attach the 45 degree bend (supplied), pointing backwards. Cut a hole in the wall, allowing the vent pipe 
assembly to traverse the wall. Cut a short piece of pipe to traverse the wall. 

4.


Moisture trap: Attach the Y joiner (supplied) as per the picture. Cut off a short piece of vent pipe and 
insert into the Y – joiner at the bottom. Finish with attaching the cap (supplied). This is your moisture 

Содержание SCANDI-POD

Страница 1: ...GREEN LOO DRY COMPOSTING TOILET Owners Installation Operation Manual for the SCANDI POD...

Страница 2: ...nal Scandi Pod Instruction leaflet supplied Please note that the original instruction the Finnish manufacturer has supplied are enclosed with the Scandi Pod There are some dissimilarities with the Gre...

Страница 3: ...firm base for the composting container to sit 2 Installing the ventilation pipe work including fan and vent cowl 3 Connecting the ventilation pipe work electrical connection and excess liquids pipe 4...

Страница 4: ...Health Treatment of Sewage and Disposal of Effluent and Liquid Waste Regulations 1974 or AS NZS 1547 See diagram for an installation below 1 INSTALLATION The first thing to do is to decide where in t...

Страница 5: ...half the pipe diameter The length of this pipe is to allow the fan to be affixed without interfering with the turning mechanism for the bulking material spreader The 45 degree cut off is to be the at...

Страница 6: ...ll as practicable However please note that the fan is not waterproof and a suitable position or covering needs to be selected 2 BEFORE USE Before putting the system into use line the bin with the Geot...

Страница 7: ...er out Cover with lid Lift the second container in place You can use a rubbish bin when carrying the container out to avoid any spillage Childproof fallow containers as per point 4c above The waste wi...

Страница 8: ...itate to contact us with any questions suggestions we are here to help Feedback is always welcome and is an invaluable part of providing an excellent product and service Finally thank you for being an...

Отзывы: