4
Remember that warm air from the composting chamber (the composting process generates its own warmth)
naturally rises, and that sharp bends restrict airflow – designing the vent piping correctly will improve natural
operation.
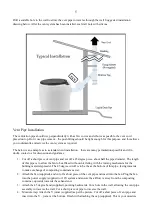
Warm air holding moisture entering a cold vent can result in condensation. Consider insulating the outlet vent
piping and install the supplied moisture (condensate) trap as per page 4 and 5.
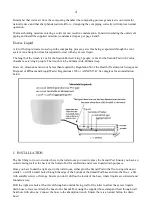
Excess Liquid
A lot of the liquid waste is used up in the composting process, as well as being evaporated through the vent
system. An absorption trench is required to deal with any excess liquid.
The length of the trench is 1 m for the Scandi-Pod servicing 2 people, or 2m for the Scandi-Pod with 2 extra
chambers, servicing 4 people. The trench is to be 400mm wide, 400mm deep.
However, dimensions must not be less than required by Regulation 50 of the Health (Treatment of Sewage and
Disposal of Effluent and Liquid Waste) Regulations 1974 or AS/NZS 1547. See diagram for an installation
below.
1.
INSTALLATION
The first thing to do is to decide where in the toilet room you want to place the Scandi Pod. Ensure you have an
outside facing wall at the back of the Scandi-Pod for ventilation and excess liquids drain purposes.
Once you have found the right spot in the toilet room, either glue the Scandi Pod to the floor using silicone or
similar – or drill 4 small holes through the edge of the bottom of the Scandi Pod base and into the floor – affix
with suitable screws or fixings. Ensure you don’t drill on the inside of the base, where liquids are collected and
funneled away.
Drill the right size hole at floor level through an outside facing wall of the toilet to allow the excess liquids
drain hose to traverse. Attach the hose to the Scandi Pod, using the supplied hose clamp and feed through wall.
Seal hole with silicone. Connect the hose to the absorption trench. Ensure there is a natural fall on the drain
hose!


