


5
0"
1"
2"
3"
4"
5"
6"
7"
0
10
20
30
40
50
60
70
80
90
100 110 120 130 140 150 160 170 180
Inch Scale
Metric Scale
To convert inches to millimeters, multiply inches by 25.4
2
3
1
1
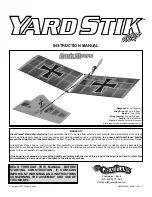
16
15
11
12
10
13
14
9
8
7
6
5
4
1
Wings
2
Stabilizer w/Elevator
3
Fin w/Rudder
4
Motor
5
Gearbox
6
Wheels
7
Motor Mounting Straps (F & R)
8
Wing Mounts
9
Control Horns
10
Tail Wire Mount
11
Main Landing Gear Wire
12
Tail Wire
13
Battery Holder Mounts
14
Battery Holder
15
Pushrod Wires
16
Fuselage Boom
Pinion Gear
Gear Cement
Prop Adapter
Propeller
(2) Control Horn Retainers
(2) Pushrod Retainers
(2) #2 x 1/2" Screws
(2) Wheel Retainers
Decal Sheet
Kit Contents (Photographed)
Kit Contents (Not Photographed)
Before starting to build, use the Kit Contents list to take an inventory of this kit to make sure it is complete and inspect
the parts to make sure they are of acceptable quality. If any parts are missing or are not of acceptable quality, or if you
need assistance with assembly, contact Great Planes Product Support. When reporting defective or missing parts, use
the part names exactly as they are written in the Kit Contents list on this page.
3002 N. Apollo Drive, Suite 1
Champaign, IL 61822
Telephone: (217) 398-8970
Fax: (217) 398-7721
E-mail: [email protected]
KIT INSPECTION


