❏
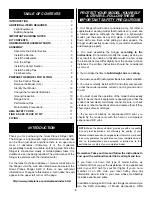
1. Apply the decals to the front of the dummy engine
inlets on the plastic center section. Also, apply the
windshield decals to the canopy. Install the Velcro
®
tape
where shown above on the plastic center section and on the
inside of the canopy (battery cover).
❏
2. Make any needed cutouts in the center section for the
motor strap, pushrod exits, receiver antenna and servo
wires where shown in the photo above.
Caution: The best tool for this is a Dremel
®
type high speed
tool with a 1/8” carbide cutter. If you use a model knife with
a #11 blade, use extreme care not to cut yourself.
❏
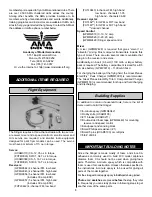
3. Secure the motor to the center section with the
included nylon tie strap. Notice that the wires have already
been soldered to the motor.
Start with the left wing panel so that your progress will
match the following photos.
❏ ❏
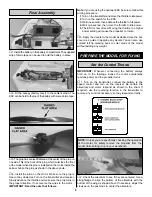
1. Find the cutout in the wing, under the plastic film
covering, for the servo. Remove the covering from over the
cutout. Your servo should fit tightly into the cutout. If it does not
fit tightly, or if you are using a smaller servo, glue some scrap
foam or balsa shims (not included) into the cutout as needed.
❏ ❏
2. Remove the screw from the servo holding the servo
control arm in place and remove the arm as well. Trim the
arm so that there is only one arm remaining.
❏ ❏
3. Plug the servo into the proper receiver channel (or
mixer if used. See the photo on page 7.) Center the trims on
the transmitter and then turn on the transmitter. Plug the
ESC into the receiver and connect a charged battery to the
ESC. Turn on the receiver according to the instructions
supplied with the ESC. With the controls in neutral, reinstall
the servo control arm and screw. The arm should be
perpendicular to the servo. Turn off the receiver and
transmitter and unplug the servo.
❏ ❏
4. Insert the servo in the cutout. The servo should be
even with the top of the wing. If it isn't, deepen the cutout
as required. Use clear tape to hold the servo in the wing. An
unused clear part of the decal sheet may also be used.
❏
5. Return to step one and install the other servo.
Install the Servos
Assemble the Center Section
ASSEMBLY
5


