INTRODUCTION . . . . . . . . . . . . . . . . . . . . . . . . . . . . . 2
ADDITIONAL ITEMS REQUIRED . . . . . . . . . . . . . . . . 3
Flight Equipment . . . . . . . . . . . . . . . . . . . . . . . . . . 3
Building Supplies. . . . . . . . . . . . . . . . . . . . . . . . . . 3
IMPORTANT BUILDING NOTES . . . . . . . . . . . . . . . . . 3
KIT CONTENTS. . . . . . . . . . . . . . . . . . . . . . . . . . . . . . 4
ORDERING REPLACEMENT PARTS . . . . . . . . . . . . . 4
ASSEMBLY . . . . . . . . . . . . . . . . . . . . . . . . . . . . . . . . . 5
Assemble the Center Section . . . . . . . . . . . . . . . . 5
Install the Servos. . . . . . . . . . . . . . . . . . . . . . . . . . 5
Install the Ailevators . . . . . . . . . . . . . . . . . . . . . . . 6
Join the Wings. . . . . . . . . . . . . . . . . . . . . . . . . . . . 6
Install the Center Section . . . . . . . . . . . . . . . . . . . 7
Install the Wing Tips . . . . . . . . . . . . . . . . . . . . . . . 7
Final Assembly . . . . . . . . . . . . . . . . . . . . . . . . . . . 8
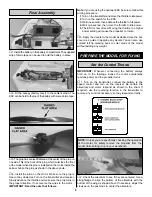
PREPARE THE MODEL FOR FLYING . . . . . . . . . . . . . 8
Set the Control Throws . . . . . . . . . . . . . . . . . . . . . 8
Balance the Model (C.G.) . . . . . . . . . . . . . . . . . . . 9
Identify Your Model . . . . . . . . . . . . . . . . . . . . . . . 10
Charge the Transmitter Batteries . . . . . . . . . . . . . 10
Ground Inspection . . . . . . . . . . . . . . . . . . . . . . . . 10
Range Check . . . . . . . . . . . . . . . . . . . . . . . . . . . 10
Performance Tips . . . . . . . . . . . . . . . . . . . . . . . . 10
Motor Safety Precautions. . . . . . . . . . . . . . . . . . . 10
AMA SAFETY CODE. . . . . . . . . . . . . . . . . . . . . . . . . 11
FIND A SAFE PLACE TO FLY . . . . . . . . . . . . . . . . . . 11
FLYING . . . . . . . . . . . . . . . . . . . . . . . . . . . . . . . . . . . 11
Thank you for purchasing the Great Planes Slinger ARF.
The Slinger is a lightweight, high performance model that
can be flown just about anywhere there is an open area
clear of obstacles. Ultimately, it is the modelers
responsibility to select a suitable, safe flying area. Since the
Slinger is constructed mostly of molded plastic foam, it is
durable and can be easily repaired. The performance of the
Slinger is excellent with the included motor.
For the latest technical updates or manual corrections to
the Slinger, visit the web site listed below and select the
Great Planes Slinger ARF. If there is new technical
information or changes to this model, a “tech notice” box will
appear in the upper left corner of the page.
http://www.greatplanes.com/airplanes/index.html
1. Your Slinger should not be considered a toy, but rather a
sophisticated, working model that functions very much like
a full-size airplane. Although the Slinger is a light-weight
model, just the same as any R/C plane, it should still be
flown with care. Even while gliding at slow speeds, the
Slinger could possibly cause injury to yourself or spectators
and damage property.
2. You must assemble the Slinger according to the
instructions. Do not alter or modify the model, as doing so
may result in an unsafe or unflyable model. In a few cases
the instructions may differ slightly from the photos. In those
instances the written instructions should be considered
as correct.
3. You must take the time to build straight, true and strong.
4.You must use an R/C radio system that is in excellent condition.
5. You must correctly install all R/C and other components
so that the model operates correctly on the ground and in
the air.
6. You must check the operation of the model before every
flight to insure that all equipment is operating and that the
model has remained structurally sound. Be sure to check
clevises or other connections often and replace them if they
show signs of wear or fatigue.
7. If you are not already an experienced R/C pilot, you
should fly the model only with the help of a competent,
experienced R/C pilot.
Remember: Take your time and follow the instructions to
end up with a well-built model that is straight and true.
If you have not flown this type of model before, we
recommend that you get the assistance of an experienced
pilot in your R/C club for your first flights. If you’re not a
member of an R/C club, your local hobby shop has
information about clubs in your area whose membership
includes experienced pilots.
In addition to joining an R/C club, we strongly recommend you
join the AMA (Academy of Model Aeronautics). AMA
NOTE: We, as the kit manufacturer, provide you with a top quality
kit and great instructions, but ultimately the quality of your
finished model depends on how you build it; therefore, we cannot
in any way guarantee the performance of your completed model,
and no representations are expressed or implied as to the
performance or safety of your completed model.
PROTECT YOUR MODEL,YOURSELF
& OTHERS...FOLLOW THESE
IMPORTANT SAFETY PRECAUTIONS
INTRODUCTION
TABLE OF CONTENTS
2


