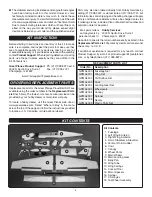
GREAT PLANES Proud Bird Скачать руководство пользователя страница 4

4

sport setup then we recommend the APC 9x9E prop.  Part 
numbers for both are provided below:

  APC 8x8 Thin Electric Propeller (APCQ4116)

  APC 9x9 Thin Electric Propeller (APCQ4149)

Adhesives and Building Supplies

This is the list of Adhesives and Building Supplies that are 

required to fi nish the Proud Bird:

  1/2 oz. [15g] Thin Pro CA (GPMR6001)

  Great Planes Pro CA- Glue Thick 1/2 oz (GPMR6013)

  Pro 30-minute epoxy (GPMR6047)

  Threadlocker thread locking cement (GPMR6060)

  Denatured alcohol (for epoxy clean up)

  Drill bits: 1/16" [1.6mm], 5/64" [2mm], 3/32" [2.4mm], 

9/64" [3.6mm], 5/32" [4mm]

  Revell Premium Soft Handle Knife w/Blades (5) 

(RMXR6900)

  Top Flite MonoKote sealing iron (TOPR2100)

  Top Flite Hot Sock iron cover (TOPR2175)

  Panel Line Pen (TOPQ2510)

  Hobbico Steel T-Pins 1" (100) (HCAR5100)

  Hobbico Curved Tip Canopy Scissors 5-1/2" 

(HCAR0667)

  Small clamps

  Zap Adhesives Ric 560 Canopy Glue (PAAR3300)

  Masking tape

  Household oil

  220 grit sand paper

Optional Supplies and Tools

Here is a list of optional tools that will help you build the 
Proud Bird:

  1/2 oz. [15g] Medium Pro CA+ (GPMR6007)

  2 oz. [57g] spray CA activator (GPMR6035)

  4 oz. [113g] aerosol CA activator (GPMR6034)

  CA applicator tips (HCAR3780)

  CA debonder (GPMR6039)

  Great Planes Pro Epoxy 6-Minute Formula 4 oz 

(GPMR6042)

  Epoxy brushes 6, (GPMR8060)

  Mixing sticks (GPMR8055)

  Mixing cups (GPMR8056)

  Pliers with wire cutter (HCAR0630)

  T.A. Emerald Performance Duster Compressed Air 

(TAEC1060)

  Servo horn drill (HCAR0698)

  DuraTrax Body Reamer (DTXR1158)

  Precision Magnetic Prop Balancer (TOPQ5700)

  AccuThrow Defl ection Gauge (GPMR2405)

  CG Machine™ (GPMR2400)

  Hobbico Flexible 18" Ruler Stainless Steel 

(HCAR0460)

  Top Flite MonoKote trim seal iron (TOPR2200)

  Top Flite MonoKote heat gun (TOPR2000)

  Hobbico Pin Vise 1/16 Collet w/6 Bits (HCAR0696)

  Great Planes Clevis Installation Tool (GPMR8030)
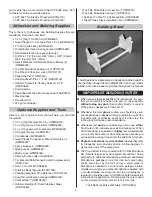
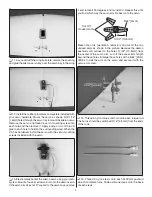
Building Stand

A building stand or cradle comes in handy during the build. We 

use the Robart Super Stand II (ROBP1402) for all our projects 
in R&D, and it can be seen in pictures throughout this manual.

IMPORTANT BUILDING NOTES

   When you see the term 

test fi t

 in the instructions, it means 

that you should fi rst position the part on the assembly 

without using any glue

, then slightly modify or

 custom 

fi t

 the part as necessary for the best fi t.

   Whenever the term 

glue

 is written you should rely upon 

your experience to decide what type of glue to use. When 
a specifi c type of adhesive works best for that step, the 

instructions will make a recommendation.

   Whenever just 

epoxy

 is specifi ed you may use 

either


30-minute (or 45-minute) epoxy 

or

 6-minute epoxy. When 

30-minute epoxy is specifi ed it is 

highly 

recommended that 

you use only 30-minute (or 45-minute) epoxy, because you 
will need the working time and/or the additional strength.
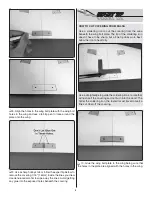
   

Photos

 and 

sketches

 are placed 

before

 the step they refer 

to. Frequently you can study photos in following steps to 
get another view of the same parts.

   The Proud Bird is factory-covered with Top Flite MonoKote 

fi lm. Should repairs ever be required, MonoKote can be 
patched with additional MonoKote purchased separately. 
MonoKote is packaged in six-foot rolls, but some hobby 
shops also sell it by the foot. If only a small piece of 
MonoKote is needed for a minor patch, perhaps a fellow 
modeler would give you some. MonoKote is applied with 
a model airplane covering iron, but in an emergency a 
regular iron could be used. A roll of MonoKote includes full 
instructions for application. Following are the colors used 
on this model and order numbers for six foot rolls.


Top Flite MonoKote Jet White 6’ (TOPQ0204)

Содержание Proud Bird

Страница 1: ...lity If the buyer is not prepared to accept the liability associated with the use of this product the buyer is advised to return this kit immediately in new and unused condition to the place of purcha...

Страница 2: ...er a sophisticated working model that functions very much like a full size airplane Because of its performance capabilities the Proud Bird if not assembled and operated correctly could possibly cause...

Страница 3: ...to have several batteries and charge them faster so they can fly more For charging up to four batteries faster at the same time the Great Planes PolyCharge4 DC powered LiPo charger is recommended Like...

Страница 4: ...Kote heat gun TOPR2000 Hobbico Pin Vise 1 16 Collet w 6 Bits HCAR0696 Great Planes Clevis Installation Tool GPMR8030 Building Stand A building stand or cradle comes in handy during the build We use th...

Страница 5: ...te at www greatplanes com Select Where to Buy in the menu across the top of the page and follow the instructions provided to locate a U S Canadian or International dealer Parts may also be ordered dir...

Страница 6: ...ns onto the wing panels The metal torque rods will fit into the holes pre drilled in the ailerons 3 When satisfied with the fit remove the ailerons from the wings Clean the ends of the torque rods wit...

Страница 7: ...together and wipe away any excess epoxy You can tape the wing panels together while the epoxy hardens The panels can also be held together with spring clamps at the root tab Slide the 4x30mm wing bol...

Страница 8: ...ering HOW TO CUT COVERING FROM BALSA Use a soldering iron to cut the covering from the area beneath the wing bolt plate The tip of the soldering iron doesn t have to be sharp but a fine tip does work...

Страница 9: ...onto the aileron servo If the servo arm does not fit square to the servo case remove it and rotate it 90 degrees and re install it Repeat this until you find which way the servo arm fits best onto th...

Страница 10: ...Links Thread the clevis up or down on the pushrod as necessary to center the ailerons with the servo arm centered Assemble the Tail Section 1 Temporarily mount the wing onto the fuselage using two 4x3...

Страница 11: ...of the way slide the stab back into the slot aligning it with the wing and centering it left and right Clean up any excess epoxy with denatured alcohol If necessary add weight to the high side of the...

Страница 12: ...re into the hole in the leading edge of the rudder 9 Hold the rudder up against the rudder hinge line on the fuselage Draw a line onto the fuselage that matches the angle of the nylon tail wheel hinge...

Страница 13: ...with alcohol Remove the T pins from the hinges and apply 6 to 7 drops of thin CA to both sides of each hinge Tug on the rudder to ensure that it is securely hinged 12 Mount the tail surface servos in...

Страница 14: ...inner hole of the pushrod to 5 64 2mm Remove the clevis from the pushrod and insert the pushrod back into the pushrod tube Reinstall the clevis onto the pushrod Connect the bend in the pushrod into th...

Страница 15: ...motor O marks and the E Flite Power 25 1250kV motor marks Other motors may not align with these marks and will require you to use the centering lines on the firewall to mark the mounting hole locatio...

Страница 16: ...mm servo lead extension is required Be sure to use tape heat shrink tubing or a special clip made for securing servo lead extension connectors together 8 Use a piece of self adhesive hook and loop mat...

Страница 17: ...into the plywood disk glued to the other side of the pant Holding the axle nut with pliers tighten the axle Repeat this step for the other landing gear leg Use threadlocker 2 Mount the landing gear o...

Страница 18: ...erfectly circular shaped holes without tearing the material DTXR1158 4 Test fit the belly pan in place and make any additional trimming and sanding necessary until you are satisfied with its fit Don t...

Страница 19: ...s of the strips The crease in the strips will help keep them rigid With the forward cockpit floor in place glue the strips to the cockpit sides as shown overlapping the front edges of the floor piece...

Страница 20: ...sides Remove the cowl from the fuselage Thread a 2 3 x 10mm washer head screw into each hole in the fuselage and back it out Apply a drop of thin CA to each hole and let the glue harden Enlarge the h...

Страница 21: ...milar to squeegee remaining water from under the decal Apply the rest of the decals the same way GET THE MODEL READY TO FLY Check the Control Directions 1 Turn on the transmitter and receiver and cent...

Страница 22: ...ther factor the C G center of gravity balance point can have the greatest effect on how a model flies and could determine whether or not your first flight will be successful If you value your model an...

Страница 23: ...attery Use the marks to position the battery on the tray for future flights Balance the Model Laterally 1 With the wing level have an assistant help you lift the model by the engine propeller shaft an...

Страница 24: ...approximately 400 feet within 3 miles of an airport without notifying the airport operator I will give right of way and avoid flying in the proximity of full scale aircraft Where necessary an observer...

Страница 25: ...ertain all pushrod linkages are secure and free of play If it fluttered once under similar circumstances it will probably flutter again unless the problem is fixed Some things which can cause flutter...

Страница 26: ...the little things that improve your lap times The easier it is to fly those fast lap times consistently the better your heat times will be We re going to walk you through the process of trimming your...

Страница 27: ...ind that the faster way around the course will be to not roll all the way out to wings level in the straights Ideally you would roll out to a bank angle of approximately 45 to 80 degrees When viewed f...

Страница 28: ...GPMA1260 Mnl This model belongs to Name Address City State Zip Phone Number AMA Number...

Отзывы: