❏
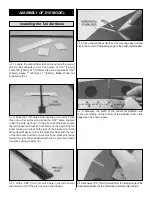
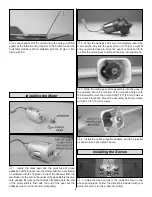
4. Locate and test fit the tail skid into the hole you drilled
earlier at the forward end of the slot in the bracket under the
horizontal stabilizer. When satisfied with the fit glue it into
place with CA.
❏
1. Locate the brass gear and the small tube of green
adhesive. Test fit the gear onto the motor shaft. If you are finding
no problems with the fit, place a drop of the adhesive from the
small tube into the hole in the center of the gear. Before the glue
sets, position the gear on the shaft at a location where the end
of the motor shaft is flush with the end of the gear. Let the
adhesive cure for an hour before proceeding.
❏
2. When the adhesive has cured completely, insert the
motor all the way into the gear drive unit. This is a tight fit
and you will also have to move the gear box back and forth
to allow the pinion gear to slide all the way into alignment.
❏
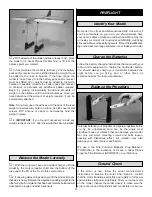
3. Slide the motor/gear drive assembly into the nose of
the airplane. Mark the location of the mounting holes onto
the firewall. Remove the unit and drill 1/16" [1.5mm] holes at
the marked locations. Mount the assembly as shown above
with #2 x 3/8" [13mm] screws.
❏
4. Install the collet, propeller adapter, and the propeller
as shown in the photograph above.
❏
1. Install the three servos in the position shown in the
above photograph. Follow the directions included with your
particular servos for the proper mounting.
Installing the Servos
Installing the Motor
9


