


5
BUILD THE FUSELAGE
Assemble the Fuselage
❏
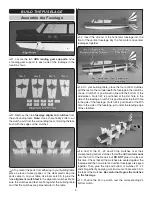
1. Locate the two
ABS landing gear supports
. Glue
a landing gear support to each side of the fuselage in the
location shown.
❏
2. Remove the nine
fuselage alignment crutches
from
the surrounding foam.
Note:
Use a sharp hobby knife to cut
the crutch parts from the surrounding foam, trimming the tabs
fl ush with the edges of the crutches.
❏
3. To prevent the parts from adhering to your building table,
place a piece of waxed paper, or the clear plastic bag the
parts came in, on your table. Use foam safe CA to glue the
nine
alignment crutch feet
to the alignment crutches. Make
sure the crutches and feet are fl at against the building table
and that the crutches are perpendicular to the table.
❏
4. Insert the aft end of the horizontal fuselage into the
front of the vertical fuselage. Key the horizontal and vertical
fuselages together.
❏
5. On your building table, place the four bottom crutches
with the feet on them underneath the fuselage in the locations
shown. Crutch #1 is positioned in line with the bottom of the
windscreen. Crutch #2 is positioned at the fi rst hole in the
side of the fuselage. Crutch #3 is positioned at the third hole
in the side of the fuselage. Crutch #4 is positioned at the fi fth
hole in the side of the fuselage, just under the leading edge
of the stabilizer.
❏
6. Test fi t the #1, #2 and #3 top crutches over their
corresponding bottom crutches. Install the ABS
motor mount
onto the front of the fi rewall, but
DO NOT
glue it in place at
this time. Check that all the crutches are seated against the
fuselage and the horizontal and vertical fuselages are keyed
together. Then, glue the top and bottom of crutches #1, #2
and #3 together by applying small amount of foam-safe CA to
the tabs of the crutches.
Be careful not to glue the crutches
to the fuselage.
❏
7. Position the #4 top crutch over the corresponding #4
bottom crutch.


