background image

8

Setting Up the Kaleido-IP

Networking Setup

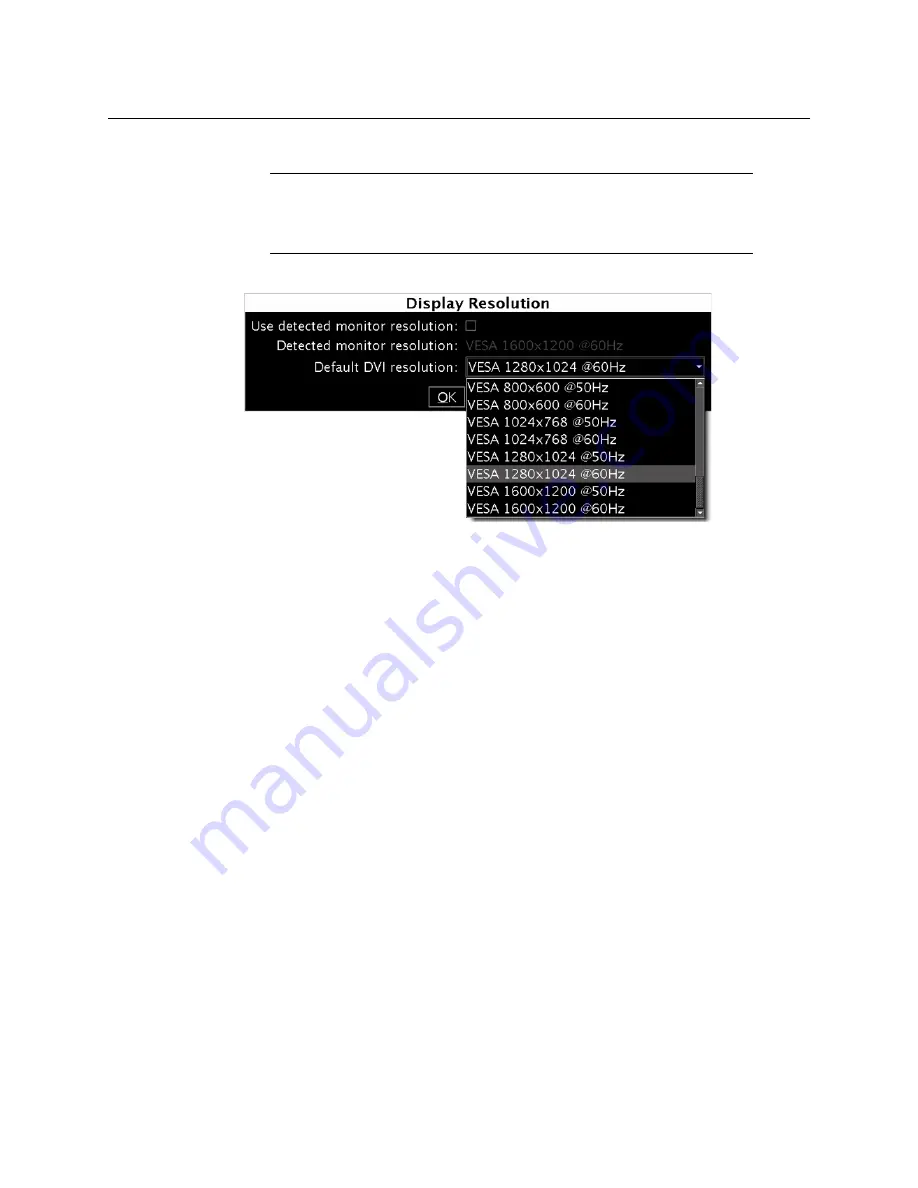
3 Clear  the 

Use detected monitor resolution 

check box.

4 Select the desired resolution from the 

Default DVI resolution

 list.

5 Click 

OK

.

The output resolution is adjusted accordingly.

Step 2: Networking Setup

The Kaleido-IP multiviewer must be configured with at least two IP addresses—one for the 
management network (MGMT), and one for a data network (DATA)—, corresponding 
network mask and gateway settings, and a system name. The Kaleido-IP X300 model may 
require up to six IP addresses. In XAdmin and XEdit, a Kaleido-IP X100 or Kaleido-IP X300 
with 

two

 network adapters is identified as 

Kaleido-IP-2

. A Kaleido-IP X110, Kaleido-IP X310, 

or Kaleido-IP X300 with 

four

 network adapters is identified as 

Kaleido-IP-4

, and a Kaleido-IP 

X310, or Kaleido-IP X300 with 

six

 network adapters is identified as 

Kaleido-IP-6

.

A client PC must be configured, within the 

management

 network, to communicate with the 

multiviewer (see 

Configuring a Client PC

, on page 13). You must also configure any Kaleido-

RCP2 units you may have ordered.

Note:

In the case of a Kaleido-IP multiviewer, the value indicated for 

Detected monitor resolution

 in the 

Display Resolution

 window is always 

“unknown” since the Kaleido-IP does not yet support automatic resolution 
detection.

Содержание KALEIDO-IP X100

Страница 1: ...Quick Start Guide M926 9905 116 2015 04 02 KALEIDO IP X300 KALEIDO IP X100 HIGH QUALITY IP VIDEO MULTIVIEWERS ...

Страница 2: ...of Kaleido multiviewers to use their product manuals for their own internal business use Manuals for Grass Valley products may not be reproduced or transmitted in any form or by any means electronic or mechanical including photocopying and recording for any purpose unless specifically authorized in writing by Grass Valley A Grass Valley manual may have been revised to reflect changes made to the p...

Страница 3: ...prior to making any other equipment connections Identifies an external protective grounding terminal which may be connected to earth ground as a supplement to an internal grounding terminal Indicates that static sensitive components are present which may be damaged by electrostatic discharge Use anti static procedures equipment and surfaces during servicing Indicates that the equipment has more th...

Страница 4: ...uid or aerosol cleaners use only a damp cloth Dangerous voltages may exist at several points in this equipment To avoid injury do not touch exposed connections and components while power is on High leakage current may be present Earth connection of product is essential before connecting power Prior to servicing remove jewelry such as rings watches and other metallic objects To avoid fire hazard us...

Страница 5: ...ipment Electrostatic Discharge ESD Protection Electrostatic discharge occurs when electronic components are improperly handled and can result in intermittent failure or complete damage adversely affecting an electrical circuit When you remove and replace any card from a frame always follow ESD prevention procedures Ensure that the frame is electrically connected to earth ground through the power c...

Страница 6: ...s le texte doit être remplacé par un fusible du même calibre Identifie une borne de mise à la terre de protection Il faut relier cette borne à la terre avant d effectuer toute autre connexion à l équipement Identifie une borne de mise à la terre externe qui peut être connectée en tant que borne de mise à la terre supplémentaire Signale la présence de composants sensibles à l électricité statique e...

Страница 7: ...ndommager les connecteurs Coupez l alimentation avant de nettoyer l équipement Ne pas utiliser de nettoyants liquides ou en aérosol Utilisez uniquement un chiffon humide Des tensions dangereuses peuvent exister en plusieurs points dans cet équipement Pour éviter toute blessure ne touchez pas aux connexions ou aux composants exposés lorsque l appareil est sous tension Avant de procéder à toute opér...

Страница 8: ...arations autres que celles qui sont décrites dans le présent manuel sauf si vous êtes qualifié pour le faire Confiez les réparations à un technicien qualifié La maintenance doit se réaliser dans un milieu libre d électricité statique L appareil peut comporter plus d un cordon d alimentation Afin de prévenir les chocs électriques débrancher tous les cordons d alimentation avant toute opération d en...

Страница 9: ...CSA UL IEC EN 60950 1 2nd Ed AM1 Safety of information technology equipment The power cords supplied with this equipment meet the appropriate national standards for the country of destination Electromagnetic Compatibility This equipment has been tested for verification of compliance with FCC Part 15 Subpart B requirements for class A digital devices This equipment has been tested and found to comp...

Страница 10: ...discharge immunity EN 61000 4 3 Radiated radio frequency electromagnetic field immunity EN 61000 4 4 Electrical fast transient immunity EN 61000 4 5 Surge transient immunity EN 61000 4 6 Conducted disturbances immunity EN 61000 4 8 Power frequency magnetic field immunity EN 61000 4 11 Voltage dips short interruptions and voltage variations immunity ...

Страница 11: ...etworking Setup 8 Finding the Management IP Address and Application Version 13 Configuring a Client PC 13 Step 3 XEdit Installation 16 Step 4 System Setup 19 Opening XEdit in Online Mode 20 Configuring Transport Streams 20 Defining Logical Sources 25 Step 5 Testing the Monitor Wall Operation 26 Using the Kaleido RCP2 with Default Settings 26 Loading a Layout 28 3 Specifications 29 Appendix Disposa...

Страница 12: ......

Страница 13: ...P X110 supports concurrent decoding of up to 16 MPEG 2 or up to 12 H 264 HD programs and up to 48 MPEG 2 or up to 24 H 264 SD programs The Kaleido IP X300 supports concurrent decoding of up to 24 MPEG 2 or up to 16 H 264 HD programs and up to 64 MPEG 2 or up to 32 H 264 SD programs The Kaleido IP X100 supports concurrent decoding of up to 8 MPEG 2 or up to 6 H 264 HD programs and up to 24 MPEG 2 o...

Страница 14: ... more dedicated 1000Base T or 100Base T Ethernet switch for your Kaleido IP units to connect to high bitrate data streams one more for a Kaleido IP X100 or X300 with two network adapters up to three or five more for a Kaleido IP X300 with four or six network adapters Client PC see below for system requirements Cables to connect your multiviewers to displays and to the networks Note Inline withour ...

Страница 15: ...p meeting the following requirements is required to access the XAdmin Web client and the other Kaleido X client applications Operating system Windows XP Professional Windows 7 Windows 8 or Windows 8 1 Processor Core 2 Duo at 2 GHz or better Memory At least 2 GB of RAM Disk space At least 2 GB free ...

Страница 16: ......

Страница 17: ...N1 to the dedicated 1000Base T or 100Base T Ethernet switch associated with your management network and connect LAN2 to the switch associated a data network see Cabling Diagram on page 7 You will use the first port gigabit LAN1 to manage your system e g by using XEdit and XAdmin and direct all high bitrate data e g MPEG2 streams to the other ports gigabit LAN2 or in the case of a Kaleido IP X300 w...

Страница 18: ... and two DisplayPort outputs only the two DisplayPort outputs are used If your displays are not collocated with your Kaleido IP unit you may choose to employ DXF 200 transmitter receiver devices that allow you to install a display up to 1 000 meters 3 300 feet from the signal source In this case use a proper DisplayPort to HDMI cable between the Kaleido IP and the DXF 200 TX module Stringing Displ...

Страница 19: ...have two or four additional DATA ports LAN3 LAN6 Changing the Output Resolution To change a display s resolution from the monitor wall 1 Connect a mouse to one of the USB connectors of the Kaleido IP 2 Right click anywhere on the monitor wall point to Monitor Wall if you clicked a monitor and then click Display resolution The Display Resolution window appears ...

Страница 20: ...nd XEdit a Kaleido IP X100 or Kaleido IP X300 with two network adapters is identified as Kaleido IP 2 A Kaleido IP X110 Kaleido IP X310 or Kaleido IP X300 with four network adapters is identified as Kaleido IP 4 and a Kaleido IP X310 or Kaleido IP X300 with six network adapters is identified as Kaleido IP 6 A client PC must be configured within the management network to communicate with the multiv...

Страница 21: ...uto negotiate Auto negotiate Data port 1 IP address LAN2 172 30 3 70 172 30 3 70 172 30 3 70 Network mask 255 255 0 0 255 255 0 0 255 255 0 0 Link mode Auto negotiate Auto negotiate Auto negotiate Data port 2 IP address LAN3 172 30 3 71 172 30 3 71 Network mask 255 255 0 0 255 255 0 0 Link mode Auto negotiate Auto negotiate Data port 3 IP address LAN4 172 30 3 72 172 30 3 72 Network mask 255 255 0...

Страница 22: ...d and then click Log in 7 Internet Explorer users If a blank page appears then refer to Enabling the Compatibility View in Internet Explorer 10 in the Kaleido X User s Manual The XAdmin Status and Options page appears 8 Click System configuration in the navigation area on the left of the page The System Configuration page appears showing the current system name management and data IP addresses net...

Страница 23: ...he system name must comply with RFC 1123 because it is also used as the device s host name Up to 8 characters are allowed limited to A Z a z 0 9 and the hyphen The system name cannot start or end with an hyphen Management IP address Must be within the network to which the Kaleido RCP2 units and the operators PCs or laptops are normally connected Data port The IP address for a data port must be wit...

Страница 24: ...onitor HLS sources then you must also configure access to your facilities DNS and proxy servers Detected link mode By default all network adapters are set to auto negotiate The connection speed and duplex mode will be set automatically based on the corresponding port settings on the associated switch Configured link mode 1000 Mbps full duplex communication can only be achieved via auto negotiation...

Страница 25: ... Management IP Address and Application Version To find the management IP address and application version 1 Connect a mouse to a USB connector either at the front of the frame or on the rear panel 2 Right click anywhere on the monitor wall On the shortcut menu point to Monitor Wall if you clicked a monitor and then click Show dashboard to display the dashboard associated with the current head A sma...

Страница 26: ...k Connections right click the network adapter you wish to configure e g Local Area Connection or Ethernet and then click Properties If the system prompts you for an administrator password or confirmation type the password or provide confirmation The Properties window for the selected network adapter opens 4 On the Networking tab under This connection uses the following items click Internet Protoco...

Страница 27: ...ck Network Connections and then click Open on the menu 2 In Network Connections right click Local Area Connection and then click Properties on the shortcut menu 3 In Local Area connection Properties select Internet Protocol TCP IP from the list on the General tab and then click Properties The Internet Protocol TCP IP Properties window opens 4 On the General tab click Use the following IP address 5...

Страница 28: ...iviewer s IP address in the address bar The multiviewer s home page appears 2 Click the XEdit button The browser prompts you to save an executable file to your hard drive Kaleido windows32 online exe2 This file is an online installer which will download XEdit and other companion elements from your multiviewer and install them Some browsers may allow you to run the file directly Depending on your b...

Страница 29: ...ortcuts are added to your desktop and to the Start menu under All Programs If you have Windows 8 1 or Windows 8 XEdit will appear on your desktop in the Apps view with all the other applications on your PC Windows 8 1 or in your Start screen Windows 8 Once the installation has completed the XEdit startup screen appears ...

Страница 30: ...e will appear to confirm the font update and instruct you to restart the application Click OK to continue and then open XEdit again by using the shortcut on your desktop in your Apps view Windows 8 1 or Start screen Windows 8 or from the Start menu Windows 7 Windows XP 4 When prompted to specify a database choose one from the Path list or click Browse to navigate to the database you wish to use as...

Страница 31: ...rk in online mode to take advantage of the predefined room and layouts that are available in the default configuration In any case you must work in online mode at least once to obtain the list of programs and elementary streams under each transport stream The supported stream types are source specific multicast source filtered multicast filtering limited to a single source IP in include mode only ...

Страница 32: ... main pane showing the multiviewer type system name and IP address and the status bar shows the connection status Configuring Transport Streams The default configuration for a Kaleido IP system includes eight predefined any source multicast ASM streams under NETWORK ADAPTER 2 Before you can use these streams you must adjust their settings to match the actual transport streams you wish to monitor D...

Страница 33: ...ress associated with the specific source you wish to monitor in the SSM source IP address box 5 If the stream you wish to add is constrained to a virtual LAN enter the appropriate VLAN identifier Note Under the network adapter elements transport streams are listed in alphabetical order Notes The Kaleido X Software supports UTF 8 encoded stream names The only characters which cannot be used in a st...

Страница 34: ... right click them and then click Remove 8 On the File menu click Save Alternatively click the Save button on the toolbar Changes to the system are saved Adding Stream Sources If you have a four port or a six port Kaleido IP X300 model and wish to monitor sources from Unicast streams or more sources from Multicast streams then you need to add transport streams to the basic system configuration See ...

Страница 35: ...he second level tab bar 2 Expand the System hierarchical list right click the appropriate network adapter for the source you wish to add and then click insert Multicast The Multicast Stream Configuration window appears 3 In Multicast Stream Configuration replace the default stream name if desired select the appropriate protocol RTP UDP and type the multicast group address and port number associate...

Страница 36: ... you have added all required multicast transport streams to your system configuration 7 On the File menu click Save Alternatively click the Save button on the toolbar Changes to the system are saved Note VLAN adapter settings must have been previously configured in XAdmin Refer to Configuring Virtual Network Adapters on a Kaleido IP in the Kaleido X User s Manual for more information Note Under th...

Страница 37: ...e elementary streams included in these programs automatically appear under the transport stream element in the System list 4 Repeat this procedure until you have added all required unicast transport streams to your system configuration 5 On the File menu click Save Alternatively click the Save button on the toolbar Changes to the system are saved Defining Logical Sources To define logical sources ...

Страница 38: ...ve added logical sources for every stream you wish to monitor 5 If your system involves a control panel from which you will control your multiviewer as a router then configure source numbers for the KX Router logical router by typing the appropriate numbers in the first column under Source info and using the incremental copy tool as needed 6 On the File menu click Save Alternatively click the Save...

Страница 39: ... the 8 key to move down the list until ROOM is displayed 5 Press ENTER and then press ESC to exit the configuration menu 6 Press the LOGIN button The following message appears on the LCD display LOGIN Position Admin 7 Press ENTER to log on to your system as Admin A message prompting you for a password appears on the LCD display 8 Press ENTER again by default there is no password Default IP address...

Страница 40: ... 1 Connect a mouse to the Kaleido RCP2 if available and log on to the Kaleido IP from the Kaleido RCP2 if you have not already done so see Using the Kaleido RCP2 with Default Settings on page 26 Alternatively connect the mouse directly to one of the USB ports on the Kaleido IP frame 2 Right click anywhere on the monitor wall point to Monitor Wall if you clicked a monitor and then click Load layout...

Страница 41: ...s OTHER INPUT FORMATS ASI Densité IRD 3802 optional ATSC RF Densité IRD 3811 VQ optional DVB S S2 RF Densité IRD 3811 DVB S2 optional Set top box EdgeVision optional VIDEO DECODERS Standard MPEG 2 H 264 AVC ITU T H 264 Chroma format 4 2 0 and 4 2 2 Kaleido IP X300 performance Concurrent decoding of 64 SD MPEG 2 or 24 HD MPEG 2 or 32 SD H 264 or 16 HD H 264 video programs Kaleido IP X100 performanc...

Страница 42: ... 60 Hz all progressive scan Height 89 mm 3 5 in 2RU Width 437 mm 17 2 in Depth 648 mm 25 5 in Weight 23 6 kg 52 lbs Power supply 700 W 1 1 hot swappable redundant power supply 10 4 amp Nominal power 400 W AC 100 240 V 60 50 Hz Operating temperature 10 35 C 50 95 F Max storage humidity 90 RH non condensing Max functional humidity 65 RH non condensing Height 43 mm 1 7 in 1 RU Width 437 mm 17 2 in De...

Страница 43: ...ic Max storage humidity 90 RH non condensing Max functional humidity 65 RH non condensing On screen control Kaleido RCP2 optional Source and layout configuration XEdit Alarms management iControl optional Device DXF 200 optional Distance 1 km 3280 ft Fiber optic cable Multi mode 50 or 62 5 125 SC Connector SC ...

Страница 44: ......

Страница 45: ...nted circuit board Before disposing of your Grass Valley equipment please remove the battery as follows 1 Make sure the equipment s AC adapters are unplugged from the power outlet 2 Remove the protective cover from your equipment 3 Gently remove the battery from its casing using a blunt instrument for leverage such as a screwdriver if necessary ...

Страница 46: ... 1 2 dimethoxyethane DME CAS 110 71 4 EINECS 203 794 9 above 0 1 by weight DME is listed as a Substance of Very High Concern SVHC by the regulation EC No 1907 2006 of the European Parliament and of the Council It is classified as a reprotoxic of category 2 in the European Union Accordingly exposure to DME may impair fertility and may cause harm to the unborn child DME is also classified as harmful...

Страница 47: ...n a local phone number for the support center nearest you please consult the Contact Us section of Grass Valley s Web site www grassvalley com An online form for e mail contact is also available from the Web site Corporate Head Office Grass Valley 3499 Douglas B Floreani St Laurent Quebec H4S 2C6 Canada Telephone 1 514 333 1772 Fax 1 514 333 9828 www grassvalley com ...

Отзывы: