background image


6

8920MUX Instruction Manual

Preface


Содержание 8920MUX -

Страница 1: ...8920MUX VIDEO AUDIO MULTIPLEXER MODULE Instruction Manual SOFTWARE VERSION 4 2 0 071803704 APRIL 2004 ...

Страница 2: ...Solutions to problems and troubleshooting efforts can be found by searching our Frequently Asked Questions FAQ database Software Downloads Software updates drivers and patches can be down loaded Region Voice Fax Address Web Site North America 800 547 8949 Support 530 478 4148 Sales 530 478 3347 Support 530 478 3181 Grass Valley P O Box 599000 Nevada City CA 95959 7900 USA www thomsongrassvalley co...

Страница 3: ...on Modes 18 AES Input Channel Status Bits 19 Local On board Configuration 21 Remote Configuration and Monitoring 23 8920MUX Links and Web Pages 25 Newton Control Panel Configuration 34 Specifications 35 Service 37 Status Monitoring 38 LEDs 38 Frame Alarm 39 Web Browser Interface 39 SNMP Reporting 40 Functional Description 41 Input Equalizing Amplifier 41 Serial to Parallel Converter and EDH EDA Er...

Страница 4: ...4 8920MUX Instruction Manual Contents ...

Страница 5: ... features of a specific module of the Gecko 8900 Signal Processing System As part of this module family it is subject to Safety and Regulatory Compliance described in the Gecko 8900 Series frame and power supply documentation see the 8900TX 8900TF 8900TFN Frames Instruction Manual ...

Страница 6: ...6 8920MUX Instruction Manual Preface ...

Страница 7: ...e module can be removed and replaced in the frame with power on Stores settings in non volatile memory if the power to the module is cycled the module will maintain its settings Multiplexes up to two AES EBU audio digital streams Requires 48 kHz AES EBU streams synchronous or asynchronous minimum grade 2 compliant AES audio within 50 ppm of the 48 kHz sample rate with input SD video Supports Grass...

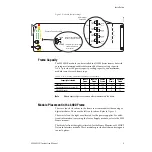
Страница 8: ... ports The 8920MUX module can be plugged in and removed from an 8900 Series frame with power on When power is applied to the module LED indica tors reflect the initialization process see Power Up on page 12 Setting On Board Jumpers Jumpers on the 8920MUX module must be set for remote or local control and for the audio input type with the following on board jumpers shown in Figure 1 on page 9 Jumpe...

Страница 9: ...wer supplies For addi tional information concerning the Power Supply module refer to the 8900 Frame manual The third slot from the right is allocated for the Frame Monitor or 8900NET Network Interface module These modules provide health monitoring and control options Table 1 Power Cooling and Module Capacity of 8900 Frames Capacity Calculated 8900T2 Frame 8900T2 F Frame 8900TX Frame 8900TF Frame 8...

Страница 10: ...e module facing to the right and the ejector tab to the top 2 Verify that the module connector seats properly against the backplane 3 Press the ejector tab in to seat the module in place Frame Controller or 8900NET Module only Any 8900 Module Power Supplies only 8037 04r1 8037 03 J1 J2 J3 J4 J5 J6 J7 J8 J9 J10 IN DA1 J2 J4 J6 J8 J1 J2 J3 J4 J5 J6 J7 J8 J9 J10 IN DA3 J1 J2 J3 J4 J5 J6 J7 J8 J9 J10 ...

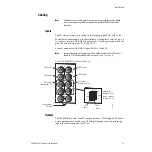
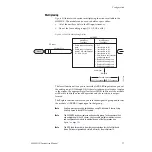
Страница 11: ...d AES EBU input BNCs to J5 and J6 Note Jumper selections on the module must be made to select either 75 Ω unbal anced or 110 Ω balanced AES EBU input see Figure 1 on page 9 Figure 4 8920MUX Input Output Connectors Outputs The 8920MUX provides four SD output streams J1 through J4 The desti nation equipment should have a 75 Ω input impedance or loop through inputs that are terminated into 75 Ω J9 J1...

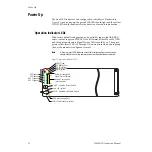
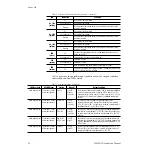
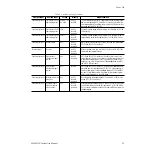
Страница 12: ...o Signal Present LEDs should be on The appro priate yellow Insert LED G1 through G4 will indicate which audio group if any the module is configured to insert Note A flashing Insert LED indicates an invalid insertion configuration has been attempted and the existing audio group has not been deleted or replaced Figure 5 Operation Indicator LEDs SW1 Function Rotary Switch G1 G4 2nd LED yellow SW2 Sel...

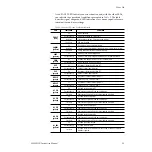
Страница 13: ... Valid 625 video signal is present 525 green Off No video or standard is other than 525 On continuously Valid 525 video signal is present AES1 P green Off No valid AES stream is present at input 1 On continuously Valid 48 kHz AES 3 stream at input 1 AES2 P green Off No valid AES stream is present at input 2 On continuously Valid 48 kHz AES 3 stream at input 2 G1_PR green Off No audio present in gr...

Страница 14: ...utput with no new group embedded Since no new group insertion is selected AES1 P and AES2 P LEDs signal present will be on if any AES stream is present G1 4_PR sig nal present LEDs will be on to indicate any embedded audio groups present Video input present Synchronous 48 kHz audio input present Auto insert syn AES asyn AES syn matrix 8920MUX will insert the input AES EBU audio into the first avai...

Страница 15: ...ronous 48 kHz audio input present Any syn AES syn matrix AES1 P and AES2 P LEDs will be on if the AES audio is close to the correct frequency If an insert or replace is selected the module will try to embed the new group but a click or noise will be noticeable If the frequency is not close the group will not be embedded and the AES1 P and AES2 P LEDs will be off Video input present Asynchronous 48...

Страница 16: ...ry page 16 Local On board Module Configuration page 21 Remote Control and Monitoring page 23 Newton Control Panel Configuration page 34 Configuration Summary A configuration summary is provided in this section for the following items on the 8920MUX Multiplexing audio insertion deletion to determine output composi tion page 17 Synchronization modes page 18 and AES Input Channel Status Bits page 19 ...

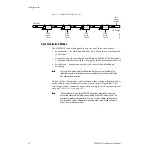
Страница 17: ...ce can be limited when using 24 bit audio Refer to Using Ancillary Space in the SMPTE standard Note The 8920MUX inserts or replaces only one audio group To change more than one audio group in the SD stream you can cable multiple modules in series and configure each module to manipulate one of the four groups see Figure 7 on page 18 Note The EDH Feed Forward bits from the incoming video for the Ful...

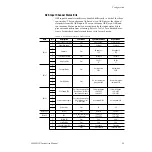
Страница 18: ...for the AES audio group insertion Any one of the three modes can be selected either using on board switches or the remote control interfaces when remote control is enabled The switching of audio channel content is done using the GUI or control panel only see Audio Matrix on page 29 Note In Asynchronous mode the 8920MUX may add or drop audio samples in each audio channel to maintain correct timing ...

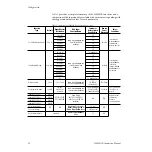
Страница 19: ...sis 100 No emphasis 100 3 4 5 Fs locked unlocked Pass Locked 0 Locked 0 6 Sampling Rate Pass 48 kHz 01 48 kHz 01 7 Byte 1 0 Channel Mode Pass Not indicated 0000 Not indicated 0000 1 2 3 4 User Bit Mode Pass No user information indicated 0000 No user information indicated 0000 5 6 7 Byte 2 0 Aux Sample Bits Pass may be wrong if the Mux setting of 20 24 bits does not match input Follows web page 20 ...

Страница 20: ...mode move paddle up to insert or replace Moving paddle down has no function Insert G1 1 4 Insert G2 1 5 Insert G3 1 6 Insert G4 1 7 Replace G1 1 8 Replace G2 1 9 Replace G3 1 A Replace G4 1 B Off 1 3 paddle down Bits per sample 20 bit 20 or 24 bit Audio Group Management Bits per Sample pulldown 1 C 20 bits up 24 bits down Bits Smpl Synchronization mode syn AES syn AES asyn AES or syn matrix Audio ...

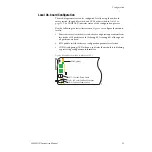
Страница 21: ... 8 to configure the module locally Function rotary switch selects a desired configuration parameter from two banks of 16 positions each 0 through 9 Athrough F although not all positions are used SW1 paddle switch initiates a configuration parameter selection CONF configuring LED when on indicates the module is initializing or processing configuration information Figure 8 Module Configuration Switc...

Страница 22: ... stream with the audio input to this module 9 Replace G2 Replaces the existing G2 audio group in the SD stream with the audio input to this module A Replace G3 Replaces the existing G3 audio group in the SD stream with the audio input to this module B Replace G4 Replaces the existing G4 audio group in the SD stream with the audio input to this module C 20 bit 24 bit Select AES EBU audio format D S...

Страница 23: ...Control Panel Configura tion on page 34 For remote access make sure the jumper block on the module is set for both Local and Remote access Figure 8 on page 21 Audio inputs must also be specified as balanced or unbalanced with jumpers J1 J5 J7 and J8 as described in Setting On Board Jumpers on page 8 8037_10 The Links section lists the frame and its current modules The selected link s Status page i...

Страница 24: ... and version of 8900NET module software They are provided for reference only Displays will differ depending on the type of platform and browser you are using and the version of the 8900NET software installed in your system Use the Refresh button to update the display available with 8900NET soft ware version 3 0 and later The Online Manual Link button can be set up to link to the documentation in p...

Страница 25: ...audio group functions page 27 Audio Matrix shows the input output audio matrix assignments page 29 Recall Save User Settings provides recall and save functions for local operations as well as recalling factory defaults page 30 Slot Config provides a Locate Module function and Slot Memory page 31 and Software Update gives information on software updating page 33 Figure 10 8920MUX Web Page Links Ref...

Страница 26: ...Color coding of the display indicates the signal status Refer to Status Monitoring on page 38 for an explanation of the color coding Information about the module such as part number serial number hard ware revision and software and firmware versions are given in a read only section at the bottom of the display Figure 11 8920MUX Status Page Use this link ...

Страница 27: ...age see Audio Matrix on page 29 Note Replace and Delete functions are not available in Synchronous Matrix mode AES audio is inserted in available space only Click the Apply button to activate each selection Auto Insert places the AES EBU input in the first available audio group If no group is empty the Status line will report a warning for all groups The status reporting section of the display pro...

Страница 28: ...28 8920MUX Instruction Manual Configuration Figure 12 Audio Group Management Display ...

Страница 29: ...p G1 G2 G3 or G4 into any or all of the output audio channels Pull down menus allow you to select any of the four input channels AES1A AES1B AES2A or AES2B for insertion in each of the output chan nels The Input Output map indicates the selected input channel by placing an X in the appropriate input row for each output column When Synchronization is set to Synchronous syn AES or Asynchronous asyn ...

Страница 30: ...gs The Recall Save User Settings page see Figure 14 allows you to set the following parameters Recall the saved User Setup Save the currently selected settings for the entire module as User Setup or Recall factory defaults Figure 14 User Settings Display Use this link ...

Страница 31: ...pon Install box has been checked the current configu ration saved to this slot is saved as slot memory When the current module is removed and another module of the same type is installed the configuration saved to the 8900NET module will be downloaded to the new module The box must be checked before the current module with the saved configuration is removed Hardware Switch Controls a read only sta...

Страница 32: ...32 8920MUX Instruction Manual Configuration Figure 15 8920MUX Slot Config Page ...

Страница 33: ...Notes that accompany the software update for com plete details Currently the only recommended method of software updating is done with a software kit 8900 FLOAD CBL that includes a CD ROM with the current software files and a serial cable assembly available from Grass Valley Refer to the 8900 FLOAD CBL Software Upgrade Instruction Manual in pdf format on the CD ROM for complete updating instructio...

Страница 34: ...e must be running software version 3 2 0 or later for proper operation of the Newton Control Panel The available control panel controls are listed in Table 5 on page 20 An example of the Newton Configurator for the 8920MUX is shown in Figure 17 Note Not all control parameters are available with the control panel Figure 17 Newton Configurator Example Refer to the documentation that accompanies the ...

Страница 35: ... 48 kHz sample rate 20 or 24 bit Signal level 1 V peak to peak SDI Output Number of outputs 4 Connector type BNC Signal type SMPTE 259M Return loss 15 dB 5 to 270 MHz Output impedance 75 Ω Error checking EDH embedded Clock jitter 0 2 UI Signal Processing Functions Electrical length 12 µs Audio delay 875 µs Audio format 48 kHz synchronous audio formatted per proposed SMPTE standard Formatting AES E...

Страница 36: ...range 0 to 40 degrees C Operating humidity range 0 to 90 non condensing Non operating temperature 10 to 70 degrees C Mechanical Frame type 8900 Series Power Requirements Supply voltage 12 V 12 V Power consumption 4 5 Watts Table 7 8920MUX Specifications continued Parameter Value ...

Страница 37: ...he AES EBU input stream is 48 kHz and synchronized with the SD video input Check cable connections Check output connections for correct I O mapping correct input con nector is used for the corresponding channel output Refer to Figure 5 for the location of PWR LED and Table 2 on page 13 for proper LED indications If the module is still not operating correctly replace it with a known good spare and ...

Страница 38: ...nternal faults and normal operation Pass Signal input states including valid present pass not present or invalid warning not monitored and not available no signal inputs Reference input states including locked valid pass not locked invalid warning and not monitored Signal output states with reporting functionality reference output LEDs LEDs on modules in the frame and on the front of the 8900TF TF...

Страница 39: ...l in the 8900NET Network Interface Instruction Manual Web Browser Interface When the 8900NET module is installed in the frame a web browser GUI can indicate frame and module status on the following web pages Frame Status page reports overall frame and module status in graph ical and text formats Module Status page shows specific input and reference signal status to the module along with enabled op...

Страница 40: ...led on the 8900NET module enabled status reports are sent to an SNMP Manager such as the Grass Valley s NetCentral application There are both hardware and software report enable switches for each report Both must be enabled for the report to be sent Software report switches are set on the 8900NET Configuration page for the Frame the 8900NET module and each module slot Refer to the 8900NET Network ...

Страница 41: ...ding the following func tional description Figure 19 8920MUX Block Diagram Input Equalizing Amplifier The equalizing amplifier lowers the impedance of the termination as fre quency increases The differential input improves the performance of the 8920MUX in the presence of common mode hum and noise Network Interface CPU Audio In 2 Audio In 1 AES Input Stereo 1 AES Input Stereo 2 27 Mhz 64 aFS 128 a...

Страница 42: ...enerator CPU interface The ancillary space manager allows the user to manipulate the embedded audio groups G1 through G4 The User can delete or replace an existing audio group without damaging the SD video stream or other data types in the ancillary space The clock generator using Direct Digital Synthesis DDS generates a 6 144 MHz AES3 carrier clock from the incoming 27 Mhz The CPU interface provi...

Страница 43: ...0MUX board has two audio inputs that can be configured to be eitherAES3 110 ohm balanced with rear connector adapter or twoAES3id 75 ohm unbalanced coax BNC connectors Refer to Figure 4 on page 11 The audio input signal passes through the AES3 input processor and re clocker before it is multiplexed Power Supply From the external source 12V the on board supply provides 5 V 5 V and 3 3 V for the 892...

Страница 44: ...44 8920MUX Instruction Manual Functional Description ...

Страница 45: ... 13 CONF configuring LED 21 configuration factory default 12 jumpers 21 LEDs 21 Remote GUI 23 summary table 20 switches 21 connectors 10 input 11 output 11 control panel 34 mneumonics 20 D documentation online 2 24 E enable SNMP 40 F factory defaults summary table 20 FAQ database 2 FAULT LED troubleshooting 38 Fault LED 13 fault report 24 format setup 22 frame cooling capacity 9 module capacity 9 ...

Страница 46: ...equirements 36 R Recall Save User Settings web page 30 Refresh button 24 remote configuration audio groups 27 insert replace 27 pass delete 27 remote configuration and monitoring 23 replace function 17 report enable switches 40 requirements 8900 software 8 S SD stream 11 17 Slot Config web page 31 slot memory 31 SMPTE alarm 24 SNMP reporting enabling 31 overview 40 software download from web 2 sof...

Страница 47: ...0MUX J2 J4 J6 J8 SD OUT 1 SD OUT 2 SD OUT 3 SD OUT 4 SD IN J1 J3 AES IN 1 AES IN 2 J5 J7 J9 J10 8920MUX J2 J4 J6 J8 SD OUT 1 SD OUT 2 SD OUT 3 SD OUT 4 SD IN J1 J3 AES IN 1 AES IN 2 J5 J7 J9 J10 8920MUX J2 J4 J6 J8 SD OUT 1 SD OUT 2 SD OUT 3 SD OUT 4 SD IN J1 J3 AES IN 1 AES IN 2 J5 J7 J9 J10 8920MUX J2 J4 J6 J8 SD OUT 1 SD OUT 2 SD OUT 3 SD OUT 4 SD IN J1 J3 AES IN 1 AES IN 2 J5 J7 J9 J10 8920MUX...

Страница 48: ...24 8920MUX Instruction Manual 8920MUX Video Audio Multiplexer ...

Страница 49: ...0MUX J2 J4 J6 J8 SD OUT 1 SD OUT 2 SD OUT 3 SD OUT 4 SD IN J1 J3 AES IN 1 AES IN 2 J5 J7 J9 J10 8920MUX J2 J4 J6 J8 SD OUT 1 SD OUT 2 SD OUT 3 SD OUT 4 SD IN J1 J3 AES IN 1 AES IN 2 J5 J7 J9 J10 8920MUX J2 J4 J6 J8 SD OUT 1 SD OUT 2 SD OUT 3 SD OUT 4 SD IN J1 J3 AES IN 1 AES IN 2 J5 J7 J9 J10 8920MUX J2 J4 J6 J8 SD OUT 1 SD OUT 2 SD OUT 3 SD OUT 4 SD IN J1 J3 AES IN 1 AES IN 2 J5 J7 J9 J10 8920MUX...

Страница 50: ...24 8920MUX Instruction Manual 8920MUX Video Audio Multiplexer ...

Отзывы: