background image

7

Index

Contents

Cutting Plotter Controller

OPS664

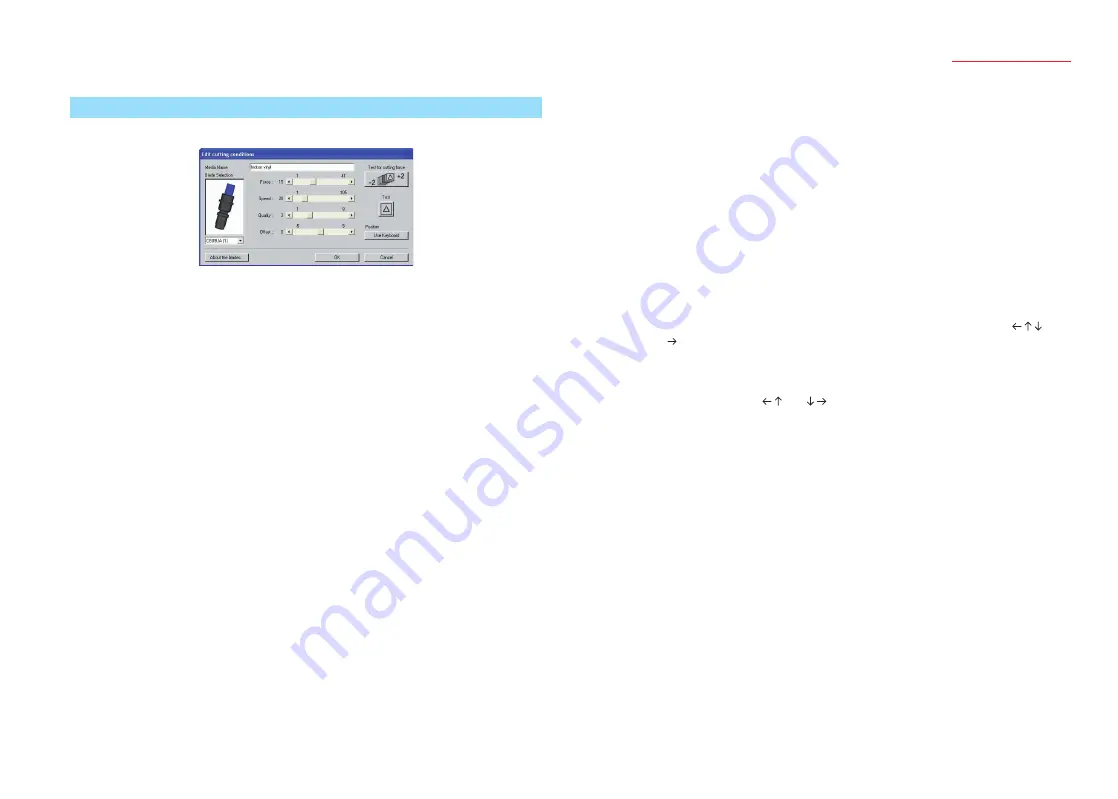
2.4  Cutting Conditions

Cutting conditions can be created and changed in the [Edit cutting conditions] window.

Media Name .... The media name for the current cutting conditions is displayed here. 

Any desired media name can be specified.

Note:  Media names of up to 27 characters (single-byte characters) can be 

entered.

Blade Selection

............ Specifies the blade name or pen type.

Force ............... Specifies the force applied to the pen for cutting or plotting.  

The optimal setting will depend on the media type and the blade or 
pen used. 

Speed .............. Specifies the pen speed on the medium for cutting or plotting.  

The optimal setting will depend on the media type and the blade or 
pen used.

Quality ............. Specifies the pen acceleration for cutting or plotting.  

Specifying a lower value increases the quality. The optimal setting will 
vary depending on the media type and the blade or pen used. 

Note:  The Quality setting cannot be changed for the Craft ROBOPro2 model.

Offset............... Performs fine adjustment of the basic offset value determined for each 

blade type.

Note:  For details on how to adjust the offset, refer to the user's manual for your 

cutting plotter.

Test for cutting force

............ Performs five test cuts in succession using the conditions currently 

displayed in the [Edit cutting conditions] window.  
The cutting force is changed for each test cut, in the range -2 to +2. If 
the displayed force is 10, for example, test cuts will be performed at 
the 8, 9, 10, 11 and 12 cutting force values.

Note:  The F9 function key on your keyboard can also be used to perform this 

operation.

Test .................. Performs test cutting using the currently displayed cutting conditions in 

order to check the cutting quality.  
Move the cutter pen to the position where you wish to perform test 
cutting, and then click the [Test] button to cut a 1 cm x 1 cm test 
pattern.

Note:  Check the cutting results. If the film is cut cleanly, and there are faint 

traces on the backing sheet, the cutting conditions are correct. If cutting 

has not been performed correctly (the backing sheet has been cut through 

or uncut areas of film remain), adjust the blade length, or change the force, 

speed and other parameters.

Note:  The quality of the cutting results will vary, depending on the type of media 

to be cut and on other factors. If you plan to cut media that you have never 

used before, always be sure to perform test cutting first.

Note:  The F8 function key on your keyboard can also be used to perform this 

operation.

Use Keyboard

............ Enables the cutter pen to be moved when one of the arrow keys (      

) on the keyboard is pressed. If an arrow key is pressed together with 

the keyboard's [Shift] key, the cutter pen moves slowly. If an arrow key 
is pressed together with the keyboard's [Ctrl] key, the cutter pen moves 
quickly. If a horizontal direction arrow key and a vertical direction arrow 
key (for example (   ) or (   )) are pressed at the same time, the 
cutter pen moves in the corresponding diagonal direction.

Note:  If both the horizontal direction keys or both the vertical direction keys are 

pressed at the same time, the cutter pen will not move.

Note:  This function can only be used when the plotter is in the Ready status.
Note:  The F6 function key on your keyboard can also be used to perform this 

setting.

About the Blade

............ Displays a table showing the compatible cutter blades and plungers 

when the Controller is selected.

Содержание OPS664

Страница 1: ...ODUCTION 1 1 About the Controller 3 1 2 Operating Environment 3 2 USING THE CONTROLLER 2 1 Launching the Controller 3 2 2 Setting the Various Parameters 4 2 3 Edit Condition List 6 2 4 Cutting Conditions 7 2 5 Registration Mark Settings 8 2 6 Advanced Settings 9 3 ERROR MESSAGES 10 Index 11 USER S MANUAL MANUAL NO OPS664 UM 153 ...

Страница 2: ...ftware and accompanying documentation Neither Graphtec nor the supplier gives any explicit or implicit guarantees regarding the infringement of a third party s rights arising from the use of the Software or accompanying manuals their commercial performance or their suitability for specific purposes Neither Graphtec nor the supplier assumes any responsibility for incidental secondary or special dam...

Страница 3: ...led when you perform setup for your cutting plotter in a Windows 2000 Windows XP or Windows Vista environment 1 1 About the Controller The Cutting Plotter Controller is a software program that lets you perform settings at your computer instead of having to make them at the plotter s control panel In particular frequently used cutting condition settings and complicated registration mark reading pro...

Страница 4: ...te and copy functions Note For further details on the Edit Condition List window refer to Section 2 3 Edit Condition List Test Performs test cutting using the currently displayed cutting conditions in order to check the cutting quality Move the cutter pen to the position where you wish to perform test cutting and then click the Test button to cut a 1 cm x 1 cm test pattern Note Check the cutting r...

Страница 5: ... lower left position when you are facing the plotter becomes the origin point When viewed from the front of the plotter cutting is performed in the same direction as it was designed in the software and so operation is more intuitive When the Registration Marks function has been enabled Specifies the direction according to how the printed design should be loaded in the plotter If the design should ...

Страница 6: ...e Controller is closed without any cutting being performed Close This button is only displayed when the Controller is launched via the Start menu Click this button to close the Controller 2 3 Edit Condition List Use this list to manage the cutting conditions files List Display Media names and the cutting conditions saved for each media name are displayed in list format The settings files initially...

Страница 7: ... Test Performs test cutting using the currently displayed cutting conditions in order to check the cutting quality Move the cutter pen to the position where you wish to perform test cutting and then click the Test button to cut a 1 cm x 1 cm test pattern Note Check the cutting results If the film is cut cleanly and there are faint traces on the backing sheet the cutting conditions are correct If c...

Страница 8: ...ed as boundary points for dividing the design up into multiple areas 4 point correction is then performed for each area This function enables even more accurate correction of media skew or other alignment problems that occurred when the design was printed Note The Correction Method Area parameter cannot be specified when the plotter is a Craft ROBOPro2 model Note Load the design in the plotter so ...

Страница 9: ...e loaded medium is automatically fed forward and backward by the preset length when data is received This operation leaves traces of the grit rollers on the medium and prevents it from slipping during a cutting or plotting operation Similarly if a roll medium is used the medium is automatically pulled out by the cutting plotter Fan Power Specifies the suction force either Normal or Weak that is us...

Страница 10: ...in Follow the instructions in the message GITKUSBP2 DLL could not be found and so the Controller could not be started Please reboot your computer or re install the Controller The GITKUSBP2 DLL functions could not be found and so the Controller could not be started Please reboot your computer or re install the Controller Follow the instructions in the message To install the software again first uni...

Страница 11: ... 6 I Import Conditions 4 Initial Down Force 9 INTRODUCTION 3 L Launching the Controller 3 Length 8 List Display 6 List Edit 4 M Media Name 7 Media Orientation 5 Media Type 4 Mirror 9 N New 6 O Offset 7 Offset Angle 9 Operating Environment 3 Option 6 Origin 5 P Page Length 9 Pen Up Speed 9 Position 4 Q Quality 7 R Read Marks 6 Registration Marks 5 Registration Mark Settings 8 Registration Mark Type...

Страница 12: ...12 Index Contents Cutting Plotter Controller OPS664 The specifications etc in this manual are subject to change without notice OPS664 UM 153 April 16 2007 3rd edition 01 GRAPHTEC CORPORATION ...

Отзывы: