background image

~

9

~

~

10

~

Please download the user manual and FAQ for more de-

tailed configuration instructions:

http://www.grandstream.com/support

S

tep 9: 

Click through the menu on the left hand side of 

the web UI for more advanced configuration parameters.

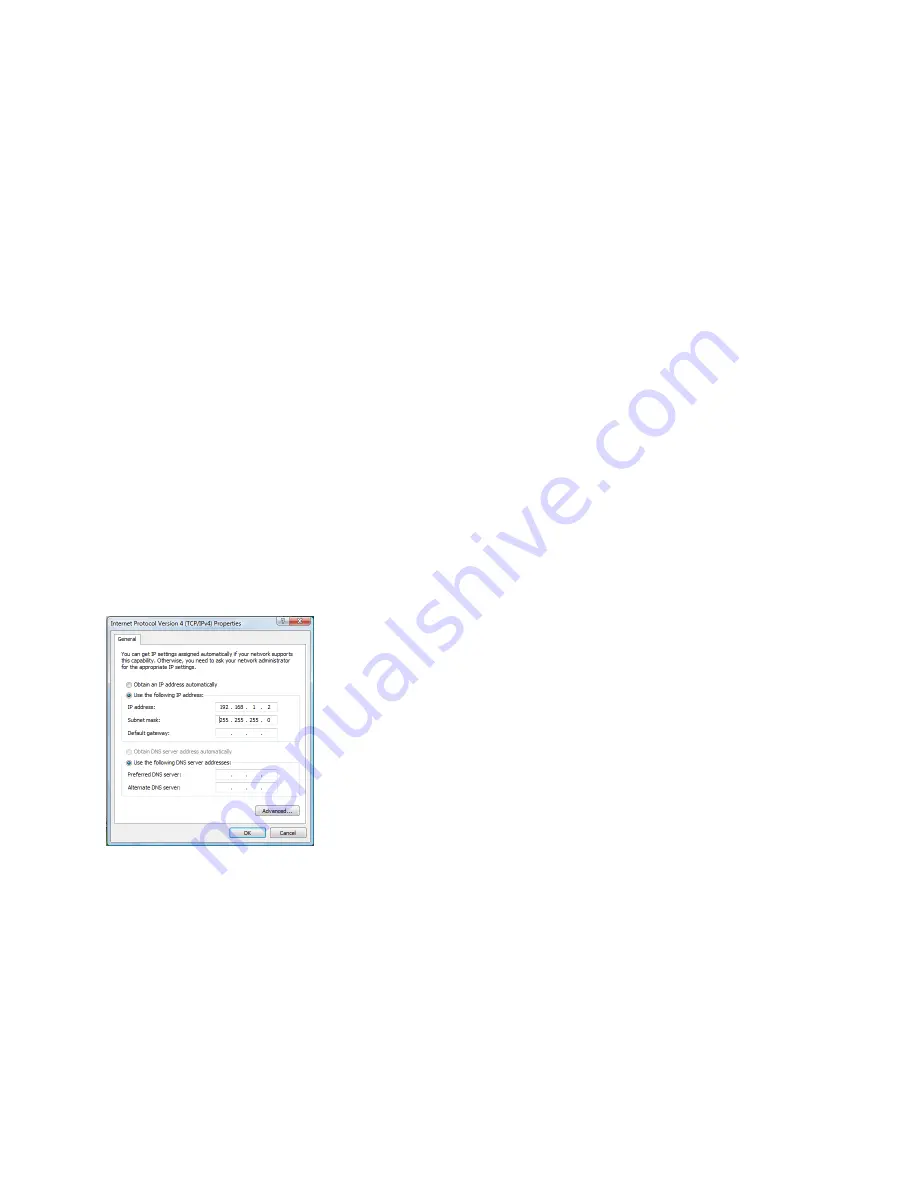
Connect the GXV3662 using Static IP

If the camera does not get an response from the DHCP 

server after 3 minutes, it can be accessed by the default IP 

192.168.1.168

S

tep 1: 

Connect your PC and the GXV3662’s to 

             the same network.

S

tep 2: 

Set the IP address of your PC to 192.168.1.X.

             Set the Default Gateway of your PC to 

             255.255.255.0.

S

tep 3: 

Open Microsoft Internet Explorer on your PC. Type 

            192.168.1.168 in the address bar.

S

tep 4-7: 

Please refer to Step 6-9 on Page 7.

Содержание GXV 3662

Страница 1: ...USA Tel 1 617 566 9300 Fax 1 617 247 1987 For Warranty and RMA information please visit www grandstream com GXV 3662 IP CAMERA QuickStart Guide Grandstream Networks Inc 2 1 5 86 755 2601 4600 86 755 2...

Страница 2: ...Content English 1 Espa ol 13 Fran ais 25 37...

Страница 3: ...this device to temperatures outside the range of 20 C to 60 C Do not expose the GXV3662 to environments outside of the following humidity range 10 90 RH non condens ing Terminal Block GXV3662 EN Tool...

Страница 4: ...nge is 0 356 1 2 Installation Cable Cable Cable Cable Step 1 Take out the 3 screws on the housing Use the tool comes with the package Step2 Open the cover Step3 Attach the alighment sticker onto the s...

Страница 5: ...n AC power outlet Plug an RJ45 Ethernet cable into the network port Insert the other end into a hub switch or router GXV3662 CONFIGURATION Configuring the GXV3662 using Microsoft Internet Explorer Con...

Страница 6: ...the default factory configuration Step 7 Once you log into the GXV3662 s web interface Internet Explorer will indicate that This website wants to install the following add on GSViewer cab from Grands...

Страница 7: ...XV3662 using Static IP If the camera does not get an response from the DHCP server after 3 minutes it can be accessed by the default IP 192 168 1 168 Step 1 Connect your PC and the GXV3662 s to the sa...

Страница 8: ...RAM GXV3662 LENS SPECIFICATIONS Lens Format 1 3 Inch Image Sensor 1 3 Inch CMOS Focal Length 3 3mm 12mm Aperture Ratio F1 6 F3 2 View Angle D 125 7 29 9 H 89 8 23 9 V 63 6 17 9 IRIS DC Auto Minimum Ob...

Страница 9: ...unidad a temperaturas fuera de este rango 20 C to 60 C No exponga esta unidad a condiciones h medas fuera del rango de 10 a 90 RH no condensadas Bloque de terminales GXV3662 Set de herramientas Sticke...

Страница 10: ...2 Instalaci n Cable Cable Cable Cable Paso 1 Retire los 3 tornillos del chasis Utilice la herramienta incluida Paso 2 Retire el domo Paso 3 Pegue el sticker de alineamiento en la superficie Paso 4 Tal...

Страница 11: ...iniciar la detecci n de equipos Paso 4 Los equipos detectados aparecer n en la pantalla Conexi n del GXV3662 Puerto de corriente Puerto de Red Opci n A Corriente sobre ethernet PoE Cuando use un swit...

Страница 12: ...e administrador y la con trase a son ambos admin Paso 7 Luego de ingresar a la pagina web su explorador le indicara que Esta p gina quiere instalar el siguiente add on GSViewerX cab desde Grandstream...

Страница 13: ...P est tica Si la c mara no recibe respuesta del servidor DHCP despu s de 3 minutos se puede ingresar usando la IP de fabrica 192 168 1 168 Paso 1 Conecte su PC y el GXV3662 a la misma red Paso 2 Coloq...

Страница 14: ...ciones del Lente Formato del lente 1 3 Inch Sensor de imagen 1 3 Inch CMOS Distancia focal 3 3mm 12mm Radio de apertura F1 6 F3 2 Angulo de visualizaci n D 125 7 29 9 H 89 8 23 9 V 63 6 17 9 IRIS DC A...

Страница 15: ...de 20 C 60 C Ne pas exposer le GXV3662 un environnement avec humidit hors de la plage de 10 90 RH sans condensation Boitier d alimentation Guide d installation express 12V Adaptateur GXV3662 Ensemble...

Страница 16: ...e r glage admise est 0 356 1 2 Installation Etape 1 Retirez les 3 vis du bo tier Utilisez l outil fourni avec le pack Etape 2 D vissez le bo tier Etape 3 Fixez l autocollant d alignement sur la surfac...

Страница 17: ...Branchez un c ble Ethernet RJ45 dans le port r seau Ins rez l autre extr mit dans un hub un switch ou un routeur La Configuration du GXV3662 Configurer le GXV3662 en utilisant le navi gateur Microsof...

Страница 18: ...strateur par d faut sont d finis sur admin la configuration d origine par d faut Etape 7 Apr s avoir acc d la page Web de votre GXV3662 IE indique que Ce site veut installer l add on GSViewerX cab de...

Страница 19: ...une ad resse IP statique Si la cam ra ne re oit pas de r ponse du serveur DHCP au bout de 3 minutes vous pouvez y acc der par l adresse IP par d faut 192 168 1 168 Etape 1 Connectez votre PC et le GXV...

Страница 20: ...ns de la lentille du GXV3662 Format de la lentille 1 3 Inch French Capteur d image 1 3 Inch CMOS Distance focale 3 3mm 12mm Rapport d ouverture F1 6 F3 2 Angle de vue D 125 7 29 9 H 89 8 23 9 V 63 6 1...

Страница 21: ...37 38 20 60 GXV3662 10 90 12V DC GXV3662 12V GXV3662 x3 x3 SD IR CUT...

Страница 22: ...39 40 1 2 1 2 3 4 5 40 6 7 1 0 160 2 0 356...

Страница 23: ...41 42 1 IP http www grandstream com support gxv_ series_surveillance general resources gs_search zip 2 IP 3 IP 4 IP HTTP GXV3662 GXV3662 DHCP GXV3662 DHCP IP GXV3662 A PoE PoE PoE B RJ45...

Страница 24: ...43 44 7 GXV3662 IE ActiveX Grandstream Networks Inc grandstream IE 8 ActiveX 5 IE IP 6 admin...

Страница 25: ...45 46 1 PC GXV3662 PC GXV3662 9 3 IE IE GXV3662 IP 192 168 1 168 4 43 6 9 http www grandstream cn IP 2 PC IP 192 168 1 X 255 255 255 0 GXV3662 DHCP GXV3662 DHCP 3 GXV3662 IP 192 168 1 168...

Страница 26: ...47 48 GXV3662 GXV3662 1 3 Inch 1 3 Inch CMOS 3 3mm 12mm F1 6 F3 2 D 125 7 29 9 H 89 8 23 9 V 63 6 17 9 DC Auto 50cm IR CUT Yes...

Отзывы: