background image

FR-39

FR-38

FRANÇAIS

FRANÇAIS

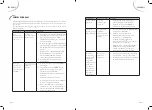
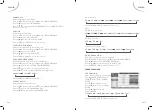
N’essayez pas d'utiliser d'autres fonctions qui ne sont pas mentionnées dans les instructions.

En cas de problème avec votre téléviseur LCD, veuillez suivre les mesures suivantes 

en premier.

Si le problème persiste, éteignez l'appareil et contactez votre revendeur ou un centre 

d'entretien agréé.

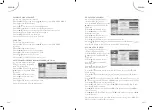
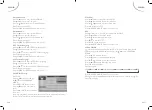
Symptômes

Cause possible

Solution

Pas 

d'alimentation 

ni d'indicateur 

lumineux

La TV n'est 

pas connectée à 

l'alimentation.

1.  Appuyez sur l’interrupteur d'alimentation 

principale pour mettre la TV en marche. 

Appuyez sur le bouton POWER 

(ALIMENTATION) pour mettre la TV 

en mode de veille.

2.  Assurez-vous que le câble d’alimentation 

est fermement connecté à la prise d'entrée 

CA du téléviseur et à la prise électrique 

murale.

3.  Eteignez la TV et débranchez le câble 

d’alimentation de la prise électrique 

murale, attendez 60 secondes puis 

rebranchez le câble d’alimentation.

4.  Connectez la TV à une autre prise 

d'alimentation.

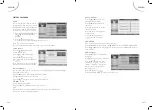
Message 

d'erreur sur 

l'écran avec 

une connexion 

HDMI.


HDCP a 

échouée.

1.  Assurez-vous que votre câble HDMI est 

homologué.

2.  Appuyez sur le bouton 

INPUT

 pour 

permuter sur une autre source, puis 

revenez à la source HDMI.

3.  Réinitialisez le dispositif auxiliaire et le 

téléviseur.

• 

Mettez le téléviseur en marche. 

• 

Sélectionnez la source d'entrée HDMI. 

• 

Activez le dispositif auxiliaire.

4.  Alors que le téléviseur et le dispositif 

auxiliaire sont sous tension, débranchez 

l'une des extrémités du câble HDMI, 

puis rebranchez le câble.

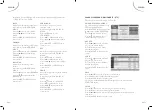
GUIDE DE DÉPANNAGE

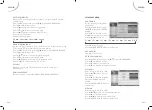
Symptômes

Cause possible

Solution

Le PC n’émet 

aucun son.

Le câble 

audio n'est pas 

connecté.

1.  Connectez un câble audio au port 

d'entrée AUDIO VGA sur la TV.

2.  Appuyez sur le bouton 

INPUT

 et 

sélectionnez la source d'entrée VGA.

La TV ne 

répond pas à la 

télécommande.

Les piles sont 

installées 

incorrectement 

ou les piles sont 

faibles.

1.  Assurez-vous d'utiliser la télécommande 

fournie avec le téléviseur.

2.  Veillez à ce que les piles de la 

télécommande sont insérées selon 

les polarités +/- indiquées dans 

le compartiment des piles de la 

télécommande et 

 si les piles ne 

doivent pas être remplacées.

3.  Eteignez la TV et débranchez le câble 

d’alimentation de la prise électrique 

murale, attendez 60 secondes puis 

rebranchez le câble d’alimentation.

L'image est 

surtout rouge 

et verte ou il 

manque du 

rouge dans 

l'image lorsque 

le téléviseur 

est connecté 

à un appareil 

auxiliaire par 

des câbles 

composants.

Connexion 

précaire / 

incorrecte.

1.  Assurez-vous que toutes les connexions 

sont 

 selon le code couleur.

2.  Insérez les câbles composants à l'intérieur 

des prises YPbPr sur le téléviseur.

Содержание LSV16A5

Страница 1: ...LSV16A5...

Страница 2: ...MATI RES MANUEL D UTILISATION CONSIGNES DE S CURIT IMPORTANTES FR 2 INSTALLATION FR 4 CONTR LES DU PANNEAU LAT RAL FR 6 DESCRIPTION DU T L VISEUR FR 7 T L COMMANDE FR 8 CONNEXION FR 11 FONCTIONNEMENT...

Страница 3: ...gine similaire Si le c ble d alimentation est endommag il doit tre remplac par le fabricant son service apr s vente ou des personnes de qualification similaire afin d viter un danger CONSIGNES DE S CU...

Страница 4: ...cal d installation des antennes INSTALLATION Emplacement Nettoyage 1 Veillez ce que les ouvertures de ventilation ne soient jamais obstru es par quelque objet que ce soit ex journaux nappe rideaux etc...

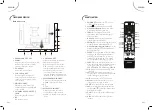
Страница 5: ...le ou pour retourner au mode de veille Indicateur d alimentation Capteur de t l commande Le sch ma est une repr sentation de l appareil Cette repr sentation peut tre quelque peu de votre t l viseur CO...

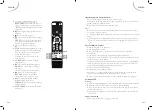
Страница 6: ...ur ce bouton pour le programme horaire num rique TV Appuyez nouveau sur ce bouton pour quitter ce mode 8 SLEEP SOMMEIL Appuyez de mani re r p t e sur ce bouton sommeil pour r gler la dur e avant l ext...

Страница 7: ...es pour viter tout risque de fuite Si les piles ont fuit nettoyez le compartiment des piles avec un c l g rement humide utilisez des gants pour assurer qu aucun produit chimique n entre en contact ave...

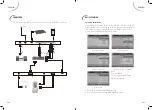
Страница 8: ...ndicateur lumineux d alimentation change de rouge vert Appuyez nouveau sur le bouton POWER ALIMENTATION pour mettre la TV en mode de veille L indicateur d alimentation changera de vert rouge et l appa...

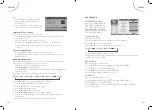
Страница 9: ...CONTRASTE Permet de r gler le niveau des blancs dans l image Appuyez sur le bouton MENU et appuyez sur pour s lectionner PICTURE MENU MENU D IMAGE Appuyez sur le bouton pour s lectionner CONTRAST CONT...

Страница 10: ...URE TEMP RATURE DES COULEURS Appuyez sur le bouton pour s lectionner les sous param tres de la temp rature des couleurs Appuyez sur le bouton pour ajuster la temp rature des couleurs R DUCTION DU BRUI...

Страница 11: ...DU MENU SON Appuyez sur le bouton pour s lectionner AVL Appuyez sur le bouton ou OK pour acc der la page choisie Appuyez sur le bouton pour s lectionner ON ACTIVER ou OFF D SACTIVER Appuyez sur le bou...

Страница 12: ...ion SKIP SAUTER sera saut lorsque vous s lectionnez les cha nes avec les boutons PR PR SWAP CHANGER Appuyez sur le bouton pour s lectionner le programme que vous d sirez changer Appuyez sur le bouton...

Страница 13: ...glage pr cis Une fois que le r glage est appuyez sur le bouton Rouge pour sauvegarder les r glages Appuyez sur le bouton MENU ou EXIT QUITTER pour retourner ou quitter le menu des r glages de PAGE DU...

Страница 14: ...our Appuyez sur le bouton MENU ou EXIT QUITTER pour retourner ou quitter le menu Preferred Audio Audio pr f r Appuyez sur le bouton pour s lectionner Preferred Audio Audio pr f r Appuyez sur le bouton...

Страница 15: ...P plusieurs reprises sur la t l commande pour changer directement la dur e du minuteur 180min 240min Arr t 10min 20min 30min 60min 90min 120min AUTO POWER OFF ARR T AUTOMATIQUE Lorsque la TV est en ma...

Страница 16: ...le bouton pour s lectionner la fonction de Position Horizontale Appuyez sur le bouton ou OK pour acc der la page choisie Appuyez sur le bouton pour d placer l image vers la gauche ou vers la droite Ap...

Страница 17: ...Appuyez sur le bouton pour s lectionner l option de mode d accueil Appuyez sur le bouton ou sur le bouton OK pour acc der au sous menu Appuyez sur le bouton pour s lectionner le mode d accueil Appuyez...

Страница 18: ...a tra c t de la vignette Appuyez sur le bouton de la t l commande pour acc der la lecture des photos en plein cran La lecture des photos se mettra automatiquement en mode diaporama Pour arr ter le mod...

Страница 19: ...u sous menu Appuyez sur le bouton pour s lectionner Arr t Auto et appuyez sur le bouton OK pour Appuyez sur le bouton MENU ou EXIT QUITTER pour retourner ou quitter le menu Remarque Lorsque l option A...

Страница 20: ...utes les semaines Tous les mois Une fois Record List Liste Enregistrement Permet une liste de enregistr s Apr s avoir acc d au menu PVR D calage temporel Appuyez sur le bouton pour s lectionner la lis...

Страница 21: ...ositif auxiliaire et le t l viseur Mettez le t l viseur en marche S lectionnez la source d entr e HDMI Activez le dispositif auxiliaire 4 Alors que le t l viseur et le dispositif auxiliaire sont sous...

Страница 22: ...oit les cha nes par l interm diaire d une connexion AV r glez le t l viseur sur la source d entr e correcte 3 Si le t l viseur est connect directement la prise murale par l interm diaire d un c ble c...

Страница 23: ...Instructions de fonctionnement REMARQUE La fonction USB prend en charge les chiers PHOTO MUSIQUE et FILM comme illustr s ci dessus Le syst me automatiquement les pris en charge Par exemple il que les...

Страница 24: ...n should not be impeded by covering the ventilation openings with items such as newspapers table cloths curtains etc No naked flame sources such as lighted candles should be placed on the apparatus Th...

Страница 25: ...e electric cable is damaged it must be replaced by the manufacturer or by the persons in order to avoid a danger Warning To prevent or shock hazard do not expose the set to rain or moisture Do not rub...

Страница 26: ...d be disposed of in a location designated for that purpose so they can be recycled safely and without posing any risk for the environment Do not burn or bury them 11 Danger of explosion if battery is...

Страница 27: ...dby 2 Mute Switches the sound on or 3 0 9 Number Buttons Press 0 9 to select a channel or input the password 4 INFO Press to display the channel information this information disappears after 10 second...

Страница 28: ...nsor on the left bottom of the front panel No obstacles should be placed between the remote control and the remote control sensor Operate the remote control within a 5 metre range and an angle of 60 d...

Страница 29: ...ou are turning on the TV and there are no programs in the TV memory the Auto Installation menu will appear on the screen Set up Home Mode Set up the country Set up the Language Set up Auto Power Mode...

Страница 30: ...e OSD setup menu 2 Press the button to select the menu pages 3 Press the or OK button to enter 4 Press the or button to select an item 5 Press the button to select or adjust a setting 6 If you do not...

Страница 31: ...e button to adjust the color temperature Press the MENU or EXIT button to return ASPECT RATIO Adjust the aspect ratio of the picture Press the MENU button and press the to select PICTURE MENU Press th...

Страница 32: ...he MENU or EXIT button to return or exit SPDIF Adjust the digital audio signal to PCM or Auto mode After entering the SOUND PAGE MENU Press the button to select SPDIF Press the or OK button to enter P...

Страница 33: ...Analog TV Press the MENU button and press the button to select CHANNEL page menu Press the or OK button to enter Press the button to select ATV Manual Search Press the or OK button to enter ATV Manual...

Страница 34: ...tal Guidance option Press or OK button to enter submenu Press the button to select your Parental Guidance 3 18 O Press OK button to Press the MENU or EXIT button to return or exit Note Parental Guidan...

Страница 35: ...utton to select Clock option Press the or OK button to enter the sub menu Note Some digital TV channels automatically transmit time and date information In this case the date and time information cann...

Страница 36: ...system this menu to get CI information PVR TIMESHIFT menu describes on page GB 32 RECORD TO USB FUNCTION 1Hour 2Hours 4Hours O SETUP PAGE MENU OSD TIMER Use this function to change OSD display time Pr...

Страница 37: ...er the sub menu Press the button to select Home mode Press OK button to Auto power time options RESET TV SETTING Use this function to reset the picture and sound settings to their default values insta...

Страница 38: ...hrough the list of music Press OK to enter the music submenu When you have selected songs in the list press OK to place a tick box next to Continue this for each song you would like to add to your pla...

Страница 39: ...entering PVR Timeshift menu Press button to select Auto Timeshift option then press or OK button to enter the sub menu Prees button to select press OK button to Press the MENU or EXIT button to retur...

Страница 40: ...Press the MENU or EXIT button to return or exit Daily Weekly Monthly Once Record List To view a list of recorded After entering PVR Timeshift menu Press button to select Record List Press the or OK b...

Страница 41: ...the remote control supplied with the TV 2 Ensure that the batteries of the remote control are inserted according to the markings indicated inside the remote compartment and that the batteries do not n...

Страница 42: ...Container Video Decoder Max Resolution MOVIE AVI Motion JPEG maximum video resolution is 640x480 XVID MPEG 4 SP ASP maximum video resolution is 1920x1080 MOV MPEG 4 SP ASP MKV MPEG 4 SP ASP MP4 MPEG...

Страница 43: ...2012 19 EU on Waste Electrical and Electronic Equipment WEEE requires that old household electrical appliances must not be disposed of in the normal unsorted municipal waste stream Old appliances mus...

Страница 44: ...Imported by Import par CONFORAMA France SA 80 Boulevard du Mandinet Lognes 77432 Marne la Vall e Cedex 2 FRANCE 2025820SSB 2025546SS...

Отзывы: