background image

The equipment type is shown on the first line and the software check in progress is shown 

in the second line.

If after the initial installation check all is correct, the LCD indicator will display the fill level 

(in %).

The figure 7 shows the LCD-display in the operation mode. The display shows the filling 

level and the operating modes as abbreviations: "FV" and "P". These abbreviations corre-

spond as follows:

FV+

 : filter valve opened

FV-

 : filter valve closed

P+

 : (pump on) house waterworks  in operation

P-

 : (pump off) no water currently being withdrawn

6.

Set up of the system control

After putting into operation, the system control must be adjusted and programmed accord-

ing to the conditions and requirements of the individual users system. The required set-

tings are easily programmed. There are four buttons for this purpose. All necessary pro-

gramming data entries follow a menu displayed by the LCD. Begin the programming of the

settings by pressing the button marked “

MENU

”. With the buttons “ ” or “ ” the menu 

may be scrolled backwards and forwards. With the respective menu point shown the 

values may be altered. For this the button “

OK

” must be used. The “?” displayed in the 

LCD will now change to a “>”graphic character. With the “ ” or “ ” the desired value may 

now be entered according to individual requirements. When the desired value has been 

entered this must be confirmed by pressing the “

OK

” button. The value is only then taken 

14

Picture 7: Display in the operation mode

Tank:     FV-    P-

50%

Status of rain water
filter flashing valve

Fill level in %

Visual check of the fill level

Status house waterworks
(pump + on / - off)

Содержание 351021

Страница 1: ...r information AquaControl Fill level measuring device and drinking water supply Item No 351021 Otto Graf GmbH Carl Zeiss Str 2 6 Tel 49 7641 5890 Kunststofferzeugnisse D 79 331 Teningen Fax 49 7641 58950 1 ...

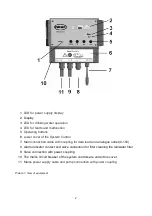
Страница 2: ...Main connection cable with coupling for data lead and analogue outlet 0 10V 8 Alarm indicator contact and valve connection for filter cleaning the rainwater filter 9 Valve connection with power coupling 10 The mains circuit breaker of the system controls are under this cover 11 Mains power supply cable and pump connection with power coupling Picture 1 View of equipment ...

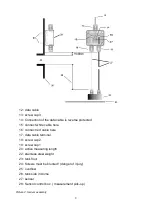
Страница 3: ...e here 16 connect red cable here 17 data cable terminal 18 screw cap 2 19 screw cap 1 20 active measuring length 22 stainless steel weight 23 tank floor 24 Screws must be blunted danger of injury 25 overflow 26 tank side in dome 27 sensor 28 Sensor control box measurement pick up Picture 2 Sensor assembly ...

Страница 4: ... hazardous situation which may cause to heavy or serious injury or even death 1 1 Personnel The installation commissioning and dismantling of the device must be done only by trained and authorized personnel During installation it is necessary to pay attention to the safety regulations defined by the user and local laws and rules 1 2 Proper Use of the Device The equipment is designed exclusively fo...

Страница 5: ...ion the device must be switched off immediately and the damaged area must be de energized While maintaining on the device ensure that the power supply is off at all times and make sure the device is de energized 1 5 Electrical Shock If objects e g hairpins needles or coins or liquids fall into the device it can cause life threatening electrical short circuits which can lead to fire The user has to...

Страница 6: ...however a type F mixed frequency sensitive may also be required Make sure to also observe the country specific regulations 1 8 Cable Connection When installing the cable connections the user needs to pay attention to the safety regulations Always pay attention to the connection to the protective earth ground Pay attention when connecting with other devices that those have to be of the same earth p...

Страница 7: ...ts gasoline etc to clean the device Only use a dry clean cloth 1 14 Unusual Smell If any unusual smoke or smell occurs immediately switch off of the device and remove it from the main power supply Contact your dealer or the manufacturer 1 15 Fuses The replacement of the fuses in the device is only permitted by trained and authorized technical staff The change of the fuses is only allowed when the ...

Страница 8: ...equipment or cables We accept no responsibility for damage caused through not following this user information or through improper handling of the equipment 2 Intended use The AquaControl is an electronic water management control system It has been devel oped especially for rain water usage systems The device is intended for use in a domestic environment It can be used with a wide variety of tank s...

Страница 9: ...d time are possible Dialogue oriented user guidance choice of language Equipment indication using 3 additional LED Supervision of the measurement pick up and the sensor Error indication in simple text Technical data Control electronics Measurement sensors Operating voltage 230V AC Measurement voltage 12V DC Fused 50mA slow blow Measurement frequency 0 2 20 kHz Power consumption 3VA Data cable leng...

Страница 10: ...play will then show a warning that describes the cause of the fault in plain text 4 Assembly 4 1 Control system The mains plug of the device serves as an on off switch Before opening the equipment pull the plug out from the mains socket Loosen the fastening screws of the lower cover 6 and remove the cover Mark out drilling points and drill according to sketch Fasten the device with the enclosed in...

Страница 11: ...the points that are showing themselves on the outside of the tank must be blunted to avoid injury 24 2 Measure the height from the bottom of the tank 23 to the end of the terminals 15 and 16 on the measurement pick up 28 3 Shorten the connection cable to suit the measured height 4 Connect the sensor cable to the sensor as described in the following instructions Remove between 5 7 mm of the insulat...

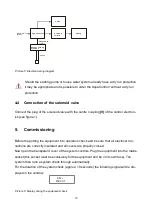
Страница 12: ...rofessional practice to constitute a correct completion of the sensor technology A protective cable conduit must be used The data cable is not suitable for installing directly in the earth The end of the data cable that is still unconnected is fitted with a plug connector This is to be plugged into the appropriate socket 7 of the system control Diagram 2 on page 3 makes clear the interrelation Not...

Страница 13: ... electrical con nections are correctly insulated and all covers are properly closed Now open the transparent cover of the system controls Plug the equipment into the mains socket this socket must be exclusively for the equipment and be on its own fuse The system then runs a system check through automatically For the duration of the system check approx 10 seconds the following signal will be dis pl...

Страница 14: ...ments of the individual users system The required set tings are easily programmed There are four buttons for this purpose All necessary pro gramming data entries follow a menu displayed by the LCD Begin the programming of the settings by pressing the button marked MENU With the buttons or the menu may be scrolled backwards and forwards With the respective menu point shown the values may be altered...

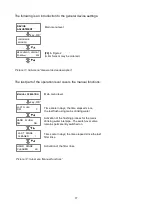
Страница 15: ...ated in the system control is introduced to familiarise the user in diagram 9 To bring up the menu press and hold the MENU button for longer than 5 seconds All outlets are inactive when the menu level has been activated The operation of the device is suspended The system control switches automatically back to the operating mode when no entries have been received for approximately 30 seconds Key ME...

Страница 16: ...The numerical value is always smaller than with Valve OFF DW INTERVAL 0 14 DAYS 14 Flush the drinking water supply piping every 14 days The value 0 switches the flushing off Flush the drinking water supply pipes for 30 seconds DW DURATION 0 60 SEC 30 Cleaning the rainwater filter every 14 days The value 0 switches the cleaning process off CLEANER INTERVAL 0 14 DAYS 14 Cleaning the rainwater filter...

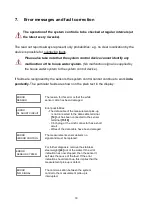
Страница 17: ... LENGHT 30 600cm 200 Picture 11 Sub menu General device description Main menu level MANUAL OPERATION LAST FLUSH DW 0 key OK HAND FLUSH DW NO Time scale in days the time elapsed since the last flush using mains drinking water LAST RINSE CLEANER 1 Time scale in days the time elapsed since the last filter rinse Activation of the filter rinse Main menu level Activation of the flushing process for the ...

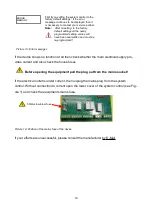
Страница 18: ...18 ERROR SENSOR The reason for this error is that the white sensor cable has been damaged ERROR DL SHORT CIRCUIT Error possibilities The data cable of the measurement pick up is not connected to the data cable terminal 14 but has been connected to the sensor terminal 15 16 Cinch plug or the cinch connector has a short circuit Wires of the data cable have been damaged ERROR SENSOR CONTROL The measu...

Страница 19: ...ontrol see Fig ure 1 and check the equipments mains fuse If your efforts are unsuccessful please consult the manufacturer by E Mail 19 Picture 13 Error messages ERROR MEMORY First try re setting the system control to the factory default settings If the error message continues to be displayed then it is necessary to contact your service partner Note After re setting to the factory default settings ...

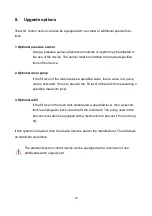
Страница 20: ...ve or a pump can be activated This is to prevent the fill level of the tank from exceeding a specified maximum level 3 Optional refill If the fill level in the main tank sinks below a specified level then a second tank is employed to back up and refill the main tank The pump used in this process must also be equipped with a mechanism to prevent it from running dry If this system is required then t...

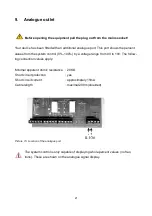
Страница 21: ...ntrol 0 100 by a voltage range from 0V to 10V The follow ing connection values apply Minimal apparent ohmic resistance 20KΩ Short circuit protection yes Short circuit current approximately 15mA Cable length maximal 200m shielded The system control is only capable of displaying whole percent values no frac tions These are shown on the analogue signal display 21 Picture 15 Location of the analogue p...

Страница 22: ...rrent of 1A is switched The activation of this contact occurs as soon as one of the malfunctions listed under point 6 appears The following picture shows the location of the connections They become available as soon as the lower cover of the system control unit is opened see diagram 1 Explanation of terms COM is the common port NC is coupled to the COM port when there is no current NO is connected...

Страница 23: ...ation sign to inform that a rainwater usage system is in stalled in the locality Notification signs marking the rainwater outlets Notification signs marking the rainwater installations network Backflow prevention e g a non return check valve Frost free installation Reservoir tank with air bleeding ventilation No diameter reduction in the drainage system EN 752 Technical regulations in relation to ...

Страница 24: ...einland net Mail info AS Prenzlau de We prefer to receive an E Mail if you must contact us then be sure to enter the serial number of your controller that begins with AS The serial number is found on the name type label see 6 in Figure 1 24 Old equipment may not be disposed of in the house refuse It must be brought to the recognised professional recycling depot Please help ensure your old electron...

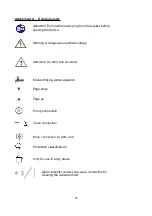
Страница 25: ...f dangerous electrical voltage Attention An error has occurred Mains drinking water operation Page down Page up Pump connection Valve connection Main connection for data lead Protection classification I Only for use in a dry areas Alarm indicator contact and valve connection for cleaning the rainwater filter 25 ...

Страница 26: ...he equipment pull the plug out from the mains socket Connect the filter flush valve to the connections 3 and 5 An existing protective conductor connection must be integrated into the protective conductor system Connect the protective conductor to the PE connection 26 ...

Страница 27: ...Space for your notes 27 ...

Страница 28: ...7 02 2018 Formatting A5 SU AQX 3 5 27 01 2020 Formatting A4 SU AQX 3 6 07 09 2020 Use of an RCD required SU Purchase date Device serial number Type AS AQ Design and specifications are subject to change without notice Dated September 2020 man_AQX_3 6_eng odt 28 ...

Отзывы: