background image

Installation 

14

333011D

Grounding

The following are minimum grounding requirements for 
a basic electrostatic system. Your system may include 
other equipment or objects which must be grounded. 
Check your local electrical code for detailed grounding 
instructions. Your system must be connected to a true 
earth ground. 

Pump: 

ground the pump by connecting a ground 

wire and clamp as described in your separate pump 
instruction manual.

Electrostatic Air Assisted Spray Gun:


ground the 

gun by connecting the Graco Grounded Turbine Air 
Hose to the turbine air inlet and connecting the air 
hose ground wire to a true earth ground. See 

Check 

Electrical Grounding, 

page 14.

Air compressors and hydraulic power supplies: 

ground the equipment according to the manufac-
turer's recommendations. 

All air and fluid lines


must be properly grounded.

All electrical cables

 must be properly grounded.

All persons entering the spray area:


shoes must 

have conductive soles, such as leather, or personal 
grounding straps must be worn. Do not wear shoes 
with non-conductive soles such as rubber or plastic.

Object being sprayed: 

keep the workpiece hang-

ers clean and grounded at all times. Resistance 
must not exceed 1 megohm. 

The floor of the spray area: 

must be electrically 

conductive and grounded. Do not cover the floor 
with cardboard or any non-conductive material 
which would interrupt grounding continuity. 

Flammable liquids in the spray area: 

must be 

kept in approved, grounded containers. Do not use 
plastic containers. Do not store more than the quan-
tity needed for one shift. 

All electrically conductive objects or devices in the 
spray area

 including fluid containers and wash 

cans, must be properly grounded.

Fluid and waste containers:

 ground all fluid and 

waste containers in the spray area. Do not use pail 
liners unless they are conductive and grounded. 
When flushing the spray gun, the container used to 
catch the excess fluid must be electrically conduc-
tive and grounded.

All solvent pails:


use only approved, grounded 

metal containers, which are conductive. Do not use 
plastic containers. Use only non-flammable sol-
vents. Do not store more than the quantity needed 
for one shift.

Check Electrical Grounding

Graco Part No. 241079 Megohmmeter is available as an 
accessory to check that the gun is properly grounded.

1. Have a qualified electrician check the electrical 

grounding continuity of the spray gun and turbine air 
hose.

2. Make sure the turbine air hose (B) is connected and 

the hose ground wire is connected to a true earth 
ground (N).

3. Turn off the air and fluid supply to the gun. The fluid 

hose must not have any fluid in it.

4. Measure the resistance between the turbine air inlet 

fitting (TA) and a true earth ground (N). 

a.

If using a black or gray turbine air hose,

 use a 

Megohmmeter to measure the resistance. Use 

When operating the electrostatic gun, any 
ungrounded objects in the spray area (people, con-
tainers, tools, etc.) can become electrically charged. 
Improper grounding can result in static sparking, 
which can cause a fire, explosion, or electric shock. 
Ground all equipment, personnel, object being 
sprayed, and conductive objects in or close to the 
spray area. Resistance must not exceed 1 megohm. 
Follow the grounding instructions below.

Megohmmeter Part No. 241079 (AA-see F

IGURE

 8) is 

not approved for use in a hazardous area. To reduce 
the risk of sparking, do not use the Megohmmeter to 
check electrical grounding unless: 

The gun has been removed from the hazardous area

Or


All spraying devices in the hazardous area are turned 
off, ventilation fans in the hazardous area are 
operating, and there are no flammable vapors in the 
area (such as open solvent containers or fumes from 
spraying).

Failure to follow this warning could cause fire, 
explosion, and electric shock and result in serious 
injury and property damage.

Содержание HA1M10

Страница 1: ...p IIA spray materials For professional use only 100 psi 0 7 MPa 7 bar Maximum Air Inlet Press 3000 psi 21 MPa 210 bar Maximum Working Fluid Pressure Important Safety Instructions Read all warnings and...

Страница 2: ...8 Spraying 18 Triggering the Fluid Alone 18 Shutdown 18 Maintenance 19 Daily Care and Cleaning Checklist 19 Flushing 19 Clean Outside of Gun 20 Clean the Spray Gun 20 Check for Fluid Leakage 21 Electr...

Страница 3: ...rovals Related Manuals Part No kV Standard Model Smart Model Bottom Manifold Rear Manifold HA1M10 85 HA1T10 85 HA2M10 85 HA2T10 85 0 24 mJ FM14ATEX0081 EN 50050 1 Ta 0 C 50 C Manual No Description 332...

Страница 4: ...Use and clean equipment only in well ventilated area Interlock the gun air supply to prevent operation unless ventilating fans are on Use cleaning solvents with highest possible flash point when flus...

Страница 5: ...HAZARD Misuse can cause death or serious injury Do not operate the unit when fatigued or under the influence of drugs or alcohol Do not exceed the maximum working pressure or temperature rating of the...

Страница 6: ...The air spins the turbine which then provides electrical power to the internal high voltage power supply The fluid is charged by the spray gun electrode The charged fluid is attracted to the nearest...

Страница 7: ...eeds contact your Graco distributor FIG 1 Typical System Installation Hazardous Area Non Hazardous Area A Gun B Graco Grounded Turbine Air Hose C Atomizer Fan and Cylinder Air D Air Supply and control...

Страница 8: ...e Manifold Fittings and Indicators A1 Atomization Air Inlet Fitting A2 Fan Air Inlet Fitting CYL Cylinder Air Inlet Fitting 1 Fiber Optic Fitting Transmit Operational on Smart models only 2 Fiber Opti...

Страница 9: ...rain valve at the pump out let Filtering the fluid will help remove coarse parti cles and sediment that could clog the spray tip The fluid drain valve is required in your system to assist in relieving...

Страница 10: ...ntilation fans to prevent the power supply from operating without ventilating fans on Non Hazardous Area Hazardous Area W See Warning above K L L L Manifold Back View A Air Hose Ground Wire B Graco Gr...

Страница 11: ...and FIGURE 5 shows the manifold connections Connect the air and fluid lines as instructed below 1 Connect the Graco Grounded Turbine Air Hose B to the gun s turbine air inlet TA and connect the hose...

Страница 12: ...onse use the shortest hose length possible 1 Fiber Optic Fitting Transmit Operational on Smart models only Connect the Graco Fiber Optic cable see page 13 2 Fiber Optic Fitting Receive Operational on...

Страница 13: ...Port 2 of the Control Module For a 2 Gun System 1 Connect Port 1 of the gun 2 manifold to Port 5 of the Control Module 2 Connect Port 2 of the gun 2 manifold to Port 6 of the Control Module FIG 6 Mak...

Страница 14: ...s they are conductive and grounded When flushing the spray gun the container used to catch the excess fluid must be electrically conduc tive and grounded All solvent pails use only approved grounded m...

Страница 15: ...eak in the stream shut off the stopwatch 3 Record the fluid type elapsed time and size of the viscosity cup 4 Compare to the chart supplied by viscosity cup manufacturer to determine your fluid viscos...

Страница 16: ...ect a Spray Tip The fluid output and pattern width depend on the size of the spray tip the fluid viscosity and the fluid pressure Use the Spray Tip Selection Chart page 45 as a guide for selecting the...

Страница 17: ...maller particle size indicates improved atomi zation 5 Continue to increase the fluid pressure and spray test patterns Do not exceed 3000 psi 21 MPa 210 bar fluid pressure When the particle size remai...

Страница 18: ...ssure to the atomiza tion A1 and fan A2 air lines using the bleed type air shutoff valves 2 Apply 60 psi 4 2 bar 0 42 MPa air pressure to the cylinder air fitting CYL to trigger the fluid Shutdown 1 F...

Страница 19: ...the gun See Flushing page 19 Clean the fluid and air line filters Clean the outside of the gun See Clean Out side of Gun page 20 Clean the air cap spray tip and tip guard daily minimum Some applicati...

Страница 20: ...into the air passages Whenever possible point the gun down when cleaning it See FIGURE 13 If it appears that there is paint inside the air pas sages remove the gun from the line for servicing 5 Dampen...

Страница 21: ...operation periodically check all openings of the gun shroud ZZ for the presence of fluid See FIGURE 12 Fluid in these areas indicates leakage into the shroud which could be caused by leaks at the flu...

Страница 22: ...The resistance should be 130 160 megohms for 85kV guns See FIGURE 18 If outside this range replace the power supply If in range and there are performance concerns go to Test Barrel Resistance page 23...

Страница 23: ...resistance between the conductive rod B and the wire lead at the bottom of the conductive ring groove 4 If the resistance is in range replace the conductive ring 33 with a new one Insert the ends of t...

Страница 24: ...ys follow the Pressure Relief Procedure on page 16 when you stop spraying and whenever you are instructed to relieve the pressure Problem Cause Solution Fluttering or spitting spray No fluid Refill su...

Страница 25: ...Reduce viscosity Fluid leaks from the fluid packing area Worn fluid needle packings or rod Replace fluid needle assembly 8 see Fluid Needle Replacement page 31 Air leaks from the air cap Worn piston s...

Страница 26: ...d see Piston Repair page 32 Actuator arm 15 is out of position Check actuator arm and nuts See page 32 Air leaks from manifold Gun is not securely tightened to manifold Tighten manifold screws Worn or...

Страница 27: ...31 Faulty turbine See Turbine Removal and Replacement page 34 No power Replace power supply see page 33 ES indicator light is not lit standard models only No power Check power supply turbine turbine...

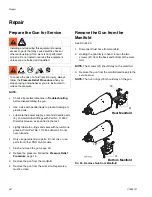
Страница 28: ...the gun from the work site Repair area must be clean Remove the Gun from the Manifold See FIGURE 20 1 Disconnect fluid hose from manifold 2 Holding the gun firmly in hand loosen the two screws 21 from...

Страница 29: ...rn more 8 Check that the spray tip gasket 3a is in place Align the spray tip tab with the groove in the air cap 25 Install the spray tip 3 in the air cap 9 Make sure that the electrode 25a is installe...

Страница 30: ...plastic extension on the end of the fluid tube 35 6 Apply low strength thread sealant to the fluid tube nut threads 7 Install the fluid tube into the gun barrel and tighten the top nut D hand tight th...

Страница 31: ...Place the 2 mm ball end wrench 45 in the back of the fluid needle assembly Push the tool in and turn it coun terclockwise about 12 full turns to unthread the nee dle 6 Using the multi tool 48 pull ba...

Страница 32: ...nut 16a onto the piston rod 11b 2 Position the parts so there is a 0 125 in 3 mm gap between the actuator arm 15 and the fluid packing rod nut E This allows the atomizing air to actuate before the fl...

Страница 33: ...fitting 32 and torque to 20 30 in lb 2 3 3 4 N m Make sure the top nut D remains tight NOTE Use two wrenches to install the fluid tube fitting C 5 Install and adjust the actuator arm 15 jam nut 16a an...

Страница 34: ...er supply spring 7a are in place Replace gas ket 9 if damaged Assemble the barrel 1 to the gun body 10 See Barrel Installation page 42 10 See Test Gun Resistance page 22 Turbine Removal and Replacemen...

Страница 35: ...s must be oriented as shown in FIGURE 34 13 Carefully press the coil assembly 8a into the front of the housing 8d while aligning the pin on the coil with the slot in the housing The 3 wire connector P...

Страница 36: ...Parts 36 333011D Parts Standard Pro Xp Auto AA Gun Models HA1T10 Rear Manifold HA2T10 Bottom Manifold HA2T10 Torque to 20 in lbs 2 N m 1 1...

Страница 37: ...Auto pack of 2 2 23 24W411 FITTING Adapter M12 TO 1 4 LH XP 1 24 24N793 RING retainer assy includes 24a 1 24a 198307 PACKING u cup UHMWPE 1 25 24N727 See Air Cap Assembly page 40 1 25a 24N643 ELECTRO...

Страница 38: ...Parts 38 333011D Smart Pro Xp Auto AA Gun Models HA1M10 Rear Manifold HA2M10 Bottom Manifold HA2M10 Torque to 20 in lbs 2 N m 1 1...

Страница 39: ...k of 2 2 23 24W411 FITTING Adapter M12 TO 1 4 LH XP 1 24 24N793 RING retainer assy includes 24a 1 24a 198307 PACKING u cup UHMWPE 1 25 24N727 See Air Cap Assembly page 40 1 25a 24N643 ELECTRODE packag...

Страница 40: ...5b 25c 25d Ref No Part No Description Qty 3a 183459 GASKET tip not shown See page 36 5 25a 24N643 ELECTRODE package of 5 1 25b 24N734 O RING PTFE package of 5 1 24E459 O RING PTFE package of 10 1 25c...

Страница 41: ...es shaft and mag net 1 8d 24N707 HOUSING includes item 8f 1 8e FAN part of item 8b 1 8f CAP housing part of item 8d 1 8g 110073 O RING 1 8h 24N709 CLIP package of 5 one clip included with item 15b 1 9...

Страница 42: ...ecessary to replace damaged ends on one cable assembly AirFlex Flexible Grounded Air Hose Grey 100 psi 7 bar 0 7 MPa Maximum Working Pressure 0 315 in 8 mm ID 1 4 npsm f x 1 4 npsm f left hand thread...

Страница 43: ...sm f x 1 4 npsm f left hand thread Part No Description 222011 Ground wire for grounding pump and other components and equipment in the spray area 12 gauge 25 ft 7 6 m 16P802 English Warning Sign Avail...

Страница 44: ...66 mm 2 5 in 63 mm 11 in 279 mm 8 2 in 208 mm 2 9 in 73 mm 5 0 in 127 mm 10 4 in 265 mm 0 53 in 13 5 mm 2x 1 4 20 UNC 2 6 in 66 mm 2 5 in 623 mm 5 8 in 147 mm 8 0 in 202 mm 1 80 in 45 72mm 90 in 22 8...

Страница 45: ...10 0 0 3 13 0 0 4 211 311 411 511 611 711 0 013 0 330 13 0 0 4 16 9 0 5 213 313 413 513 613 713 813 0 015 0 381 17 0 0 5 22 0 0 7 215 315 415 515 615 715 815 0 017 0 432 22 0 0 7 28 5 0 85 217 317 41...

Страница 46: ...in 305 mm in mm at 600 psi 4 1 MPa 41 bar at 1000 psi 7 0 MPa 70 bar 6 8 150 200 8 10 200 250 10 12 250 300 12 14 300 350 14 16 350 400 16 18 400 450 Spray Tip 0 008 0 203 8 5 025 11 0 0 32 608 0 010...

Страница 47: ...per ISO Standard 9216 at 40 psi 90 4 dB A at 100 psi 105 4 dB A at 0 28 MPa 2 8 bar 90 4 dB A at 0 7 MPa 7 bar 105 4 dB A Sound Pressure measured 1 m from gun at 40 psi 87 dB A at 100 psi 99 dB A at 0...

Страница 48: ...purchaser transportation prepaid If inspection of the equipment does not disclose any defect in material or workmanship repairs will be made at a reasonable charge which charges may include the costs...

Отзывы: