background image

16          308741

Daily Gun Care, Flushing, and Cleaning

14. Trigger the gun while you install the fluid nozzle

(12) with the gun tool (28). Tighten the nozzle
securely to 125–135 in-lb (14–15 N

S

m) to obtain a

good seal.

15. Install the air cap retaining ring (15) and air

cap (14).

Fig. 23

12

14, 15

7045A

28

Torque to 125–135 in-lb (14–15 N

S

m)

1

1

16. Dampen a soft cloth with solvent and wring-out the

excess. Point the gun down and wipe off the
outside of the gun.

Fig. 24

7047A

17. After cleaning the gun, lubricate the following parts

with lubricant 111265 daily:

D

Fluid adjustment knob threads

D

Trigger pivot pin

D

Fluid needle shaft

Fig. 25

Lubricate

Lubricate

07032A

Содержание Delta Spray 239559

Страница 1: ...m Compliant Inbound Air Pressure U S Patent 6 019 293 Taiwan Patent 199585 Taiwan Patent 199601 Table of Contents Symbols 2 Warnings 2 Selection Charts 4 Air Flow and Atomizing Pressure 6 Typical Installation 7 Setup 8 Operation 12 Daily Gun Care Flushing and Cleaning 13 Troubleshooting 17 Service 18 Parts 24 Accessories 28 Dimensions 30 Technical Data 30 Graco Standard Warranty 32 Graco Informati...

Страница 2: ...nt daily Repair or replace worn or damaged parts immediately D Use this equipment only in low pressure air spray systems D Do not exceed the maximum working pressure of the lowest rated system component This equip ment has a 100 psi 0 7 MPa 7 bar maximum working fluid and air pressure D Route the hoses away from the traffic areas sharp edges moving parts and hot surfaces Do not expose Graco hoses ...

Страница 3: ...sult in fire or explosion and serious injury D Provide fresh air ventilation to avoid the buildup of flammable fumes from solvent or the fluid being sprayed D Extinguish all open flames or pilot lights in the spray area D Electrically disconnect all equipment in the spray area D Keep the spray area free of debris including solvent rags and gasoline D Do not turn on or off any light switch in the s...

Страница 4: ... 239561 239602 192321 pressure 0 055 1 397 16 406 medium 12 18 0 36 0 54 239562 239603 192322 pressure 0 070 1 778 17 432 medium heavy 16 20 0 48 0 60 239563 239604 192322 pressure 0 086 2 184 17 432 heavy 18 22 0 54 0 66 239564 239605 192323 pressure 0 110 2 790 18 457 heavy 20 24 0 60 0 72 239565 239606 192321 pressure 0 042 1 067 16 406 light medium 8 14 0 24 0 42 239566 239607 192321 pressure ...

Страница 5: ...SAP 6 152 measured with gun nozzle 10 in 254 mm from target surface Selecting the Proper Needle Nozzle Kit The spray gun s needle nozzle kits range in size to provide different fluid flow rates As a general guideline use the fluid nozzle that will give the required flow with the needle fully triggered at the lowest fluid pressure For low flow rates or light viscosity fluid select the smaller nozzl...

Страница 6: ... 70 AIR FLOW scfm GUN INLET PRESSURE psi Atomizing Air Pressure inlet pressure versus atomizing pressure 0 2 4 6 8 10 12 14 16 18 20 10 20 30 40 50 60 70 GUN INLET PRESSURE psi NOMINAL ATOMIZING PRESSURE psi Gun Inlet Pressure psi kPa bar Nominal Atomizing Pressure psi kPa bar 10 70 0 7 1 7 0 1 20 140 1 4 4 28 0 2 30 210 2 1 7 48 0 4 40 280 2 8 10 70 0 7 50 345 3 4 13 91 0 9 60 410 4 1 16 111 1 1 ...

Страница 7: ...al applica tions while easily operating from any paint delivery system including cups pressure pots or remote pumps for production line operation The spray gun typically utilizes 40 psi 280 kPa 2 8 bar inbound air pressure to produce high quality paint finishes at 10 psi 70 kPa 0 7 bar atomizing air pres sure The air regulator must have a minimum air flow capacity of 30 scfm at 100 psi 0 7 MPa 7 b...

Страница 8: ... of the air hose D to a reg ulated air supply line H NOTE Fig 2 shows the filter G air regulator F and air shut off valve E on the air supply line 01990 D F G Fig 2 H E 2 Connect the Fluid Hose NOTE D Before connecting the fluid line blow it out with air and flush it with solvent Use solvent which is compatible with the fluid to be sprayed D Install a fluid regulator L on the fluid line to control...

Страница 9: ...adjustment knob 13a fully clockwise Refer to Fig 12 page 11 Vertical Pattern Horizontal Pattern Fig 6 02020 6 Adjust the Spray Pattern WARNING COMPONENT RUPTURE HAZARD Do not exceed the 100 psi 0 7 MPa 7 bar maximum fluid and air pres sure of this gun Higher pressures can cause parts to rupture and result in serious injury Follow these steps to establish the correct fluid flow and air flow A Turn ...

Страница 10: ...ill maintain the same flow rate but slow down the fluid stream velocity When air is applied this allows the air to act on the fluid longer and improve the atom ization D If further fluid flow restriction is needed at the gun turn the fluid adjustment knob 21 clockwise to reduce the volume of fluid output by limiting the needle travel Fig 11 21 close 7039A WARNING PRESSURIZED EQUIPMENT HAZARD To av...

Страница 11: ... compliance The accessory Air Cap Verifica tion Kit is available to measure the atomizing pres sure at the air cap Fig 13 F 01997 Pressure Drop Chart 5 16 inch 7 9 mm I D hose Recommended hose size to minimize excessive pressure drop Expected pressure drops measured using 25 ft 7 625 m long hose with gun triggered Air Regulator Pressure Setting psi kPa bar Gun Inlet Pressure psi kPa bar 18 5 128 1...

Страница 12: ...the HVLP spray gun instead of a conven tional air spray gun you may need to use a slightly slower hand movement and make fewer passes with the gun to coat a part This is due to the reduced spray velocity produced by lower HVLP air pressures along with a larger fluid particle size because there is less air to blow off solvents than what is produced by conven tional air spray Take care to avoid runs...

Страница 13: ...TION Solvent left in gun air passages could result in a poor quality paint finish Do not use any cleaning method which may allow solvent into the gun air passages 02055 02027 Do not immerse the gun in solvent Do not wipe the gun with a cloth soaked in solvent ring out the excess Do not point the gun up while cleaning it Do not use metal tools to clean the air cap holes as this may scratch them scr...

Страница 14: ...nnect the fluid supply hose J and air supply hose D from the gun Fig 15 J D 7044A 3 Connect the solvent supply hose N to the gun Fig 16 N 7109A 4 Point the gun down into a grounded metal con tainer and flush the gun with solvent until all traces of paint are removed from the gun passages 7035A Fig 17 5 Turn off the solvent supply 6 Relieve the pressure Disconnect the solvent supply 7 Disconnect th...

Страница 15: ... 11 Dip the end of a soft bristle brush into a compatible solvent Do not continuously soak the brush s bristles with solvent and do not use a wire brush Fig 20 02007 12 With the gun pointed down clean the front of the gun using the soft bristle brush and solvent Fig 21 7046A 13 Scrub the air cap retaining ring air cap and fluid nozzle with the soft bristle brush To clean out air cap holes use a so...

Страница 16: ...r cap retaining ring 15 and air cap 14 Fig 23 12 14 15 7045A 28 Torque to 125 135 in lb 14 15 NSm 1 1 16 Dampen a soft cloth with solvent and wring out the excess Point the gun down and wipe off the outside of the gun Fig 24 7047A 17 After cleaning the gun lubricate the following parts with lubricant 111265 daily D Fluid adjustment knob threads D Trigger pivot pin D Fluid needle shaft Fig 25 Lubri...

Страница 17: ...I D hose 2 Fluid pressure too low causing fluid flow to reduce when gun is elevated 3 Raise fluid pressure at source or use a smaller fluid nozzle Pattern becomes off set or heavy on ends Air cap horn holes plugged or dam aged Clean air cap horn holes with non metallic item such as a toothpick or replace air cap Gun fluid pressure is too high with gun triggered Using needle nozzle kit with too sma...

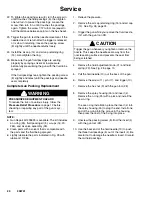
Страница 18: ...retaining ring 15 and air cap 14 See Fig 26 3 Trigger the gun while you remove the fluid nozzle 12 with the gun tool 28 CAUTION Trigger the gun whenever you tighten or remove the nozzle This keeps the needle seat away from the nozzle seating surface and prevents the seat from being scratched 12 14 15 28 7028A Fig 26 4 Remove the fluid adjustment knob 21 and fluid spring 23 See Fig 28 5 Pull the fl...

Страница 19: ...uid adjustment knob threads 21 and install the fluid spring 23 and adjustment knob 19 Install the trigger 10 pin 17 and screw 11 Torque the screw to 20 30 in lb 2 3 3 4 NSm 20 To avoid galling of the fluid nozzle seat in the insert 4 apply a thin film of lubricant to the seat Trigger the gun while you install the fluid nozzle 12 with the gun tool 28 Torque the nozzle securely to 145 155 in lb 16 1...

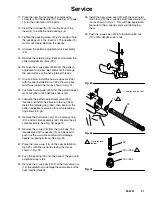
Страница 20: ...udes an o ring 2b fluid packing kit 5 u cups 16 20 25b and air valve assembly 26 D Clean parts with a solvent that is compatible with the parts and the fluid being sprayed D Lightly lubricate the parts indicated in Fig 28 with lubricant 111265 1 Relieve the pressure 2 Remove the air cap retaining ring 15 and air cap 14 See Fig 26 page 18 3 Trigger the gun while you remove the fluid nozzle 12 with ...

Страница 21: ...o the nut 25a Install the retaining ring 25d then back out the pattern adjustment valve as far as the retaining ring allows it to go 20 Remove the fluid valve nut 19 air valve spring 22 and air valve assembly 26 Discard the air valve assembly See Fig 28 page 19 21 Remove the u cup 16 from the gun body The threaded end of the needle 13 can be used to push out the u cup Be careful not to damage need...

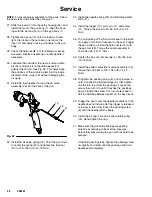
Страница 22: ... and screw 11 Torque the screw to 20 30 in lb 2 3 3 4 NSm 35 To avoid galling of the fluid nozzle seat in the insert 4 apply a thin film of lubricant to the seat Trigger the gun while you install the fluid nozzle 12 with the gun tool 28 Torque the nozzle securely to 145 155 in lb 16 17 NSm 36 Tighten the hex nut 9 securely to 125 135 in lb 14 15 NSm 37 Install the pattern adjustment valve assembly...

Страница 23: ...308741 23 Notes ...

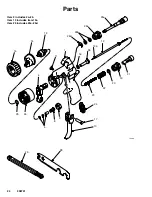
Страница 24: ...24 308741 Parts 7586A 1 4 2a 2b 5 8 9 10 11 17 12 13 14 13a 15 26 16 22 20 23 19 24 25c 21 25a 25b 25d Item 2 includes 2a 2b Item 13 includes item 13a Item 25 includes 25a 25d 29 28 ...

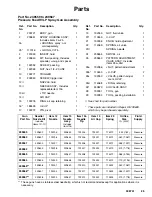
Страница 25: ...djust ment HVLP 1 25d 114068 S RING retaining 1 26 240823 AIR VALVE ASSY 1 28 192281 TOOL gun 1 29 192282 TOOL packing installation 1 l See chart for part number These parts are included in Repair Kit 239639 which may be purchased separately Gun Part No Needle Nozzle Kit Includes items 12 13 Item 12 Nozzle Item 13 Needle Assy Includes item 13a Item 13a Needle Tip Item 14 Air Cap Item 23 Spring Ori...

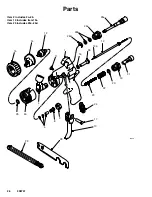
Страница 26: ...26 308741 Parts 7585A 1 4 2a 2b 5 8 9 10 11 17 12 13 14 13a 15 26 16 22 20 23 19 24 25c 21 25a 25b 25d Item 2 includes 2a 2b Item 13 includes item 13a Item 25 includes 25a 25d 29 28 ...

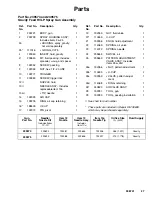
Страница 27: ... Ref No Part No Description Qty 19 192355 NUT fluid valve 1 20 110453 U CUP 1 21 192266 KNOB fluid adjustment 1 22 114069 SPRING air valve 1 23 114072 SPRING needle 1 24 239655 SWIVEL air 1 25 239653 PATTERN ADJUSTMENT VALVE ASSY Includes items 25a 25d 1 25a 192356 S NUT pattern adjustment 1 25b 110453 S U CUP 2 25c 192353 S VALVE pattern adjust ment 1 25d 114068 S RING retaining 1 26 240823 AIR V...

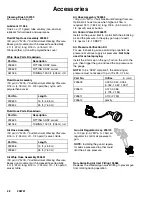
Страница 28: ...sed hose flexibility 4 ft 1 22 m long 5 16 in 7 94 mm I D 1 4 npsm f swivel nitrile Air Hose Assembly 185353 100 psi 0 7 MPa 7 bar Maximum Working Pressure Optional air hose for use when higher air flow is required 25 ft 7 625 m long 3 8 in 9 53 mm I D 1 4 npsm f swivel buna n Air Control Valve Kit 243670 Install on the gun air inlet to control both the atomizing air and the pressure in the spray ...

Страница 29: ...er capacity 304 stainless steel cup Includes air pressure regulator and gauge 4 ft 1 2 m length air and fluid hose with 1 4 npsm f swivel ends pressure relief valve and rigid hook handle 7623A SST Pressure Cup Kit 239803 with double air regulator 1 qt 0 95 liter capacity 304 stain less steel cup Includes a pressure relief valve a 0 100 psi 0 0 7 MPa 0 7 bar air regulator for gun atomization and a ...

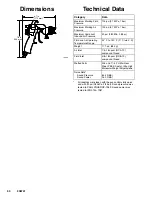
Страница 30: ...re Range 32_ F to 140_ F 0_ C to 60_ C Weight 17 1 oz 484 g Air Inlet 1 4 18 npsm R1 4 19 compound thread Fluid Inlet 3 8 18 npsm R3 8 19 compound thread Wetted Parts 304 and 17 4 PH Stainless Steel PEEK Acetal Ultra High Molecular Weight Polyethylene Noise Data Sound Pressure Sound Power 84 4 Db A 94 0 Db A All readings were taken with the gun controls fully open and with 40 psi 280 kPa 2 8 bar S...

Страница 31: ...308741 31 Notes ...

Страница 32: ...breach of warranty shall be as set forth above The buyer agrees that no other remedy including but not limited to incidental or consequential damages for lost profits lost sales injury to person or property or any other incidental or consequential loss shall be available Any action for breach of warranty must be brought within two 2 years of the date of sale Graco makes no warranty and disclaims a...

Отзывы: