


13
(ID: 040708)
1/4" X 2" Phillips
Pan Head Screw
1/4" X 3/4" Phillips
Pan Head Screw
3/16" Flat Washer
1/4" Jam Nut
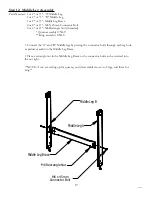
King Table
Assembly
Queen Table
Assembly
Crib Table
Assembly
Track Support Splice "B"
Track Support Splice "A"
1/4" X 3/4" Phillips
Pan Head Screw
Table Splice
Table Splice
1/4" X 3/4" Phillips
Pan Head Screw
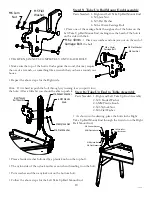
• Place a M6 x 50mm phillips pan head screw
through the center two holes in the aluminum track
support and then through the Table Splice. Then
place a washer and jam nut onto the ends of the
screws.
KING ASSeMBLY:
• Place Table #3 next to Table #4, and follow the
above steps to compete your king set up.
• The M6 X 20mm phillips
pan head screws will go
through the end two holes
with a washer and jam nut
on the end.
• Follow the above steps
for the other side.
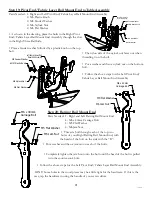
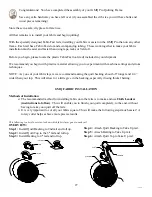
Step 6: Table Splice to Table Assembly
Parts Needed: 1- Crib or Queen* or King** Table
1 or 2* or 3**- Table Splice
4 or 8** or 12**-M6 x 20mm Phillips Pan Head Screw
• Place a Table Splice over the seam between
Table #2 and #3 (if you are setting up in Queen
or King), and follow the above directions.
• Place a Table Splice over the seam between
Table #3 and #4 (if you are setting up in King).
• Thread the philips pan head screws through the top
of the table with the ends screwing into the Table
Splice under the table, as pictured left and above).
• Place a Table Splice over the seam in the table (between Table #1 and #2).
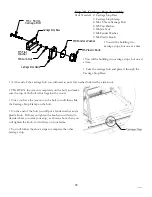
M6 Jam Nut
M5 FLat Washer
M6 x 20mm Philips
Pan Head Screw
M6 x 50mm
Philips Pan
Head Screw
M6 x 20mm Philips Pan
Head Screw
M6 x 20mm Philips Pan Head
Screw


