11
EN
■
Do not reach into the rotating inserts or the feed chute during operation.
■
Keep body parts, hair and clothing away from rotating parts of the device.
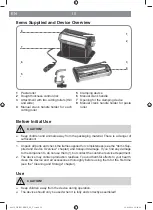
You can make three different sorts of pasta:
Pasta roller
For initial rolling of the
dough and making lasa-
gne sheets
Cutting roller, thin
For making thin pasta
(2 mm), e.g. taglionlini
Cutting roller, wide
For making wide pasta
(6 mm), e.g. tagliatelle
1. Place the device onto the edge of a
fl
at, stable surface so
that you can attach the clamping device to the edge of the
table.
2. Place the clamping device into the opening provided for it
and use the clamping device to screw the device
fi
rmly to
the edge of the table.
3. To remove any possible dust from the device, guide a piece of dough through the
pasta roller and the cutting rollers. The dough which you use to do this should of
course not be used again.
4. Use the control dial to select the dough thickness you want (level 1 - 7):
–
Pull the control dial out a little,
–
turn it to the level you want
–
and then let go of the control dial again. The control dial must not be at an angle;
this means it is not locked on the level you want.
5. First place the prepared dough that has already been rolled once with a rolling pin
onto the pasta roller.
6. Insert the crank handle into the opening.
7. Turn the crank handle clockwise and slowly guide the dough through.
8. Once the dough has passed through, fold it in half and guide it through the pasta
roller again. Keep repeating this process until you get a smooth sheet of dough.
9. If you want to use one of the cutting rollers, place the at-
tachment with the cutting rollers onto the body of the ma-
chine using the hooks.
10. Place the manual crank handle into the opening for the cutting roller you want.
11. Turn the crank handle clockwise and slowly guide the dough through.
12. Allow the pasta dough to dry to the level speci
fi
ed in your dough recipe.
09952_DE-EN-FR-NL_A5_V1.indb 11
09952_DE-EN-FR-NL_A5_V1.indb 11
19.01.2016 16:18:51
19.01.2016 16:18:51
Содержание Z 09952
Страница 2: ...09952_DE EN FR NL_A5_V1 indb 2 09952_DE EN FR NL_A5_V1 indb 2 19 01 2016 16 18 43 19 01 2016 16 18 43 ...
Страница 23: ...09952_DE EN FR NL_A5_V1 indb 23 09952_DE EN FR NL_A5_V1 indb 23 19 01 2016 16 19 09 19 01 2016 16 19 09 ...
Страница 24: ...09952_DE EN FR NL_A5_V1 indb 24 09952_DE EN FR NL_A5_V1 indb 24 19 01 2016 16 19 09 19 01 2016 16 19 09 ...


