229
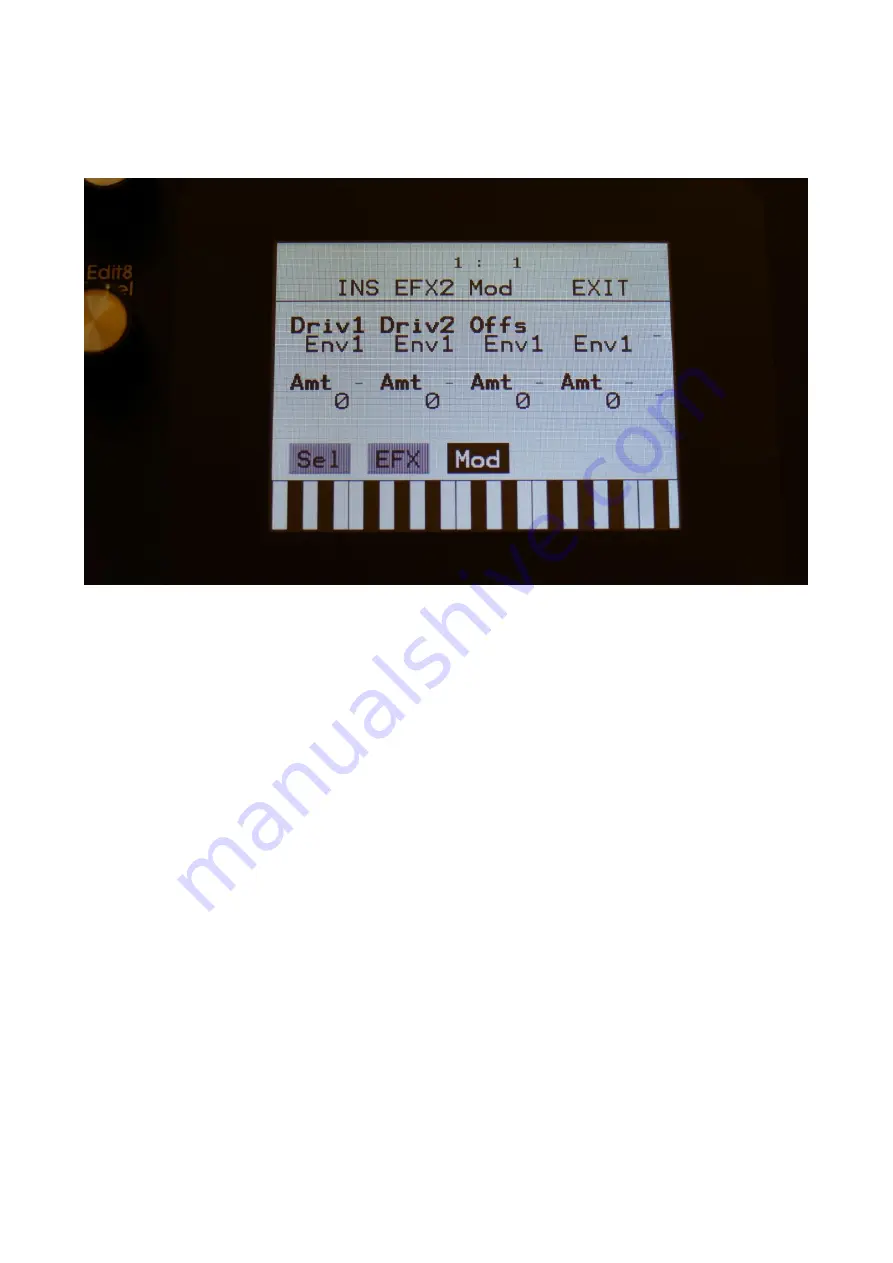
Distortion Modulation
Touch the Mod touch button, to access this page.
The 2 VU-meters at the right of the screen, shows the Effect input and output. The small VU-meters
next to the parameters, shows the activity of the selected modulation sources.
For each parameter, that can be modulated, it is possible to select a modulation source, and to
adjust the modulation amount. Only the positive modulation sources, can be selected by the Edit
Knobs. To make a modulation source negative, touch the modulation source parameter. For a
complete list of modulation sources, see the list in the start of this section.
The upper row of parameters
selects the modulation sources,
the lower row of parameters
(Labelled Amt) adjusts the modulation amount in the range 0 to 511.
The parameters on this page:
Driv1 and Driv2:
Modulates the drive parameter.
Offs:
Modulates the offset parameter.
Содержание Tiny LD
Страница 1: ...1 Gotharman s Tiny LD Granular Workstation User Manual V13 80 ...
Страница 21: ...21 ...
Страница 22: ...22 Turn it on Push the I on the power switch Your Tiny LD should now turn on ...
Страница 41: ...41 ...
Страница 50: ...50 Accessing The Synth Part Pages From the Preset Song Select screen Touch the EDIT field ...
Страница 59: ...59 To set the tunings for the keys G to B touch Tu2 to go to the next tuning page ...
Страница 102: ...102 From the Synth main page touch the box named OSC to enter the oscillator pages ...
Страница 103: ...103 Touch the SEL touch button to enter the oscillator mode selection page ...
Страница 104: ...104 Set the Mode parameter to Smp Now touch the SMP touch button to enter the sample selection page ...
Страница 108: ...108 Set the Bus parameter so that the VCA will output to 2 busses 1 2 3 4 5 6 or 7 8 Now touch the MOD touch button ...
Страница 109: ...109 Make sure that Pan is set to Man and pan Amt to 256 Exit the VCA pages to go back to the Synth main page ...
Страница 110: ...110 Touch the box named BUS to enter the audio bus pages ...
Страница 112: ...112 Touch the box named FLT to enter the digital filter pages ...
Страница 197: ...197 BPF Mix between the multimode filter A and the band pass filter B ...
Страница 205: ...205 On the third VCF page MO1 you can modulate parameter 1 and 2 and the names of these are shown ...
Страница 206: ...206 On the fourth VCF page MO2 you can modulate parameter 3 4 8 and the G Ray feedback parameter ...
Страница 207: ...207 The fifth VCF page MIX is exactly the same as for any other filter board ...
Страница 295: ...295 Fade When this parameter is turned up each grain will fade in and out to minimize clicks ...
Страница 313: ...313 Entering the Sequencer From the Preset Select Screen touch the EDIT field ...
Страница 314: ...314 Touch SEQ on the navigation bar in the top of the screen ...
Страница 347: ...347 On this page touch TRIG ...
Страница 351: ...351 You should now enter this page Touch the REC touch button ...
Страница 355: ...355 You should now have entered this page Touch NOTE TRACK 1 16 to enter the note track page ...
Страница 357: ...357 Touch MAIN ...
Страница 359: ...359 The audio track sample will be saved in this format Preset number _ Track number _ BPM _AUDTR ...
Страница 365: ...365 Middle Will move any values closer to the middle value Zero Will lower any values Full Will raise any values ...
Страница 378: ...378 More preset parameters Setup From the Preset Select page touch the Edit field ...
Страница 379: ...379 On the navigation bar at the top of the screen touch MOR ...
Страница 392: ...392 10 VCF10 SSI2140 50 User filter A filter board that can be defined by you or a third party 60 Dual SSI2140 filter ...
Страница 399: ...399 You are now back on the User filter page and the name has changed ...
Страница 406: ...406 Preset Song Mode Touch this to toggle between preset mode and song mode Song mode is described later in this manual ...
Страница 411: ...411 Touch SAVE when you are done Your preset will now be saved and Tiny LD will exit from the save pages ...
Страница 414: ...414 On the navigation bar at the top of the screen touch MOR ...
Страница 416: ...416 Now PRS turns into SONG and Tiny LD are in song mode If you would like to go back to preset mode just touch SONG ...
Страница 428: ...428 Touch SAVE when you are done Your song will now be saved and Tiny LD will exit from the save pages ...
Страница 439: ...439 You will now enter the Sample Edit page Touch the REC touch button to enter the Sample Rec page ...
Страница 444: ...444 Touch SAVE to save the new sample and return to the Sample Rec page ...
Страница 454: ...454 Tiny LD will now show When it has found some chop points it will return to the Chop page ...
Страница 456: ...456 Touch the sample slot 1 name to open the sample select page ...
Страница 457: ...457 Select the sampling touch OK and touch the OSC touchbutton ...
Страница 476: ...476 Tiny LD will write Saving Sample for some time and then it will jump back to the functions page ...
Страница 485: ...485 Touch the Import button Tiny LD will now import the selected file and show the progress on a progress bar ...
Страница 497: ...497 11 Touch the UPD button ...
Страница 500: ...500 Programming processor counter in the bottom counts up ...
Страница 501: ...501 15 When programming is done Tiny LD will ask you to restart it Please turn Tiny LD off and then on again ...
Страница 515: ...515 Opening MkI Place Tiny LD on a table ...
Страница 516: ...516 Remove the 4 screws in the corners of the left end panel using the Phillips screwdriver ...
Страница 517: ...517 Take the left end panel a bit out ...
Страница 519: ...519 Take the right end panel a bit out so it now should look like this ...
Страница 520: ...520 Remove the plastic frames from the end panels ...
Страница 521: ...521 It should now look like this ...
Страница 523: ...523 Put the box somewhere else so you have the front panel and the two end panels for themselves ...
Страница 524: ...524 Opening MkII Place Tiny LD MkII on a table in front of you so that it is turning the same way as on the picture ...
Страница 525: ...525 Remove the 2 hex screws located on the left side of the front facing panel using a T10 Torx ...
Страница 526: ...526 It should now look like this ...
Страница 527: ...527 Flip your Tiny LD MkII around so that the back is now facing towards you ...
Страница 528: ...528 Remove the 2 hex screws that are now on the left side of the rear panel using a T10 Torx ...
Страница 529: ...529 It should now look like this ...
Страница 530: ...530 Now grab the side panel draw it out and put it on a safe place ...
Страница 531: ...531 Right there might not be the safest place ...
Страница 532: ...532 Grab the bottom panel and slide it out ...
Страница 533: ...533 Like this And put it away ...
Страница 535: ...535 A closer look at the spacer and the connector ...
Страница 536: ...536 The MkII connectors ...
Страница 541: ...541 It should now look something like this ...
Страница 543: ...543 On the Tiny LD MkII a nylon screw is used to hold the filterboard in place ...
Страница 546: ...546 Place the plastic frame on the right end ...
Страница 547: ...547 Mount the right end panel and put the 4 screws back ...
Страница 548: ...548 It should now look like this ...
Страница 549: ...549 Place the plastic frame on the left end ...
Страница 550: ...550 Mount the left end panel and put the 4 screws back ...
Страница 551: ...551 It should now look like this ...
Страница 552: ...552 Assembling MkII Slide the bottom panel back in to place ...
Страница 553: ...553 Put the side panel back on ...
Страница 554: ...554 Mount the hex screws You will need to hold the end panel in place when you are mounting these screws ...
Страница 555: ...555 Turn your Tiny LD on and enjoy ...
Страница 556: ...556 Written by Flemming Christensen Gotharman 2020 ...


