Maintenance (Continued)
2. Remove Coupling (Ref. No. 3) and
Rod (Ref. No. 2) by unthreading
Screws (Ref. No. 4).
3. Loosen, but do not remove set
screws in Shaft Seal Assembly
(Ref. No. 7).
4. Unscrew Shaft Seal Assembly in a
counter-clockwise direction, then
carefully lift off of Shaft (Ref.
No. 21).
REASSEMBLY
IMPORTANT: Pump Shaft may have
been gouged from set screws. Before
installing new Shaft Seal Assembly,
smooth-over these gouges with a light
grit emery cloth to prevent damage to
new seal.
1. Once shaft is free of burrs, lubricate
Shaft and o-ring cavity in Adapter
(Ref. No. 8) with soapy water.
2. Carefully slide new Shaft Seal
Assembly onto Shaft, then tighten in
clockwise direction and torque to
26 ft-lbs [35 N-m].
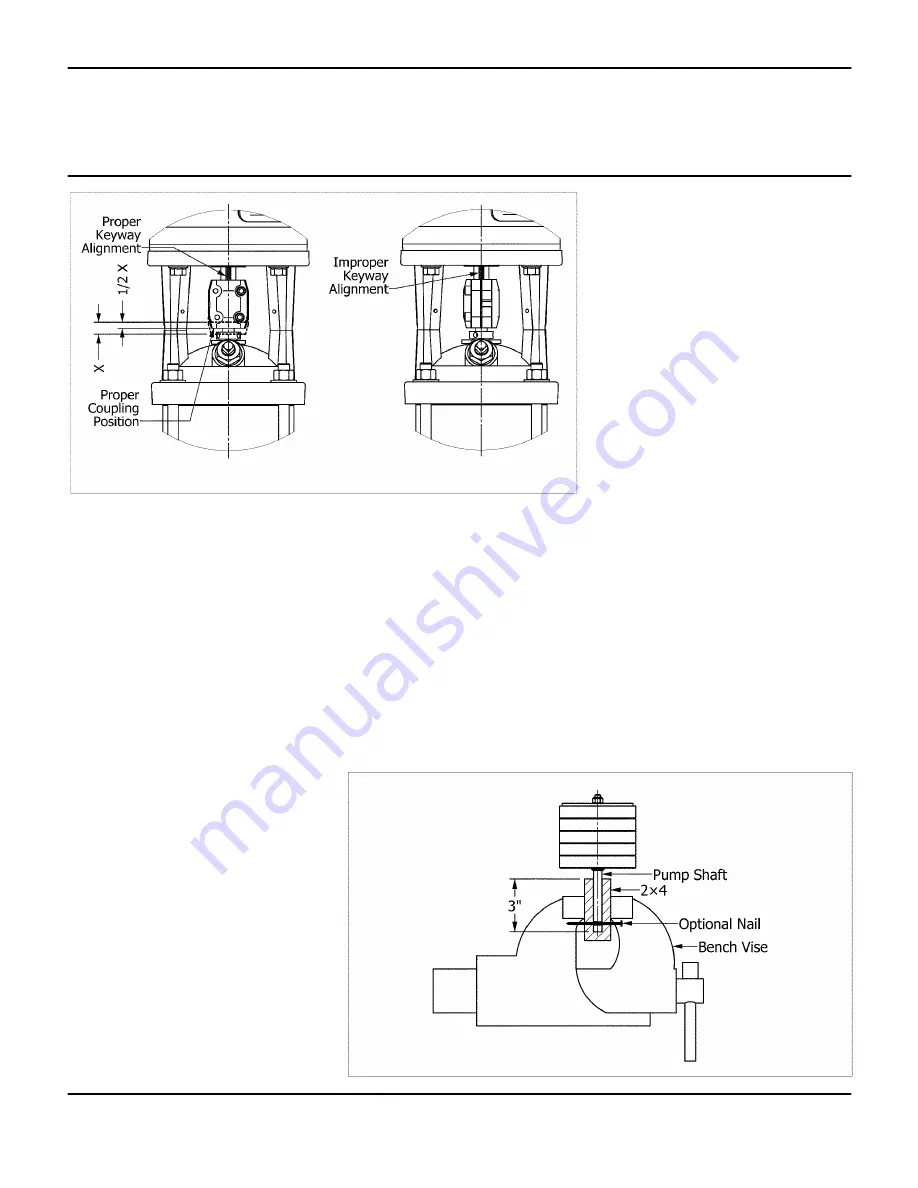
3. Mark or otherwise note shaft height.
Lift shaft as high as it will go, then
lower it back down ½ the total
distance. Maintain this position
while evenly tightening 3 set screws
in seal collar and torque each to
2 ft-lbs. [2.5 N-m].
4. Place Rod thru Shaft, then reinstall
Coupling and screws but do NOT
tighten.
5. Proceed to Reassembly under Motor
Replacement section.
PUMP OVERHAUL/INSPECTION
To inspect condition of pump internals,
proceed as follows:
NOTE: To facilitate overhaul, a handy
holding device can be made easily. Take
a short piece of 2×4 lumber and on the
narrow side, drill a 1/2” diameter blind
hole 3” deep. Place block into bench vice
with hole facing up to receive pump
shaft after step 5 (see Figure 5).
DISASSEMBLY
1. Proceed to Disassembly under Shaft
Seal Replacement.
2. Remove 4 Fastener sets (Ref. Nos.
15 & 16).
3. Lift Adapter (Ref. No. 8) from pump,
use a soft mallet to break loose if
necessary.
NOTE: Inspect o-ring groove in Adapter
after o-ring is removed. Rust/pitting in
this region may cause leaks, be sure to
clean or replace Adapter entirely if
damage is excessive.
4. Remove wave Spring (Ref. No. 18)
from Adapter.
NOTE: Inspect wave Spring for cracks
and replace if found.
5. Pump internals can now be removed
all at once. Use pump Shaft (Ref.
No. 21) as a handle and gently lift
the entire assembly out. If stage-1
Volute (Ref. No. 38) stays behind, it
can be removed and inspected later.
Specifications Information and Repair Parts
Manual
PM1, PM3, and PM5 Series
Multistage Centrifugal Pumps
Vertical Inline Models
4
Figure 4 – Coupling Alignment
Figure 5 – Inspection


