GB 8
Water inlet hose(s)
• Check the hose regularly for brittleness and cracks.
Replace if necessary.
Filter
• Check and clean the filter regularly, at least 3 or
4 times a year (see “Cleaning the Filter/ Draining
Residual Water”).
Do not use flammable fluids for cleaning the
appliance.
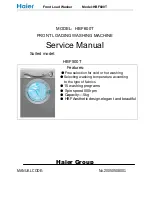
Recovering an object that falls between
the drumand the tub
If an object accidentally falls between the drum and
the tub, you can recover it thanks to one of the remov-
able drum blades:
1. Unplug the washing machine.
2. Remove the laundry from the drum.
3. Close the drum flaps and turn the drum a
half-turn (picture
25).
4. Using a screw-driver, press on the plastic end while
sliding the blade from left to right (picture
26, 27).
5. It will fall into the drum.
6. Open the drum: you can recover the object
through the hole in the drum.
7. Refit the blade from inside the drum: Position the
plastic tip above the hole on the right side of the
drum (picture
28).
8. Then slide the plastic blade from right to left until
it clips.
9. Close the drum flaps again, turn the drum through
half a turn and check the positioning of the blade at
all its anchorage points.
10. Plug the washing machine in again.
REMAINING MOISTURE CONTENT OF THE LAUNDRY
AFTER SPINNING
The degree of moisture remaining in the laundry
after spinning mainly depends on the fabric type, the
selected programme and spin speed.
The lowest remaining moisture content can be
achieved using the wash programme referred to by
the Energy Label, with maximum spin speed. This
programme is marked in the separate programme
chart as “Reference programme for the Energy Label”.
Below a survey of the remaining moisture content
(in %) related to the various spin-drying efficiency
classes:
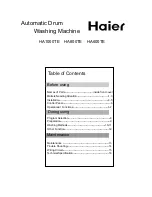
TRANSPORT AND HANDLING
(picture
29)
1. Unplug the washing machine.
2. Turn off the tap.
3. Remove the water supply and drain hose.
4. Eliminate all water from the hoses and the washing
machine (see “Cleaning the Filter/ Draining
Residual Water”). Wait for the water to cool so as to
avoid any accidents.
5. To facilitate moving the machine, pull the handle
situated at the bottom front (if available on your
model) out a little by hand and pull it out to the stop
with the foot. Afterwards push the handle back into
the original stable position.
6. Fix the transport bracket again for transportation.
7. Transport the washing machine upright.
IMPORTANT: Do not use the washing machine while
the handle is pulled out.
AFTER-SALES SERVICE
Before contacting After-Sales Service:
1. Try to remedy the problem yourself (see
“Troubleshooting Guide”).
2. Restart the programme to check whether the
problem has solved itself.
3. If the washing machine continues to function
incorrectly, call After-Sales Service.
Specify:
• The nature of the problem.
• The exact model of the washing machine.
• The service code (number after the word
SERVICE).
The After-Sales Service sticker is situated
behind the filter cover or on the rear of the
machine.
• Your full address.
• Your telephone number and area code. As a
priority, you should contact the After-Sales Service
of the retailer who supplied you with the washing
machine.
Spin-drying efficiency
class
Remaining moisture
content in %
A (= most efficient)
less than 45
B
45 or more, but less than 54
C
54 or more, but less than 63
D
63 or more, but less than 72
E
72 or more, but less than 81
Содержание WT72122
Страница 1: ...www gorenje com INSTRUCTIONS FOR USE WASHING MACHINE GB...
Страница 2: ...a b c d g e f g A A B A B C D 2 3 4 5 6 7 8 9 10 11 12 13 14 15 16 1...
Страница 13: ......
Страница 14: ...A B 20 21 22 17 25 26 28 18 19 29 23 24 27...
Страница 15: ...GB DT350 W10761910 06 2017...