


3B. Remove the by-pass screws by using the flat-blade screwdriver (T2) and the nose pliers (T3).
Place the new by-pass screws with the nose pliers and screw the by-pass screws of all gas taps in,
by using the flat-blade screwdriver.
3C. Adjust the by-pass screws (3) of all gas taps by using the flat-blade screwdriver (T2) until a stable
flame is established with a minimal gas flow. Please check if the flame is stable in the cold and hot
condition of the burner.
Check for gas tightness and operation
When the appliance is connected to the gas supply, use leak test spray to check the gas tightness.
1.
Seal the injector.
2.
Open the gas tap.
Attention:
press and open tap to override the thermo-electric safety device
and keep it pressed down.
3.
Spray leak test spray over all gas connections and check for gas tightness.
4.
Repeat for every burner.
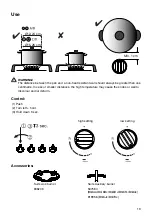
Start up
1.
Reinstall the knobs, burner parts and pan supports.
2.
Check if the appliance is connected to the correct gas type and pressure.
3.
Open the main gas valve.
4.
Insert the plug into the power socket.
Checking operation
1.
Ignite the burners.
2.
Check whether the flame profile is normal, uniform and stable for the
complete ratio:
3.
•
Check if the flame does not smother in simmer rate;
•
Check if the flames are not ‘blowing off’ at maximum rate;
•
No long, yellow flames should be visible during operation.
4.
Paste the data label with the modified gas specifications and setting
over the current data label with old specification (at the underside of
the appliances nearby the gas connection).
26
Содержание BG3 A Series
Страница 10: ...BG7xB BG7xD BG7xA BG7xC BG9xA BG9xD BG9xB BG9xE 10...
Страница 14: ...Burner position Cleaning 14...
Страница 21: ...Gas connection PTFE tape Accessibility oven oven metal safety hose 21...
Страница 22: ...Built in only for 75 90cm Min 20 mm Max 50 mm Connecting testing WARNING Check if connections are gastight 22...


