background image

Shenzhen Gooxi Hengyu Technology Co., Ltd

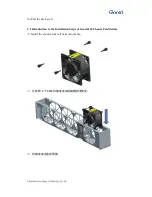
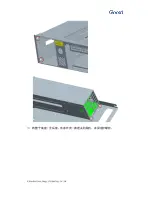
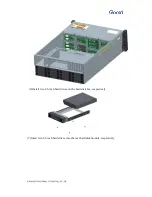
(2)Install the 3.5-inch hard drive to the hard drive bracket according to screw holes, as
shown in the figure below.

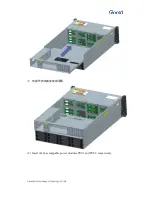
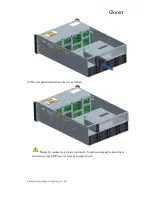
(3) The installed hard disk is shown in the following figure:

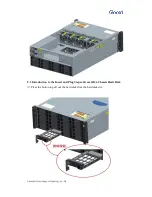
(4) Insert hard disk to the chassis, and close the switch. As shown in the following

figure.

Содержание RMC4136-670-HSE

Страница 1: ...RMC4136 670 HSE User Manual...

Страница 2: ...Shenzhen Gooxi Hengyu Technology Co Ltd Version 1 0...

Страница 3: ...Shenzhen Gooxi Hengyu Technology Co Ltd Content Manual Structure Foreword Chapter 1 Chassis Overview Chapter 2 Easy Installation Instruction Chapter 3 Chassis Parameters...

Страница 4: ...cuses on the quality and content Gooxi RMC4236 670 HSE server chassis uses imported first class SGCC galvanized steel and possessed with the characteristics of fingerprint resistance corrosion resista...

Страница 5: ...ooxi Hengyu Technology Co Ltd Chapter 1 Chassis Overview 1 1 Chassis Structure 1 Top cover 2 Rear window 3 Ventilation wall 4 Backplane 5 Hard disk module 6 Base 7 Hard disk box 8 Left side ear 9 Righ...

Страница 6: ...of 6 32 5mm countersunk screws are used for fixing hard disks 10 pieces of active studs with the total height of 8mm are used to install the motherboard 16 pieces of 6 32 6mm cross recessed pan head s...

Страница 7: ...above picture shows the front panel buttons and LED indicators each button or indicator light has its own function and status description that are described in the following table LED Status Descript...

Страница 8: ...ic can be viewed through IPMI management software The green light is on Internet access 1 connection is normal The green light is on Internet access 2 connection is normal USB interface 2 USB2 0 inter...

Страница 9: ...and the specific description is as follows RMC4124 BPE 12G Correspondin g site Interface jumper slot Correspon ding site Interface jumper slot 1 2 3 4 5 5 ATX 10 PMC PM8044 Expander 6 7 8 9 4 4PIN 11...

Страница 10: ...Hengyu Technology Co Ltd temperature control fans interface 1 8 Introduction to the Output Interface of Backplane Hard Disk Front built 24 bit expander backplane order Back built 12 bit expander backp...

Страница 11: ...Shenzhen Gooxi Hengyu Technology Co Ltd...

Страница 12: ...yu Technology Co Ltd Chapter 2 Easy Installation Instruction 2 1 Introduction to the Disassemble Steps of Gooxi 4136 Chassis Cover Unscrew the top cover screws Press the button of chassis back cover P...

Страница 13: ...Shenzhen Gooxi Hengyu Technology Co Ltd 4 Pull the back cover 2 2 Introduction to the Installation Steps of Gooxi4136 Chassis Fan Module Install the shock proof soft nails into the fan 4 8038...

Страница 14: ...Shenzhen Gooxi Hengyu Technology Co Ltd...

Страница 15: ...Shenzhen Gooxi Hengyu Technology Co Ltd 2 3 Introduction to the Insert and Plug Steps of Gooxi4136 Chassis Hard Disk Press the button to pull out the hard disk from the hard disk site...

Страница 16: ...the 3 5 inch hard drive to the hard drive bracket according to screw holes as shown in the figure below 3 The installed hard disk is shown in the following figure 4 Insert hard disk to the chassis and...

Страница 17: ...o the Installation Steps of Gooxi4136 Chassis Power Supply 1 Place the power supply case to the chassis according to the hole site as shown in the figure below 2 Fix the power supply bracket and screw...

Страница 18: ...Shenzhen Gooxi Hengyu Technology Co Ltd...

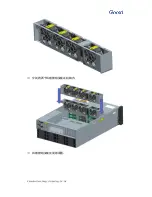
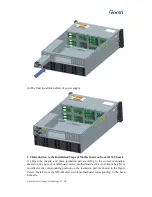
Страница 19: ...Shenzhen Gooxi Hengyu Technology Co Ltd 2 Insert the hot swappable power modules PSU1 and PSU2 respectively...

Страница 20: ...ooxi 4136 Chassis 1 Open the chassis and place insulation pad according to the correct orientation Based on the hole of motherboard screw motherboard active stud 8mm height is installed at the corresp...

Страница 21: ...motherboard active stud 8mm height is installed place the motherboard into the chassis and fasten motherboard screw at the hole site As shown in the figure below 2 6 Introduction to the Installation...

Страница 22: ...and remove the blind plate at rear window 2 5 module dummy module 2 2 5 inch hot swappable hard drive module is installed and locked to the chassis base with a screw as shown in the figure below 3 Ef...

Страница 23: ...Technology Co Ltd 4 Push the entire base including 2 5 inch hard drive module into the chassis and fix the base and rear window screw 5 Effect picture of completed installation of 2 5 inch hot swappa...

Страница 24: ...Shenzhen Gooxi Hengyu Technology Co Ltd 6 Install two 2 5 inch hard drives on the hard disk box respectively 7 Insert two 2 5 inch hard drives into the rear hard disk module respectively...

Страница 25: ...en Gooxi Hengyu Technology Co Ltd 8 The completed installation effect is as follows Note If customer selects two optional 2 5 inch hot swappable hard drives then Gooxi type CRPS power must be equipped...

Страница 26: ...rd disk shockproof system Hard disk bracket is designed with EMI shrapnel The unique shockproof fan design can reduce the resonance between the fan and hard disk without affecting the reading and writ...

Страница 27: ...Shenzhen Gooxi Hengyu Technology Co Ltd Note This manual is a general instruction of RMC4136 670 HSE series Specific parameters of each type please refer to the chassis detailed parameters...

Отзывы: