background image

4

Your HD Digital TV Recorder

01

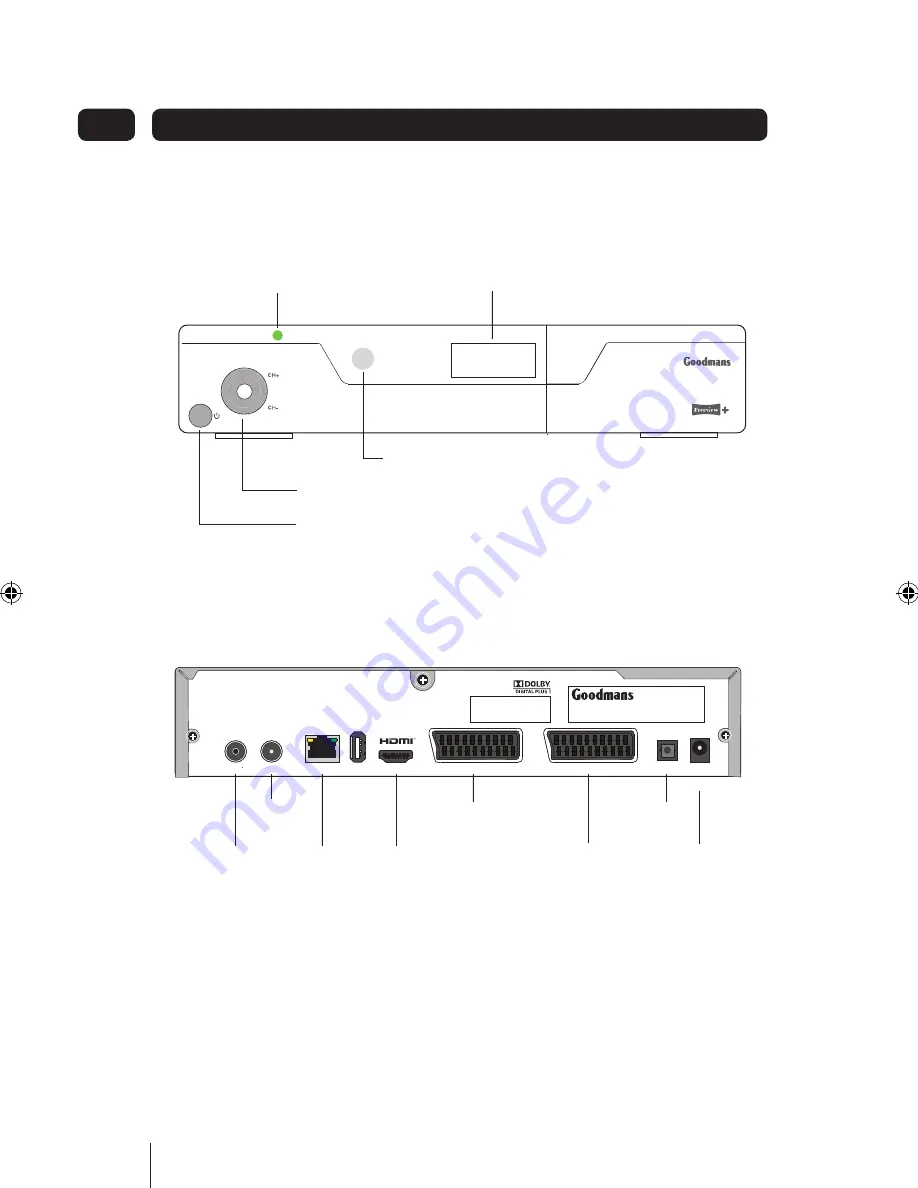
Front view

Rear view

1

   2. A

RF IN      RF OUT         NETWORK     USB         HDMI                           TV SCART                                       AUX SCART                       S/PDIF     DC IN

SCART FOR AUX

EQUIPMENT

RF IN

RF OUT

SCART FOR TV

USB

NETWORK

(ETHERNET) 

DC IN

(12VDC)

HDMI

S/PDIF

0000

4-DIGIT LED DISPLAY

POWER ON OFF INDICATOR

POWER ON OFF SWITCH

CHANNEL CHANGE BUTTON

REMOTE CONTROL SENSOR

Содержание GV101YRH Series

Страница 1: ...GV101YRH Series HD Digital TV Recorder User Guide IMPORTANT Please read all instructions carefully before use and keep for future reference ...

Страница 2: ...eview coverage For more information about Freeview and to check reception in your area visit www freeview co uk Introduction Safety is important Use of any electrical equipment should be undertaken with care Please read the safety section on pages 37 before using this digital box This appliance is for household use only A digital box lets you access the free digital channels that are broadcast in ...

Страница 3: ...19 Settings 28 Troubleshooting 35 Specifications 36 Warnings 37 Guarantee 38 05 06 07 08 09 Contents HD Digital TV Recorder Quick Start Guide The above images are for illustrative purposes only and may differ to the items supplied Remote Control FA V O N LI N E Power supply 2 x AAA batteries HDMI cable RF cable ...

Страница 4: ...IN RF OUT NETWORK USB HDMI TV SCART AUX SCART S PDIF DC IN SCART FOR AUX EQUIPMENT RF IN RF OUT SCART FOR TV USB NETWORK ETHERNET DC IN 12VDC HDMI S PDIF 0000 4 DIGIT LED DISPLAY POWER ON OFF INDICATOR POWER ON OFF SWITCH CHANNEL CHANGE BUTTON REMOTE CONTROL SENSOR ...

Страница 5: ...rmation about programmes and recordings LIBRARY Displays a library of previously recorded programming MENU Display the Main Menu MUTE Turns your TV sound on off Navigation Navigate up down left right in menus on screen displays OK Press to confirm current selection ONLINE Display the online menu PLAY PAUSE Toggle action for recordings and Live Pause TV R RECORD 1 Record a programme 2 Set a future ...

Страница 6: ...d your external aerial wall socket Cable 2 2 HDMI Connect the HDMI cable between the HDMI socket on the back of your digital box and an HDMI socket on your HD Ready TV Cable 2 3 SCART Connect the SCART cable not included between the TV SCART socket on the back of your digital box and the SCART socket on your TV Cable 3 4 Connect the power supply to the DC IN connection on the back of your digital ...

Страница 7: ...not included between your digital box AUX SCART socket and the SCART socket on the DVD player DON T FORGET Connecting via SCART cable will not allow you to view high definition picture quality DON T FORGET DVD content played through the digital box via the SCART cable will be standard definition picture quality If you have a DVD R player any recorded content through the digital box will be in stan...

Страница 8: ...and the power indicator LED changes to red The time of day now appears on the 4 digit display Press the button again to return to the active state The unit is now ready for use 4 Connecting up your digital box to your router You will need an internet broadband router If you are not ready to complete this stage of the setup at this time you can skip this step and continue with setting up your digit...

Страница 9: ...partment observing the polarity shown below and embossed in the base of the compartment Battery Disposal Dispose of used batteries with regard to the recycling regulations in your area DO NOT short circuit batteries or throw them into water general rubbish or in a fire Weak batteries can leak and damage the remote control Replace them in good time 5 CLIP BATTERIES TYPE AAA BATTERY COMPARTMENT BATT...

Страница 10: ...ng the installation process Easy install may not always provide the optimum setting level for your TV If you know the screen size aspect ratio of your display you can set this manually by following the Advanced install set up process The Installer screen will be displayed If Easy is not already selected 1 press the Button on your remote control to select it 2 Press the OK Button to begin The Easy ...

Страница 11: ...ly stored in the digital box For a first time install these will both be 0 8 Press the OK Button The system will scan for TV and Radio channels and updates the number of channels found During this time a progress bar advances until complete 100 This step takes about 8 min When scanning has finished the screen displays Installation 9 complete Press the 10 OK Button to begin watching the first TV ch...

Страница 12: ...tton The Advanced Setup screen will be displayed with the TV Setup function selected How your digital box is connected to your TV will also be shown 3 Press the OK Button Repeatedly press the 4 Button until the screen size aspect ratio of your TV appears in the highlighted panel Press the the 5 Button to highlight the screen resolution panel Repeatedly press the 6 Button until the resolution of yo...

Страница 13: ...scan for TV and Radio channels and updates the number of channels found During this time a progress bar advances until complete 100 This step takes about 8 min When scanning has finished the screen displays Installation 11 complete 12 Press the GREEN Button if you want to view the TV and Radio channels found Press the GREEN Button again to hide the lists 13 Press the OK button to begin watching th...

Страница 14: ...n the top right of the screen To enter 51 for example enter 5 2 and then soon after enter 1 The TV will switch to channel 51 3 DON T FORGET If the delay between pressing 5 and 1 is too long then the digits will not be read as 51 Using the channel change buttons Press the 1 P button to change to the next channel Press the 2 P Button to change to the previous channel Using the Guide The Guide lets y...

Страница 15: ...ically after a set time To view additional information about the current programme at this time press the i Button see i Button on page xx Changing the volume You can change the volume using the V and V buttons on the remote control Press the 1 V Button to increase the volume Press the 2 V Button to decrease the volume A symbol will be displayed in the top right of the screen to indicate the volum...

Страница 16: ...V programme Repeatedly press the 1 FFWD Button until the desired forward speed is displayed in the bottom left of screen Each press of this button steps through the preset speeds x2 x4 x8 x16 x32 x64 Press the 2 FFWD Button again to resume playback at normal speed Recording The Record button is used to record programmes while watching Live TV or from within the Guide To record a programme While wa...

Страница 17: ...iption narrative can be turned on or off using the AD Button on the remote control When turned on the narrative will be heard at the volume set in the Settings Language menu Subtitles Subtitles if present can be set to be displayed overlay the TV picture or not displayed To turn Subtitles on Press the 1 SUB Button Subtitle ON is displayed on the 2 screen for a short time and the subtitles if avail...

Страница 18: ...the 3 OK Button to confirm your selection If not appropriate for example when viewing a photograph or any other media type that has no soundtrack the Audio Language dialogue box will display Not available Swap This button lets you swap between the current and last watched channels It has a toggle action Press the 1 SWAP Button to change to the previously watched channel Press the 2 SWAP Button aga...

Страница 19: ... to select a programme to watch now set a reminder for a later event record live programmes or plan a future recording and view information about selected programmes In the Guide you can browse the TV and radio schedules for the next 7 days and you can display any two hour window over the next 7 days You can select programmes to Watch or listen now Set reminders for programmes you wish to be alert...

Страница 20: ...le HD and Dolby Setting the time window You can jump forward or backwards to specific times within time range of the the Guide 0 to 7 days as follows To step backward 2 hours press the RED button Repeat as required To step forward 2 hours press the GREEN button Repeat as required To step back 24 hours press the YELLOW button Repeat as required To step forward 24 hours press the BLUE Button Repeat ...

Страница 21: ...ou selected Stop recording and the programme was part of a series recording then the current recording will stop but the next episode in the series will be marked with the multi R icon and will be recorded at the next broadcast time If you selected Stop series then the current recording will stop and the record icon will be removed from the programme cell in the guide table Recording a future prog...

Страница 22: ...xt broadcast time If you selected Stop series then the current recording will stop and the multi RECORD icon for this programme will be removed from the guide table Resolving recording conflicts If you try to record two programmes where the broadcast times overlap the Conflict Management window will be displayed This allows you to choose a recording to cancel 1 Use the and Buttons to select the re...

Страница 23: ... recorded programmes and scheduled recordings in a four column list and shows the following information Programme Name Channel Number and Name Date of recording Status Recording Watched and Recorded The Library tools along the bottom of the display allow you to Sort in Date order The Library has three sections Header This displays information specific to the selected recording and includes program...

Страница 24: ...elect from Resume play or Play from start Press the 5 OK Button The recording will playback now 6 according to the option selected Play from time option You may know the time in a recording that you would like to start playback from Press the 1 LIBRARY Button on the remote control to open the library Use the 2 and Buttons to navigate to the recording you wish to play Press the 3 GREEN Button The O...

Страница 25: ...d the Library 2 will be displayed Deleting a recording When you wish to permanently remove a recording from the hard disk Use the 1 and Buttons to navigate to the recording you wish to delete Press the 2 RED Button Delete A message box will open named Delete Recording Use the button to select Yes 3 delete it Press the 4 OK Button The recording will be removed from the list and deleted from the har...

Страница 26: ...re displayed at a time You can use the and Buttons to scroll up or down the list and to see other channels in the list Press the 1 CH LIST Button to open the channel list Use the 2 and Buttons to select the channel required Press the 3 OK Button to watch the channel The channel list will be removed from the screen and you will be returned to live TV Favourites list You can create a list of your fa...

Страница 27: ...Enter the name you want to call your favourites list When the name has been entered 12 use the and Buttons to select Use Advanced Features Press the 13 OK Button to save the list with this name 14 Press the BLUE Button to exit Press the 15 YELLOW Button to enter the favourites selection screen Select the required Favourites list 16 The limited channel set will now 17 appear in the left column The ...

Страница 28: ...gs list Use the 4 and Buttons to move up and down this list to reach the required function to set Use the 5 and Buttons to adjust the setting from the available presets or where the setting is Launch press the OK Button to Launch the function To exit a menu press the 6 Button until the menu bar is reached To exit and return to the Main 7 menu press the MENU Button To remove the Main menu press 8 t...

Страница 29: ... The available options are On or Off Lip sync Sometimes the soundtrack in a broadcast is out of sync with the video The Lip Sync option can be used to correct this To re synchronise sound and video Launch the function 1 An adjustment bar will be displayed 2 at the bottom of the screen Use the 3 and buttons to correct the synchronisation between sound and video The set level is visible in the adjus...

Страница 30: ...d and given another opportunity to enter the correct PIN Set system PIN This function lets you choose your own Parental PIN to replace the factory set PIN To set a new PIN of your choice Use the 1 and Buttons to select Set System PIN A panel opens asking you to enter your new PIN Press the 2 OK Button Use the numerical buttons on the 3 remote control and enter your new PIN The message Please confi...

Страница 31: ...t recording mode Note that high definition will use more hard drive space than Standard Definition recordings If you do not want to specify in advance Select Always Ask and you will be asked at the time of selecting the recording The available options are High Definition Standard Definition and Always Ask Series link mode This lets you set the default series link mode Record once or Record series ...

Страница 32: ...cordings If you don t do this your new recordings will fail DON T FORGET If you don t do this your new recordings will fail Format hard disk drive DON T FORGET Formatting is permanent and cannot be undone This lets you format the hard drive in your digital box deleting all data and recordings To format the drive Use the 1 and Buttons to select Format Hard Disk Drive Press the 2 OK Button The Forma...

Страница 33: ...hannel counters Press the 5 BLUE Start Scan Button to begin Scanning will start and the channel 6 counter will increase incrementally for each channel found This will take several minutes to complete The progress bar grows as the 7 scanning proceeds until finished 100 and the total number of TV and Radio channels is then displayed Press the 8 GREEN View Channels Button to see the lists of channels...

Страница 34: ... but is not in your channel list This function is only expected to be useful for users with knowledge of transmission frequencies To perform a Manual tune carry out the following When the System settings menu is 1 selected use the and Buttons to select Channel Retune Press the 2 OK Button The Manual search window will be 3 displayed Use the 4 and Buttons to navigate and edit the Channel number and...

Страница 35: ... or sound SCART or HDMI cable not securely connected Volume is set to minimum or mute Check SCART and HDMI connections Check volume settings Scrambled channel message Channel is scrambled This digital box is not able to decode scrambled channels subscription channels No response to remote control Digital box is switched 1 off Remote control not 2 aimed correctly Front panel obstructed 3 Remote con...

Страница 36: ...2 4 MPML 4 3 16 9 Switchable MPEG Layer I II 32 44 1 48KHz HDMI RGB CVBS Connection Power Tuner Video Audio 12V Mains adapter Antenna input Twin SCART HDMI Digital coaxial audio output Power supply Input voltage Power consumption AC 230V 50Hz MAX 12W standby 0 5W IMPORTANT Due to continual revision and improvements to our product design specifications are subject to change without notice Note Unqu...

Страница 37: ...ntilated area away from high humidity Do not expose this digital box to rain or moisture dripping or splashing For stubborn stains use a damp not dripping cloth Do not use any cleaning solutions on this digital box Safety Tips If smoke abnormal noise or odor comes out of this digital box unplug from the mains supply immediately and contact the retailer Never try to repair the digital box on your o...

Страница 38: ...in the boundaries of the country of purchase The product must be correctly installed and operated in accordance with the instructions contained in this User Guide This digital box must be used solely for domestic purposes The guarantee will be rendered invalid if the digital box is re sold or has been damaged by inexpert repair The manufacturer disclaims any liability for incidental or consequenti...

Страница 39: ...39 ...

Страница 40: ...0871 230 1777 ...

Отзывы: