background image


30 

F

UNCTION


1. Press the 

MENU


button to display FUNCTION from the main menu. 

2. Press the 

P

Ξ

 / P

Ο】

button to move to one of the sub-menu options. 

3. Press the 

VOL

/ VOL

  button to select the settings. 

4. Press the 

EXIT/INFO


button to return to the previous screen.


LANGUAGE: 

1.


Press the 

P

Ο

  button to select LANGUAGE option.


2. Choose a language. [ENGLISH], [DEUTSCH], [NEDERLANDS], 

[ITALIANO], [CASTELLANO], [FRANCAIS], [DANSK], [NORSK], 
[SVENSKA], [SUOMI] 


RECALL: 

Reset to factory settings. 

SOURCE

TV 

SOURCE

TV 

Содержание GTVL20W7HD

Страница 1: ...Model GTVL20W7HD HD READY 0870 873 0080 www goodmans co uk...

Страница 2: ...20...

Страница 3: ...istics 7 Accessories 9 3 CONNECTING EXTERNAL DEVICES 10 4 CONTROLS AND LOCATION 11 5 REMOTE CONTROL 12 6 SUMMARY OF REMOTE CONTROL BUTTONS 13 7 CONNECTIONS APPLICATIONS 14 8 GENERAL CONTROLS ADJUSTMEN...

Страница 4: ...ii PC menu 31 NICAM IGR Broadcast Selection 34 9 TELETEXT 35 10 OTHER FUNCTIONS 37 11 TROUBLESHOOTING 38 12 PC INPUT PRESET TIMING TABLE 40 13 SPECIFICATIONS 41...

Страница 5: ...with the following code BLUE NEUTRAL BROWN LIVE IMPORTANT As the colours of the wires in the mains lead of this appliance may not correspond with the coloured markings identifying the terminals in you...

Страница 6: ...ad to an electrical short circuit or even fire resulting in damage to your LCD display Slots and openings in the LCD display are for ventilation purpose Do not cover these openings as this may lead to...

Страница 7: ...power cable power supply overheats or is damaged if liquid has got into the monitor if the LCD display is dropped or the housing damaged REPAIR Leave all repairs of your LCD display to authorised and...

Страница 8: ...tures between 41 F and 95 F 5 C to 35 C and at a relative humidity between 20 and 85 without condensation When switched off the LCD display can be stored most reliably between 4 F and 140 F 20 C 60 C...

Страница 9: ...ector to protect your LCD display from damage resulting from voltage surges or lightning To remove the LCD display from the power supply disconnect the plug from the AC outlet The power outlet must be...

Страница 10: ...UCTIONS When using any electronic equipment basic safety precautions should always be taken Following the guidelines below can reduce the risk of fire electric shock and injury to person Do not use th...

Страница 11: ...sed to greet you as a new customer SERVICE Your display comes with a one year warranty this is in addition to your statutory rights This manual contains a separate chapter on Troubleshooting on page 3...

Страница 12: ...Zoom 1 Zoom 2 Modes available are dependant upon the source P MODE settings include Movie Bright Manual and Standard APS auto program search for automatic TV channel tuning Teletext function availabl...

Страница 13: ...9 ACCESSORIES Please check that you have received the following items with your LCD TV Power Cord Remote Control Batteries AAA X2 User s Manual USER S MANUAL LCD TV HDMI DVI Cable Audio Cable...

Страница 14: ...N NN NE EC CT TI IN NG G E EX XT TE ER RN NA AL L D DE EV VI IC CE ES S AC POWER SOCKET DVI D SUB AUDIO IN HEAD PHONE Y Pb Pr L R L AUDIO R AUDIO COMPOSITE IN COMPONENT IN TV AERIAL IN SCART S VIDEO V...

Страница 15: ...CHANNEL down or up change the channel VOLUME increase or decrease the volume EXIT ARC Set up the aspect ratio of display TV Video source Panorama Normal Full Zoom1 Zoom2 Auto PC DVI source Full Normal...

Страница 16: ...R RO OL L PICTURE CONTROL TELETEXT FUNCTION WIDE CONTROL POWER RETURN TO PREVIOUS PROGRAM RTN EXIT MENU SHOW TV INFORMATION SLEEP TIMER MUTE SELECT CHANNEL SOUND Stereo Mono MENU SELECTION CHANNEL VOL...

Страница 17: ...roadcasts Other Function INFO button Display current channel Input source signal format WIDE button In PC mode Set the picture mode to Full Fill aspect One to one In Video mode Toggle the picture mode...

Страница 18: ...14 7 7 C CO ON NN NE EC CT TI IO ON NS S A AP PP PL LI IC CA AT TI IO ON NS S PC DVI D SUB AUDIO IN...

Страница 19: ...VI cable or DVI DVI adapter between the DVI connector on the TV and the DVI connector on the DVD player Set top box 2 Connect an audio cable between the PC AUDIO IN jack on the TV and AUDIO OUT jack o...

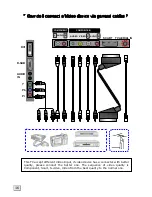
Страница 20: ...has a connector with better quality please connect the better one The sequence of video quality is Component Scart S video Video from the best quality to the normal one S VIDEO VIDEO AUDIO AUDIO COMP...

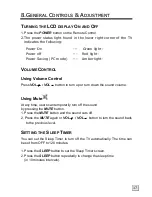
Страница 21: ...ntrol Press VOL VOL button to turn up or turn down the sound volume Using Mute At any time users can temporarily turn off the sound by pressing the MUTE button 1 Press the MUTE button and the sound cu...

Страница 22: ...the MENU button The main menu appears on the screen 2 Use the VOL VOL button to select one of the menu options and then press the P P button to access the sub menu 3 Press the VOL VOL button to make a...

Страница 23: ...PICTURE from the main menu 2 Press the P P button to select the desired item 3 Press the VOL VOL button to adjust ranges from minimum to maximum 4 Press the EXIT INFO button to return to the previous...

Страница 24: ...ack light level of screen COLOR Deeper and lighter picture color SHARPNESS Softer and sharper image COLOR MODE 1 Press the P P buttons to select COLOR MODE option and then press the VOL button to ente...

Страница 25: ...in menu 2 Press the P P button to move to one of the sub menu options 3 Press the VOL VOL button to select the settings 4 Press the EXIT INFO button to return to the previous screen AVC You can set AV...

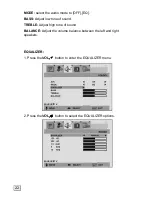
Страница 26: ...w tone of sound TREBLE Adjust high tone of sound BALANCE Adjust the volume balance between the left and right speakers EQUALIZER 1 Press the VOL button to enter the EQUALIZER menu 2 Press the VOL butt...

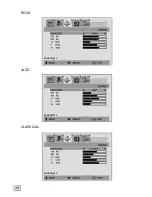
Страница 27: ...zer modes available MANUAL VOICE POP ROCK JAZZ CLASSIC 4 Settings for VOICE POP ROCK JAZZ and CLASSICAL are pre configured You cannot change these settings The frequency responses are as below VOICE P...

Страница 28: ...24 ROCK JAZZ CLASSICAL SOURCE TV SOURCE TV SOURCE TV...

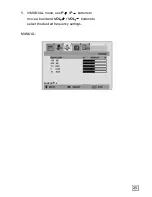
Страница 29: ...25 5 In MANUAL mode use P P buttons to move a band and VOL VOL buttons to select the desired frequency settings MANUAL SOURCE TV...

Страница 30: ...reen COUNTRY UK EIRE DENMARK FINLAND ITALY NORWAY SPAIN SWEDEN LUXEMBURG FRANCE CZECH POLAND HUNGARY AUSTRIA GERMANY SWITZERLAND BELGIUM NETHERLANDS A P S 1 Press the button to select A P S option and...

Страница 31: ...number or VOL VOL button to select the program that the user wants the tuned channels to store 2 Press P P button to select the items and then press VOL VOL button to select the setting CHANNEL choos...

Страница 32: ...bers and names You can use this list to edit the name delete or insert programs 1 Select channel by pressing the P P or VOL VOL buttons Selecting the program list will display the stored program on th...

Страница 33: ...program is highlighted by a red bar and then press yellow button again to erase To cancel press blue button CHILD LOCK 1 Press the MENU button to display TV CHANNEL from the main menu 2 Press the P P...

Страница 34: ...ptions 3 Press the VOL VOL button to select the settings 4 Press the EXIT INFO button to return to the previous screen LANGUAGE 1 Press the P button to select LANGUAGE option 2 Choose a language ENGLI...

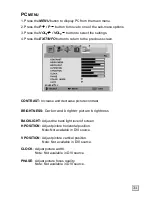
Страница 35: ...CONTRAST Increase and decrease picture contrast BRIGHTNESS Darker and brighter picture brightness BACKLIGHT Adjust the back light level of screen H POSITION Adjust picture horizontal position Note No...

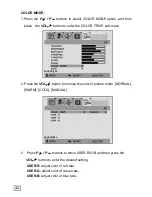
Страница 36: ...TEMP sub menu 2 Press the VOL button to choose the color of picture mode NORMAL WARM COOL MANUAL 2 Press P P buttons to move USER R G B and then press the VOL button to enter the desired setting USER...

Страница 37: ...33 AUTO Automatically adjust picture Press the VOL button to adjust picture position automatically Screen will disappear until it has completed adjustment SOURCE PC SOURCE PC...

Страница 38: ...SOUND button to listen to different language sources Under different systems broadcast function will show differently sends the primary broadcast language to the loudspeakers sends the secondary broa...

Страница 39: ...played on the screen headline The first page number indicates your selection while the second shows the current page being displayed Press the TELETEXT button again to switch off Teletext The previous...

Страница 40: ...Press UPDATE button to switch to TV mode while waiting for the text page A small blue box in which shows appears in the upper left corner When the required text page is found the required page number...

Страница 41: ...OM 1 Some DVD movies may not fill the top and bottom of the screen The 14 9 zoom function extends the height to fill the screen ZOOM 2 Same as 16 9 ZOOM but the button edge of the screen pulls up a li...

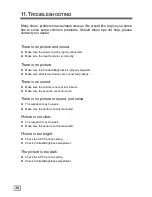
Страница 42: ...ntrast Brightness is properly adjusted Make sure all external devices are connected properly There is no sound Make sure the volume is not set to minimum Make sure the sound is not set to mute There i...

Страница 43: ...or triple image Make sure the aerial is facing the right direction There may be reflected signals from mountains or buildings The picture is spotty There may be interference from automobiles trains h...

Страница 44: ...2 VGA 640 480 37 500 75 000 31 500 3 SVGA 800 600 37 879 60 300 40 000 4 SVGA 800 600 46 875 75 000 49 500 5 XGA 1024 768 48 363 60 000 65 000 6 XGA 1024 768 56 476 70 000 75 000 7 XGA 1024 768 60 023...

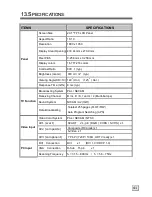
Страница 45: ...125 o Ver Panel Response Time GTG 8 ms typ Broadcasting System PAL SECAM Receiving Channel B G D K I and L L Multi Europe Sound System NICAM A2 IGR Teletext 255 pages FLOF TOP TV Function Data Broadca...

Страница 46: ...French German Spanish Italian Finnish Swedish Dutch Danish Norwegian Function Keys Power Source Menu Up Down Channel Volume ARC EXIT Video Performance Comb filter De interlace Canal Plus Teletext WID...

Страница 47: ......

Страница 48: ...E030057224...

Отзывы: