Goodmans GDVD300R Скачать руководство пользователя страница 63

63

D

VD+R/R

W


Rec

ord

er

RW

D

D

Initial Settings

4

4-3

 VIDEO Setup

-continued

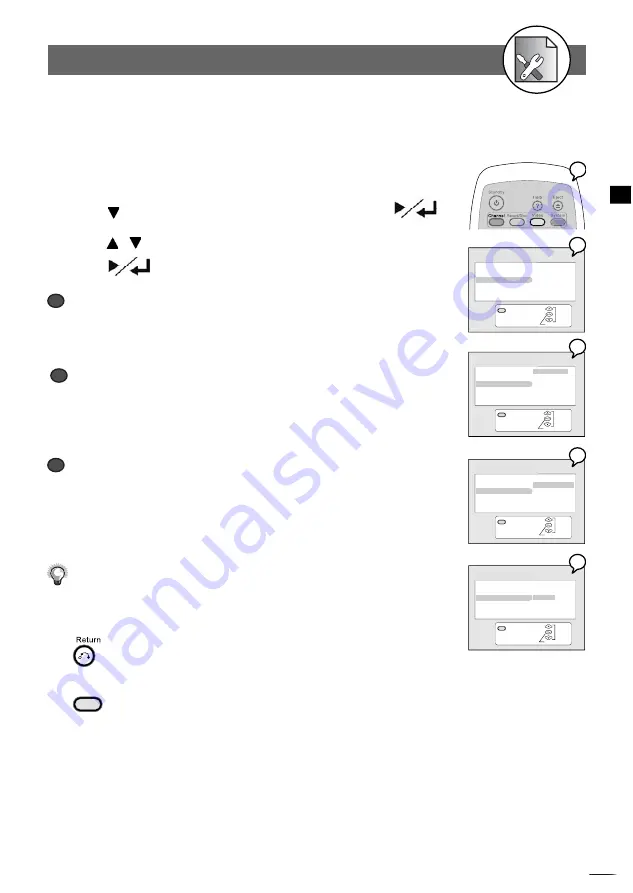
Please choose the preferred video output according to the output format. 

1


Press 

Video

 in the stop mode to display the menus.

2


Press    to select “Video Output”, and then press 

 .

3


Press    /    to select the preferred video output setting and 

     press 

 .


a

a

  SCART RGB

Select “

SCART RGB” 

when you’ve connected this recorder’s SCART OUT to TV via 

Scart cable. This will provide  a better viewing result.


b

b

 RCA Component


Select “

RCA Component” 

when you’ve connected this recorder’s  Cr Y Cb Out 

jacks to TV’s Cr Y Cb input via Component video cable. This will provide the best 
viewing result.

c

c

  S-Video


Select

 S-Video

 when you’ve connected this recorder’s S-Video Out jacks to your 

TV’s S-Video In jacks.

Select S-Video Only if your TV does not provide Progressive nor component jacks.

For details on the way of connections, please refer to the 

Quick Reference

.


What if the screen turns black while setting the Video Output OSD ...

       -- Press 

TV Sys.

 a number of times until the screen is back to normal.

To return to the Setup MENU screen

Press 

button.

To 

fi

 nish the setup operation

Press 

Video

 to exit from Video setup screen.

Video Output Setting

Exit

Select

Con

fi

 rm

VIDEO

TV Type
TV System
Video Output
Subtitle

Exit

VIDEO

TV Type          SCART RGB
TV System 

        RCA Component

Video Output                S-Video
Subtitle

Select

Con

fi

 rm

Exit

VIDEO

TV Type          SCART RGB
TV System 

        RCA Component

Video Output                S-Video
Subtitle

Select

Con

fi

 rm

Exit

VIDEO

TV Type          SCART RGB
TV System 

        RCA Component

Video Output                S-Video
Subtitle

Select

Con

fi

 rm

2

3a

1

3b

3c

Содержание GDVD300R

Страница 1: ...DVD Recorder GDVD300R Digital Versatile Disc Recorder with Remote Control User Guide 82 128 04282 EJECT PLAY STOP UP DOWN SOURCE RECORD STANDBY ON S VIDEO 2 AV INPUT VIDEO 2 AUDIO 2 R L...

Страница 2: ...ortant Notes 6 Important Safety Instructions 7 Precautions 8 About This Manual 9 How to Proceed in This Manual 9 Package Contents 11 Parts and Controls 12 Front View 12 Rear View 12 Remote Control 13...

Страница 3: ...ing 54 Fine Tune Setting 55 Programme Swap Setting 55 Erase Programme Setting 55 4 2 Record Disc Setup 56 Record Quality Setting 56 Auto Chapter Setting 57 Disc Info Setting 58 Finalise Setting 59 Mak...

Страница 4: ...lug should be connected as shown in the diagram The colours of the wires in the mains lead of the unit may not correspond with the coloured markings identifying the terminals in your plug Connect them...

Страница 5: ...ore your DVDs in a cool area to avoid damage from heat Important Notes For safety reasons do not remove any covers or attempt to gain access to the inside of the product Refer any servicing to qualifi...

Страница 6: ...ng or discomfort in the ears indicates that the volume is maybe too loud Once your have established a comfortable listening level DO NOT INCREASE THE SOUND LEVEL FURTHER The following list of typical...

Страница 7: ...lso North Korea Mongolia 6 China Never make or change connections with the power switched on CAUTION VISIBLE AND INVISBLE LASER RADIATION WHEN OPEN AVOID EXPOSURE TO BEAM WARNING LOCA TION INSIDE ON L...

Страница 8: ...of this unit is dangerous and may cause serious damage to the unit Do not at tempt to disassemble the unit Do not put any foreign object on the disc tray Keep away from water magnet Keep the unit away...

Страница 9: ...r external damage If the discs are self burn self copy or are non original we can not guarantee that they will be playable How to Proceed in This Manual Using the DVD recorder and its features may be...

Страница 10: ...hows from local cable TV or music and picture from an external audio and video device on both DVD R and DVD RW media Refer to section of Chapter 1 2 Recording in the manual 6 Play back a disc After ma...

Страница 11: ...ld be 1 x GDVD 300R Recorder 1 x remote control 2 x AAA batteries for the remote control 1 x RCA AV line cable 1 x RF coaxial cable 1 x S video cable 1 x Scart to scart cable 1 x Component video cable...

Страница 12: ...Input VIDEO 2 Input EJECT button STOP button PLAY button UP button DOWN button Aerial In RCA Video In RCA Audio In Left Right Aerial Out RCA Vide Out S Video In Cr Y Cb Out RCA Audio Out Left Right S...

Страница 13: ...PR button TV DVDR button PLAY ENTER button Cursor buttons RETURN button DISC INFO button EDIT button STOP button SLOW button F FWD button F BWD button REPEAT A B button REPEAT 1 ALL button PROGRAM bu...

Страница 14: ...llation of batteries We recommend the use of Alkaline batteries Using The Remote Control To use the remote control point it at the front of the DVD player towards the sensor situated to the right of t...

Страница 15: ...r TV otherwise it will cause picture interference VIDEO INPUT L R IN Option 1 RCA Audio Video cable supplied TV 300R O p t i o n 2 S c a r t C a b l e s u p p l i e d 2 1 P i n S c a r t D V D t o 2 1...

Страница 16: ...Recorder before making any connections 178 C020 Aerial In TV S c a r t C a b l e s u p p l i e d 2 1 p i n S c a r t D V D t o 2 1 p i n S c a r t T V Aerial Lead not supplied TV Aerial RF Loop throu...

Страница 17: ...In socket this will provide a better viewing result on TV Make sure to set Video Output Settings to S Video from VIDEO Setup Screen Connecting External Equipment IN TV S VIDEO Existing Outdoor Aerial...

Страница 18: ...obtain the best viewing result Make sure to set Video Output Settings to RCA Component from VIDEO Setup Screen Connecting External Equipment Cr Y Cb Cr 300R Y Cb IN TV Red Green Blue Red Green Blue Ex...

Страница 19: ...isc was recorded in Dolby Digital format Connecting External Equipment RF Loop through Aerial cable supplied Cr Y Cb VIDEO INPUT Existing Outdoor Aerial TV 300R Coaxial digital output to coaxial digit...

Страница 20: ...nect to a VCR or Camcorder or other AV device using RCA Audio Video cable Connecting External Equipment EJECT PLAY STOP UP DOWN SOURCE RECORD STANDBY ON S VIDEO 2 AV INPUT VIDEO 2 AUDIO 2 R L RCA Audi...

Страница 21: ...everal minutes to be done 4b A warning message appears when the aerial connection did not make properly 5 Press EJECT to open the disc tray 6 Place a recordable DVD RW or DVD R onto the disc tray Labe...

Страница 22: ...ECT again to close the tray The DVD Recorder starts playback 5 If it does not start playback do the following If playing a DVD DVD R DVD RW a disc menu appears Press to select the preferred title and...

Страница 23: ...tandard Long Play to record about six hours For details on how to do Record Quality OSD Setting please refer to Chapter 4 2 RECORD DISC Setup Disc Media Setting Only works when a DVD R or DVD RW is lo...

Страница 24: ...ime Pressing the REC OTR button repeatedly will increase the record time in 30 minute increments Depending on the recording quality you selected each time you press the button the recording time will...

Страница 25: ...doing this the timer recording will be complete To return to the Setup MENU screen Press button To finish the setup operation Press Timer to exit from Timer setup screen Exit Event Date Quality Prog S...

Страница 26: ...e sure Date and Time of this DVD Recorder be the same as your local time If not check Date Time Setting to correct it Refer to Timer Setup section Before schedule recording remember to put a recordabl...

Страница 27: ...6 Press SOURCE on the remote control to toggle different external A V input sources Press SOURCE repeatedly to scroll through various A V input including TV Scart CVBS1 CVBS2 S Video1 and S Video2 7...

Страница 28: ...itle One is to edit a title while the title is playing the other is to edit a title while the title is not playing 1 3 Editing You have five options to edit a title Insert chapter Remove chapter Hide...

Страница 29: ...o see the hidden chapter you have to select it by chapter number For details please refer to Chapter 2 2 Direct Selection of Scenes To playback hidden chapters refer to Play Full Title function To rec...

Страница 30: ...o Play Full Tilte 2 Press EDIT the EDIT menu will be shown on the screen 3 Press to select Show chapter The hidden marks will be removed and hidden chapters will be recovered New picture You can creat...

Страница 31: ...ss TITLE Title 2 S VIDEO2 8 20 49 PM Apr 10 2004 Length 0 20 18 Quality SP Rec mark Title 3 CVBS2 11 22 08 PM Apr 15 2004 Length 0 12 33 Quality EP Title 1 Prog02 2 36 11 PM Apr 9 2004 Length 0 30 42...

Страница 32: ...Length 0 20 18 Quality SP Title 3 CVBS2 11 22 08 PM Apr 15 2004 Length 0 12 33 Quality EP Title 1 Prog02 2 36 11 PM Apr 9 2004 Length 0 30 42 Quality HQ DVDRW EDIT Protect Title Erase Title Play full...

Страница 33: ...tle from the title menu 2 Press EDIT the EDIT menu will be shown on the screen Press to select Play full title and press 3 It will start playback the entire title including hidden chapters from the di...

Страница 34: ...S VIDEO2 8 20 49 PM Apr 10 2004 Length 0 20 18 Quality SP Rec mark Title 3 CVBS2 11 22 08 PM Apr 15 2004 Length 0 12 33 Quality EP Title 1 Prog02 2 36 11 PM Apr 9 2004 Length 0 30 42 Quality HQ Title...

Страница 35: ...ore titles recorded on it a menu screen will appear on the TV screen Proceed with steps 5 and 6 when a menu is available on the disc 5 Press to select the item you want to change and press The content...

Страница 36: ...e control to turn to stand by mode When on stand by mode the power indicator of this DVD Recorder turns red The disc continues to rotate while the menu is displayed even after the player has finished...

Страница 37: ...d To return to normal playback Press Skipping Ahead or Back to Chapters You can skip a specific chapter or track to playback Skipping Ahead Press NEXT during playback Skips a chapter each time you pre...

Страница 38: ...To locate Chapter 12 press 0 1 and 2 T 012 C 001 00 48 45 To locate 01 hr 50 min 00 sec press 0 1 5 0 0 and 0 T 001 C 001 01 50 00 5 Press This DVD Recorder starts playback from selected title chapter...

Страница 39: ...the box disappears Repeat playback works only with discs for which the elapsed playing time appears on the player s display during playback Repeat playback may not work correctly with some DVDs 1 Pres...

Страница 40: ...choose the preferred scene to see it in different sizes Zoom x2 Zoom x4 and Zoom x8 To return to normal playback Press ZOOM a number of times until the zoom window box disappears You can change the a...

Страница 41: ...the initial setting If you select a subtitle language which is not recorded on the disc the player will play back a prior subtitle language programmed on the disc You can change the subtitle language...

Страница 42: ...ted item To enter other menu screen Repeat steps 2 and 3 To return to the previous menu screen Press TITLE 1 Press MENU A DVD chapter menu with brief broadcast of each paragraph now appears You may se...

Страница 43: ...on the tray After few seconds the player starts play back the pictures in slide show automatically ZOOM 1 Press ZOOM repeatedly to view picture in different sizes Zoom x2 Zoom x4 Zoom x1 2 Zoom x1 4...

Страница 44: ...s EJECT to close the tray 5 Press TV DVDR to DVDR mode A Track List appears as above screen Track List Track 001 00 03 56 Track 002 00 03 16 Track 003 00 02 53 Track 004 00 03 42 Track 005 00 03 00 Tr...

Страница 45: ...02 Bye Baby MP3 003 A 03 When You Wish Upon a Star MP3 004 A 04 What a Wonderful World MP3 005 A 05 Baby Mine MP3 006 A 06 Humble Me MP3 007 A 07 Nighty Night MP3 008 A 08 Brahm s Lullaby MP3 009 A 09...

Страница 46: ...button Skipping Back Press PREV during playback When you press the button once midway through a track this DVD Recorder returns to the previous track to playback The player skips a track each time th...

Страница 47: ...ist Select Play then press to start playback of the order from the programme list Press to clear all the programmed tracks Press to continue to the next page The Programme List according to your selec...

Страница 48: ...rself On the contrary if you did set all the playback order of the available tracks this DVD Recorder will start playback of the order you specified To Remove the Programmed tracks Press to choose the...

Страница 49: ...box turns yellow you can t choose other options Selecting Music by Track 1 Press Goto during playback 2 Press to move the cursor to the time box Tr 001 00 48 45 1 2 Normal 3 Press the time box turns y...

Страница 50: ...yback press Goto while the box turns white If the box turns yellow you can t choose other options You could choose to playback your audio CD in random order 1 Press Goto during playback 2 Press to mov...

Страница 51: ...1 4 Remaining Track 1 3 Off 4 Press to select to display other information of the play ing disc 5 Press The information you selected will be displayed at the bottom CD T 002 016 RT 00 00 12 RT Remain...

Страница 52: ...nder RECORD DISC Setup a a When No Disc is placed B b b When a DVD R disc is placed B c c When a DVD RW disc is placed CHANNEL Auto Tuning System Fine Tune Programme Swap Erase Programme Exit Select C...

Страница 53: ...elect Confirm Exit In Advance 1 Press the STANDBY ON button on the DVD Recorder or the Standby button on the remote control to turn on your DVD Recorder 2 Turn on your TV and switch it to the correct...

Страница 54: ...ill erase and replace all previously stored channels 2 Before doing Channel Search make sure your TV connections has been made properly For Details on how to make TV connection to your DVD Recorder pl...

Страница 55: ...Setup MENU screen Press button To finish the setup operation Press to exit from Channel setup screen Fine Tune Setting Exit Select Confirm CHANNEL Auto Tuning System Fine Tune Programme Swap Erase Pr...

Страница 56: ...insert no disc a DVD R or a DVD RW disc Please find the Discs you can use on top of each function that best suits your case DVD R DVD RW No Disc DVD R DVD RW No Disc a When a DVD R disc is placed b Wh...

Страница 57: ...Chapter markers after recording For details please refer to Chapter 1 3 Editing The OSD Example in the right is when No Disc is placed If you insert a DVD R or DVD RW disc the OSD will be shown as fo...

Страница 58: ...fo Setting 1 Press Record Disc in the stop mode to display the menus 2 Press to select Disc Info and then press 2a If placed a DVD R disc 2b If placed a DVD RW disc 3 The related information about you...

Страница 59: ...d then press The finalization function only works Once in DVD R discs You must finalise a DVD R disc before it can be played on another DVD player To return to the Setup MENU screen Press button To fi...

Страница 60: ...Protect Disc Setting 1 Press Record Disc in the stop mode to display the menus 2 Press to select Protect Disc and then press 3 Select Confirm and then press After the Disc is Protected the Erase func...

Страница 61: ...the movie in FULL size IMPORTANT If you select this setting for a conventional size TV this might result a distorted screen 3b 4 3 Letter Box Select 4 3 Letter Box if you want to play the movie in it...

Страница 62: ...ess To return to the Setup MENU screen Press button To finish the setup operation Press Video to exit from Video setup screen TV System Setting Subtitle Setting Allows you to set various languages for...

Страница 63: ...ve connected this recorder s S Video Out jacks to your TV s S Video In jacks Select S Video Only if your TV does not provide Progressive nor component jacks For details on the way of connections pleas...

Страница 64: ...8 No Limit General Audience recommended as acceptable for viewers of all ages Parental Guidance suggested Material is unsuitable for children under the age of 13 Parental Guidance restricted recommen...

Страница 65: ...ve inputted the wrong password the following screen will appear Please then re enter your password If you ve forgotten your password please select Factory Reset to restore to the default setting To re...

Страница 66: ...on To finish the setup operation Press System to exit from System setup screen Factory Reset Setting Exit Select Confirm SYSTEM Rating Change Password Version Factory Reset Exit Return SYSTEM Rating C...

Страница 67: ...of programming system may be various for example VCR Plus North South America G Code Asia Australia Video Plus United Kingdom and ShowView Europe Africa Important Make sure Date Time Setting be the s...

Страница 68: ...ough the following items Event Date Quality Freq End Start Prog Example The default setting will be shown on screen for your reference after you select and enter one entry Press to select the source o...

Страница 69: ...ll change automatically according to your setup date 4 Press Every time before doing timer recording you have to check the date and time setting again to make sure the information of the date and time...

Страница 70: ...ngs menu to make sure that the digital output is set to on Check if the audio format of the selected audio language matches your receiver capabilities Distorted picture Check the disc for fingerprints...

Страница 71: ...5 1 Channel speaker Check if the speaker is properly connected Check if the audio output setting is right SYMPTOM COMMON REMEDY No key operation by the DVD Recorder Turn the unit off and then back to...

Страница 72: ...re likely to occur which will cause noise If the disc is brought from a cold to a warm environment moisture may form on the disc Wipe this moisture off with a soft dry lint free cloth before using the...

Страница 73: ...0 6 mm thin discs which are adhered to each other Since the thinner the disc the higher the density at which the information can be recorded a DVD disc has a greater capacity than a single 1 2 mm thi...

Отзывы: