background image


General Information 


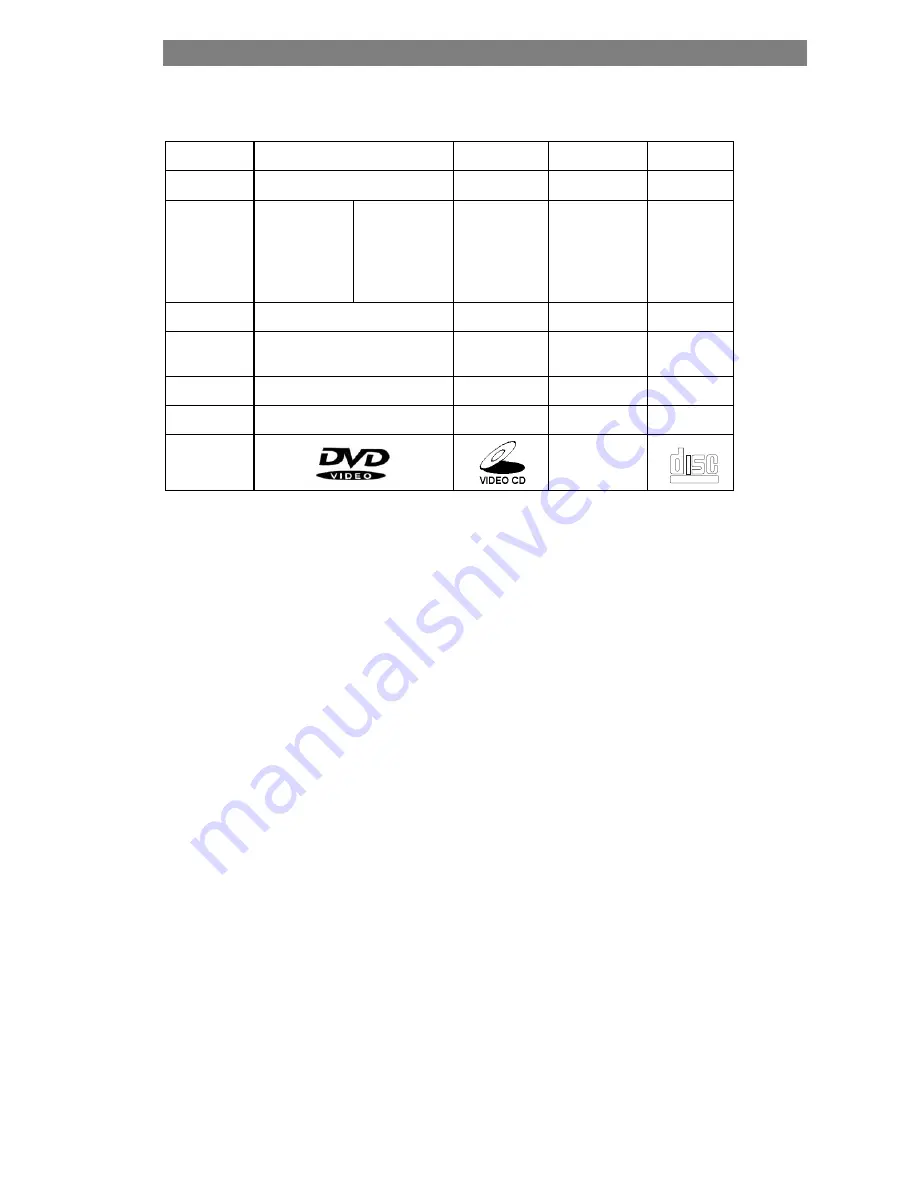
 Disc Information 


Disc types 

DVD 

VCD 

DIVX 

CD 

Recording 
method 

Digital / MPEG II 

Digital / MPEG I 

MPEG 4 

Digital 

Capacity Single 

layer 

Single side 

4.7GB = 2 hr 


Single layer 

Double sides 

8.5GB =4 hr 

650MB 

74min 

650MB 


 650MB 

74min 

Disc size 

12cm / 8cm 

12cm 


12cm / 8cm 

Horizontal 
Resolution 
 

500 lines up 

240 lines up 


Sub-titles 32 

  - 

Sound tracks 


Symbol 


DIVX 


This unit can play the following types of disc: 
 
DVD  


single sided / double sided 
single layered / double layered 

DivX 


Ver. 3.11 / 4.xx / 5.xx 

CD-DA 
MP3 
CD-R 
CD-RW 


COMPACT

DIGITAL AUDIO

Содержание Gdvd161dx

Страница 1: ...1 DVD DIVX PLAYER GDVD161DX INSTRUCTION MANUAL Read this manual before installation and use Goodmans Product Information Helpline 0870 873 0080 ...

Страница 2: ...F CONTROLS 12 1 FRONT PANEL 12 2 REAR PANEL 12 3 REMOTE CONTROL 13 INSERTING BATTERIES INTO THE REMOTE CONTROL 14 GETTING STARTED 15 1 PLAY A DISC 15 2 STOP 15 3 SKIP SEARCH 16 4 SLOW MOTION STEP 16 5 VOLUME 16 SETUP MENU 17 1 GENERAL SETUP 17 2 SPEAKER SETUP 19 3 AUDIO SETUP 21 4 DIVX R REGISTRATION 23 5 PREFERENCES 24 JPEG PICTURE CDS 27 SMART NAVI MENU 27 FUNCTION KEYS 27 MP3 OPERATION 28 SMART...

Страница 3: ...3 Important Safeguards ...

Страница 4: ...unattended operations or has a standby mode Switch off using the switch located on the equipment and make sure that your family knows how to do this Special arrangement may need to be made for infants or handicapped people DON T listen to headphone at high volume as such use can permanently damage your hearing DON T obstruct the ventilation of the equipment for example with curtains or flourishing...

Страница 5: ... 2 hr Single layer Double sides 8 5GB 4 hr 650MB 74min 650MB 650MB 74min Disc size 12cm 8cm 12cm 12cm 8cm Horizontal Resolution 500 lines up 240 lines up Sub titles 32 Sound tracks 8 2 Symbol DIVX This unit can play the following types of disc DVD single sided double sided single layered double layered DivX Ver 3 11 4 xx 5 xx CD DA MP3 CD R CD RW COMPACT DIGITAL AUDIO ...

Страница 6: ... Soviet Union India North Korea Pakistan Turkmenistan 6 China DVD Features Each DVD disc contains different combinations of features depending on the design and production of the disc The following symbols representing some DVD features Regional Code Video Output System Dolby Digital Surround DTS Digital Surround Number of audio Tracks Number of Sub titles Screen modes Child Lock Number of Angles ...

Страница 7: ...ipment or near any heat source Avoid positions where the disc would be subjected to direct sunlight for long periods After use return the DVD disc back to its case and store in dry location free from moisture and humidity Clean the disc with soft dry cloth only wipe gently from centre to the edge When cleaning do not use solvents commercially available cleaners or antistatic spray intended for use...

Страница 8: ... Connections 1 CONNECTING TO TV SET Connect the player to the TV using the SCART cable as shown below Please ensure that the unit is disconnected from the mains supply until all connections have be made PLAYER ...

Страница 9: ...EO AMPLIFIER Connect the player to the TV using the SCART cable as shown below Connect the Audio output Front Left and Front Right of the DVD player to the audio input terminals of the stereo amplifier cable not supplied PLAYER ...

Страница 10: ...OBLY DIGITAL decoder and 6 analog audio outputs Connect the player to the TV using the supplied SCART cable as shown below Connect each of the 6 output sockets to the relevant inputs on the amplifier cables not supplied An amplifier with 6 channels input and output is required AC3 decoder is NOT required PLAYER ...

Страница 11: ...UTPUT should be set to SPDIF RAW Please double check with the Amplifier s instruction manual to find the correct setting Press the SETUP button on the remote control to display the player s SETUP MENU Press up down navigation keys on the remote control to highlight AUDIO SETUP then press ENTER Press up down navigation keys on the remote control to highlight SPDIF OUTOUT then press right navigation...

Страница 12: ...ection to amplifier without digital decoder 4 S Video Output Socket 5 YCbCr Video output Cr 6 Coaxial Digital Audio output for connection to amplifier with digital decoder 7 Optical Digital Audio output for connection to amplifier with digital decoder 8 Centre Output for connection to amplifier without digital decoder 9 Surround Left Output for connection to amplifier without digital decoder 10 Fr...

Страница 13: ...13 3 REMOTE CONTROL ...

Страница 14: ...arity When replacing batteries replace both batteries Do not mix new and used batteries together If you are not going to use the DVD Player for a long time remove the batteries from the remote control to prevent against damage due to leaking batteries Remove the battery compartment cover from the rear of Remote Control Insert two AAA batteries observing the correct polarities Replace the battery c...

Страница 15: ...disc into the tray with the DVD printed side uppermost and press the OPEN CLOSE button to close the disc tray The unit will take several seconds to read the disc data the disc type will be displayed in the top left corner of the TV screen and playback will commence automatically Please Note MP3 discs may take longer to read when loading On some DVD discs a menu will be shown please use one of the ...

Страница 16: ...apters Press the SEARCH FORWARD button to cycle through the available speeds for forward search Press the SEARCH BACKWARD button to cycle through the available speeds for reverse search 4 Slow Motion Step Press the SLOW button to play in slow motion Press repeatedly to cycle through the available rates as follows NOTE 2x is speed 4x is speed etc Repeatedly press the STEP button to advance frame by...

Страница 17: ... is played using the letterbox style If connected to wide screen TV black bands will appear at top and bottom of the screen Wide For 16 9 TV Select when connected to a wide screen 16 9 TV set PIC MODE PICTURE MODE DEFAULT AUTO Select AUTO the player PICTURE mode will depend on DVD disc Select HI RES format for best image resolution Select N FLICKER format on images or pictures with noise or distor...

Страница 18: ...ith captions is being viewed and the captions are required If the captions are not required set this option to OFF SCR SAVER SCREEN SAVER DEFAULT ON This player has a screen saver which if this option is set to ON will appear if no button is pressed for 1 minute To deactivate this screen saver set the option to OFF TV DISPLY PIC MODE ANGLE MARK ON OSD LANG OFF CAPTIONS SCR SAVER MAIN PAGE GENERAL ...

Страница 19: ...Please note all other options in the SPEAKER SETUP menu will only be available if this option is set to off CENTER DEFAULT ON This option will turn the CENTER speaker output on or off REAR DEFAULT ON This option will turn the REAR speaker outputs on or off SETUP MENU MAIN PAGE GENERAL SETUP SPEAKER SETUP AUDIO SETUP DIVX R REGISTRATION PREFERENCES EXIT SETUP DOWNMIX LT RT CENTER STEREO REAR OFF SU...

Страница 20: ...ll speakers arrive at your desired listening location at the same time TEST TONE DEFAULT OFF A test tone is played through each speaker in turn to aid in the positioning and setting of delays for the speakers DOWNM IX CENTER REAR SUBWOOFER ON CNTR DELAY OFF REAR DELAY TEST TONE M AIN PAGE SPEAKER SETUP PAGE DOWNM IX CENTER REAR SUBWOOFER 5M S CNTR DELAY REAR DELAY 3M S TEST TONE 1M S M AIN PAGE OF...

Страница 21: ...ket DUAL MONO Mode selection for the L R channel outputs Mix mono can be used only if the DVD played has 5 1 channel audio COMPRESSION DEFAULT OFF Dynamic Range Control is used to suppress loud sounds and enhance quiet sound for using the player at night There are 8 steps between full compression and no compression SETUP MENU MAIN PAGE GENERAL SETUP SPEAKER SETUP AUDIO SETUP DIVX R REGISTRATION PR...

Страница 22: ...ate if required LPCM OUTPUT DEFAULT LPCM 96K Select the LPCM Line Pause Code Modulation OUTPUT between LPCM 48K and LPCM 96K The difference between LPCM 48K and LPCM 96K lies in the sampling frequency The higher the sampling frequency is the better the output audio quality is It is recommended to select LPCM 96K SPDIF OUTPUT OP MODE DUAL MONO COMPRESSION PRO LOGIC OFF LPCM OUTPUT ON AUTO MAIN PAGE...

Страница 23: ...r with the DivX Video On Demand service This will allow the purchase and renting of videos using the DivX Video On Demand format To learn more visit www divx com vod SETUP MENU MAIN PAGE GENERAL SETUP SPEAKER SETUP AUDIO SETUP DIVX R REGISTRATION PREFERENCES EXIT SETUP ...

Страница 24: ... AUDIO language to be used when viewing DVD If the selected language is not recorded on the disk the default language on the DVD will be heard SUBTITLE LANGUAGE DEFAULT OFF Select the default SUBTITLE language to be used when viewing DVD SETUP MENU MAIN PAGE GENERAL SETUP SPEAKER SETUP AUDIO SETUP DIVX R REGISTRATION PREFERENCES EXIT SETUP TV TYPE VIDEO OUTPUT AUDIO ENGLISH SUBTITLE FRENCH DISC ME...

Страница 25: ...an be viewed without entering a PIN number NOTE This setting varies between DVDs If no rating is recorded on DVD the player will play the disc ignoring what is set for this option PASSWORD SETTING DEFAULT 3308 To change the rating set for PARENTAL option a PIN number PASSWORD must be entered Use this option to change the PIN number from the default value of 3308 Select change then on the next scre...

Страница 26: ...splay the folder and track list When listening to an MP3 CD or viewing a JPEG picture CD Select NO MENU to use the MP3 CD as a normal CD VIDEO OUTPUT AUDIO SUBTITLE DISC MENU LOCALE PARENTAL PASSWORD DEFLAUTS RESET PREFERENCE PAGE AUDIO SUBTITLE DISC MENU LOCALE PARENTAL PASSWORD DEFLAUTS NO MENU SMART NAVI WITH MENU PREFERENCE PAGE ...

Страница 27: ...GATIONAL KEYS to select the file to start playback with During playback press the STOP J button to return to the menu If the SMART NAVI option in the setup menu is set to No Menu the smart navi menu will not be shown To start playback press the PLAY button FUNCTION KEYS Zoom Press the ZOOM Button ZOOM ON will be shown on the TV screen then press SEARCH FORWARD BACKWARDS buttons to zoom in or zoom ...

Страница 28: ...o select the file to start playback with During playback the NAVIGATIONAL KEYS will not function and it will not be possible to use the menu to select an new track Press the STOP J button to return to the menu If the SMART NAVI option in the setup menu is set to No Menu the smart navi menu will not be shown and the disc will be played as a normal CD FUNCTION KEYS Forward Press the SEARCH FORWARD B...

Страница 29: ...ng The left column shows a list of folders on the disc The right column shows the contents of the folder selected Use the NAVIGATIONAL KEYS to highlight the folder to be viewed and then press enter The contents of the selected folder will be displayed in the right column Then use the NAVIGATIONAL KEYS to select the file to be played During playback press the STOP J button to return to the menu FUN...

Страница 30: ...back press to pause To resume normal playback from pause mode press this button again SEARCH FORWARD SEARCH BACKWARD Use these buttons to search backwards or forwards for a specific section at high speed Press the button repeatedly to change the speed Press PLAY PAUSE button to resume normal playback Please note While searching the audio will be muted SKIP FORWARD SKIP BACKWARD Skip to the next or...

Страница 31: ...s repeatedly until OFF is shown on the display PBC PLAYBACK CONTROL for VCD PBC Playback control will show a menu of different movies that are recorded onto the VCD Use the numerical keys to select the movie to be viewed Please note VCD will only work on version 2 0 VCDs ENTER CONFIRM SELECTION SHUFFLE PLAYBACK THE MATERIAL ON THE DISC IN A RANDOM ORDER NAVIGATION Keys USE THESE BUTTON TO MOVE MAK...

Страница 32: ...YBACK CHAPTER TITLE TRACK DISC Use this button to select the REPEAT mode for playback DVD mode Press the REPEAT button once to repeat the current chapter Press again to repeat the current title Press a third time to repeat the whole contents of the disc Finally press again to cancel repeat mode Other disc types mode Press the REPEAT button once to repeat the current track Press again to repeat eve...

Страница 33: ...ogram Press PROG button and the following will be shown on the screen PROGRAM P 00 00 track number Program position Use the numerical keys to directly enter a track into the programme memory or use the NAVIGATIONAL KEYS to highlight a track with SMART NAVI set to WITH MENU and then press enter to store the track into the programme memory For example Press 2 P 01 02 then Press 5 P 02 05 then Press ...

Страница 34: ...E The audio will be muted during slow motion playback STEP TO ADVANCE FRAME BY FRAME PRESS THE STEP BUTTON REPEATEDLY TITLE GO TO DVD DISC TITLE MENU DVD DISC ONLY SUB TITLE SUBTITLE LANGAGE Press SUBTITLE button repeatedly to cycle through the available subtitle languages on the DVD ANGLE VIEW ANGLE On some DVDs a particular scene may be recorded at the same time from different angles Use the ANG...

Страница 35: ...on L R TO CHANGE THE AUDIO TRACK VCD only SETUP DISPLAY THE SETUP MENU VIDEO CHANGE THE VIDEO OUTPUT BETWEEN PAL AND NTSC NOTE the video output varies according to the DVD v Press and v to increase or decrease the audio volume ...

Страница 36: ...is dirty or damaged Clean the disc or try another disc 2 Check that the colour system PAL NTSC matches the colour system of the TV 3 Do not connect the DVD through a Video player as the copyright protection system in the player may make some DVD un viewable Picture not full screen 1 Select the screen format Enter SETUP MENU TV DISPLAY 2 Select the screen format from DVD disc menu DVD dependant Can...

Страница 37: ... recognised This is normal and not a fault with the unit 2 Check the disc if all the files on disc are MP3 files 3 Skip the file or try the other file Remote control does not function 1 Remove all obstacles between the remote and the unit 2 Point the remote at the remote sensor on the unit 3 Check the batteries of the remote control have been inserted correctly observing the polarities 4 Replace t...

Страница 38: ...gital output DTS digital output Video Output 1Vpp at 75 ohm Audio Output Stereo 2Vpp Audio Output 5 1 channels 0 5Vpp Frequency Response CD 4Hz 20KHz EIAT DVD 4Hz 22KHz 48K 4Hz 44KHz 96K S N ratio 92Db THD 0 04 Output Terminals S Video output X1 AC3 5 1 channel X 1 Optical digital output X 1 Coaxial digital output X1 YCbCr output X1 Power input 110 240VAC 50Hz 60Hz 25W Dimension Body size W430 X D...

Отзывы: