Goodmans GCE67W5DVDK Скачать руководство пользователя страница 30

30

DUAL-SCREEN PORTABLE DVD PLAYER 
USER GUIDE

Disc Handling and Maintenance

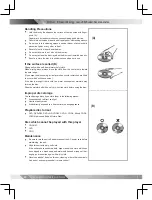
Handling Precautions


Hold the disc by the edges so the surface will not be soiled with finger-
prints. (A)


Fingerprints, dirt and scratches can cause skipping and distortion.


Do not write on the label side with a ball-point pen or other writing utensils.


Do not use record cleaning sprays, benzine, thinner, static electricity 
prevention liquids or any other solvent.


Be careful not to drop or bend the disc.


Do not install more than 1 disc on the disc tray.


Do not try to close the disc tray when the disc is not installed properly.


Be sure to store the disc in its exclusive case when not in use.

If the surface is soiled (B)

Wipe gently with a soft, damp (water only) cloth.
When wiping discs, always move the cloth from the center hole toward 
the outer edge.
(If you wipe the discs using a circular motion, circular scratches are likely 
to occur, which will cause noise.)
If the disc is brought from a cold to a warm environment, moisture may 
form on the disc
Wipe the moisture off with a soft, dry, lint-free cloth before using the disc.

Improper disc storage

You can damage discs if you store them in the following places:


Areas exposed to direct sunlight


Humid or dusty areas


Areas directly exposed to a heat outlet or heating appliance

Playable disc format 


DVD, DVD+RW, DVD+R, DVD-RW, DVD-R, CD-DA, Mixed CD-DA, 
JPEG file disc and Kodak Picture Disc.

Disc which cannot be played with this player 


CD-ROM


CVD


CD-G

Maintenance


Be sure to turn the unit off and disconnect the AC power cord before 
maintaining  the unit.


Wipe this unit with a dry soft cloth.


If the surfaces are extremely dirty, wipe clean with a cloth which has 
been dipped in a weak soap-and-water solution and wrung out thor-
oughly, and then wipe again with a dry cloth.


Never use alcohol, benzine, thinner, cleaning fluid or other chemicals. 
And do not use compressed air to remove dust.

(A)

(B)

Содержание GCE67W5DVDK

Страница 1: ...82 195 00220 GCE67W5DVDK Dual Screen Portable DVD Player With Remote Control User Guide Goodmans Product Information Helpline 0870 873 0080 GCE67W5DVDK...

Страница 2: ...Changing Audio Soundtrack Language 19 Changing Subtitle Languages 19 Viewing from Different Angles 19 Using a DVD Menu 19 Using the Menu Function 19 Audio CD Playback 20 Basic Audio CDs Playback 20 S...

Страница 3: ...must be authorised by Macrovision Corporation and isintended for home and other limited viewing uses only unless otherwise authorised by Macrovision Corporation Reverse engineering or disassembly is p...

Страница 4: ...r filled items such as a vase on top of the Portable DVD Player Do not place naked flame sources such as candles on top of the Portable DVD Player Cleaning Ensure that the mains adapter is disconnecte...

Страница 5: ...duce heat DO NOT use this apparatus near water for example sinks tubs and pools or expose it to rain moisture or dripping or splashing liquids No objects filled with water such as vases should be plac...

Страница 6: ...ul To guard against this before your hearing adapts set the volume at a low level Declbel Level dB example 30dB quiet library soft whisper 40dB Living room fridge freezer bedroom away from traffic 50d...

Страница 7: ...1 Monitor X 1 Remote Control X 1 Rechargeable battery 2800mAh X 1 Power adaptor X 1 12V cigar adaptor X 1 AV RCA cable X 1 Earphone X 2 Carry bag for the DVD player X 1 Mounting straps for the monito...

Страница 8: ...F BWD LEFT Button 6 PLAY SEL Button 7 PREVIOUS Button 8 STOP DOWN Button 9 Number Buttons 10 LCD Button Remote Control 11 MODE Button 12 SUBTITLE Button 13 TITLE Button 14 ANGLE Button 15 F FWD RIGHT...

Страница 9: ...ed continued 1 LCD Screen 2 Speakers 3 VOLUME Button 4 VOLUME Button 5 PLAY Button 6 PAUSE Button 7 STOP Button 8 OPEN Button 9 Remote Sensor 10 LED Indicator 11 Disc Cover 12 DC IN Socket 13 POWER Sw...

Страница 10: ...4 3 switch 5 BRIGHTNESS adjustment dial 6 COLOUR adjustment dial 7 Earphone 1 socket 8 Earphone 2 socket 16 10 11 12 13 14 15 Front Panel Back Panel Right Left Panel 5 6 7 8 9 9 Volume adjustment dia...

Страница 11: ...By AC power adaptor b By cigar adaptor plug Getting Started continued Power Supply Connect the supplied AC power adaptor 12Vdc 1 25A the other end to the wall outlet Connect the supplied 12 volt cigar...

Страница 12: ...Always remember to lock the clips and tighten the straps to ensure safety of your passengers 1 Place your portable DVD player into the carry bag 2 Pull the elastic straps over the top corners of the s...

Страница 13: ...gh eyelets of the monitor 1 Loop the straps around the headrest with the screen facing the rear seat and then fasten the straps with the velcros 2 6 Connect the DVD player and the monitor to your car...

Страница 14: ...the unit 2 The charging time the battery pack is approximately 3 5 hours and the playing time is approximately 2 5 hours Battery Pack Information Charge Playback Time Charge Time hr DVD Playback Time...

Страница 15: ...press battery release button then slowly remove it from the portable DVD player by sliding it carefully away from the player 2 Connect the AC power adaptor to the DC IN socket on the right side of th...

Страница 16: ...ode if the player is in AV IN Mode Note AV OUT appears on the screen after switching the mode Connecting to Other Audio Equipment 1 Connect the DVD Player to Power 2 Connect the Coaxial output of the...

Страница 17: ...ayer to the Audio Video Out of external devices 3 Press Mode button to switch to AV IN Mode if the player is in AV OUT mode Note AV IN appears on the screen after switching the mode VIDEO OUT AV IN AU...

Страница 18: ...pped by pressing Play Sel 2 To completely stop the disc playback press Stop again Pausing Playback 1 Press Pause 2 To return to normal playback press Play Sel Frame Advance Step 1 Press Pause to pause...

Страница 19: ...ng the button several times it may indi cate that language is not available on the disc Changing Subtitle Languages 1 Press Subtitle during playback 2 Press Subtitle a number of times until a preferre...

Страница 20: ...n press Info again Skipping a Track Ahead or Back Skipping Ahead Press Next during playback Skip a track each time you press the button Skipping Back Press Previous during playback When you press the...

Страница 21: ...enu appears after a few seconds 2 Press Left to enter the folder list on the left screen Press Up Down to highlight a folder and then press Play Sel 3 Press Right to enter the file list on the right s...

Страница 22: ...press Play Sel To leave SETUP MENU press Setup Note If the language selected is not recorded on the disc the player will play the top priority language of the disc Audio Setup Digital Out 1 Press Setu...

Страница 23: ...t to a 2 channel digital stereo amplifier Please do not adjust the volume to zero Video Setup 1 Press Setup in stop mode 2 Press Left Right to select VIDEO SETUP icon and then press Play Sel AUDIO SET...

Страница 24: ...6 9 Wide Select 16 9 Wide for a wide screen TV set to played in FULL size To leave SETUP MENU press Setup TV System 3 Press Up Down to select TV SYSTEM and then press Play Sel 4 To select the option p...

Страница 25: ...r children under age 17 8 ADULT Adult only Note You can use the parental control lock ONLY with DVD discs featured with the parental lock function Please keep in mind that discs not encoded with ratin...

Страница 26: ...preferred option and then press Play Sel To leave SETUP MENU press Setup Note Pressing Angle will change camera angles for moviesthatsupportthisfeatureregardlessofwhether the ANGLE MARK feature is On...

Страница 27: ...ain until the LCD setting box disappears Panel Setting 1 Press LCD a number of times to select PANEL 2 Press Left Right to choose a preferred panel setting Press LCD again until the LCD setting box di...

Страница 28: ...O NOT leave the disc near a heat source such as heating pipe DO NOT leave a disc inside a car under direct sunlight After Playback always remove the disc from the player and return it to the display s...

Страница 29: ...hoose the correct setup TV Aspect item No operations perform with the remote Check the batteries are installed with the correct polarities and control The batteries are depleted replace them with new...

Страница 30: ...circular motion circular scratches are likely to occur which will cause noise If the disc is brought from a cold to a warm environment moisture may form on the disc Wipe the moisture off with a soft...

Страница 31: ...axial Output x 1 Headphone Socket Headphone Socket x 1 Line Voltage AC 100 240 VAC 10 50 60 Hz Adapter Power Consumption 15W 12V 1 25A Dimensions 210 mm L x 155 mm W x 41 mm H Monitor LCD Display 7 ac...

Страница 32: ...Goodmans Product Information Helpline 0870 873 0080...

Отзывы: