background image


-

11-


5.


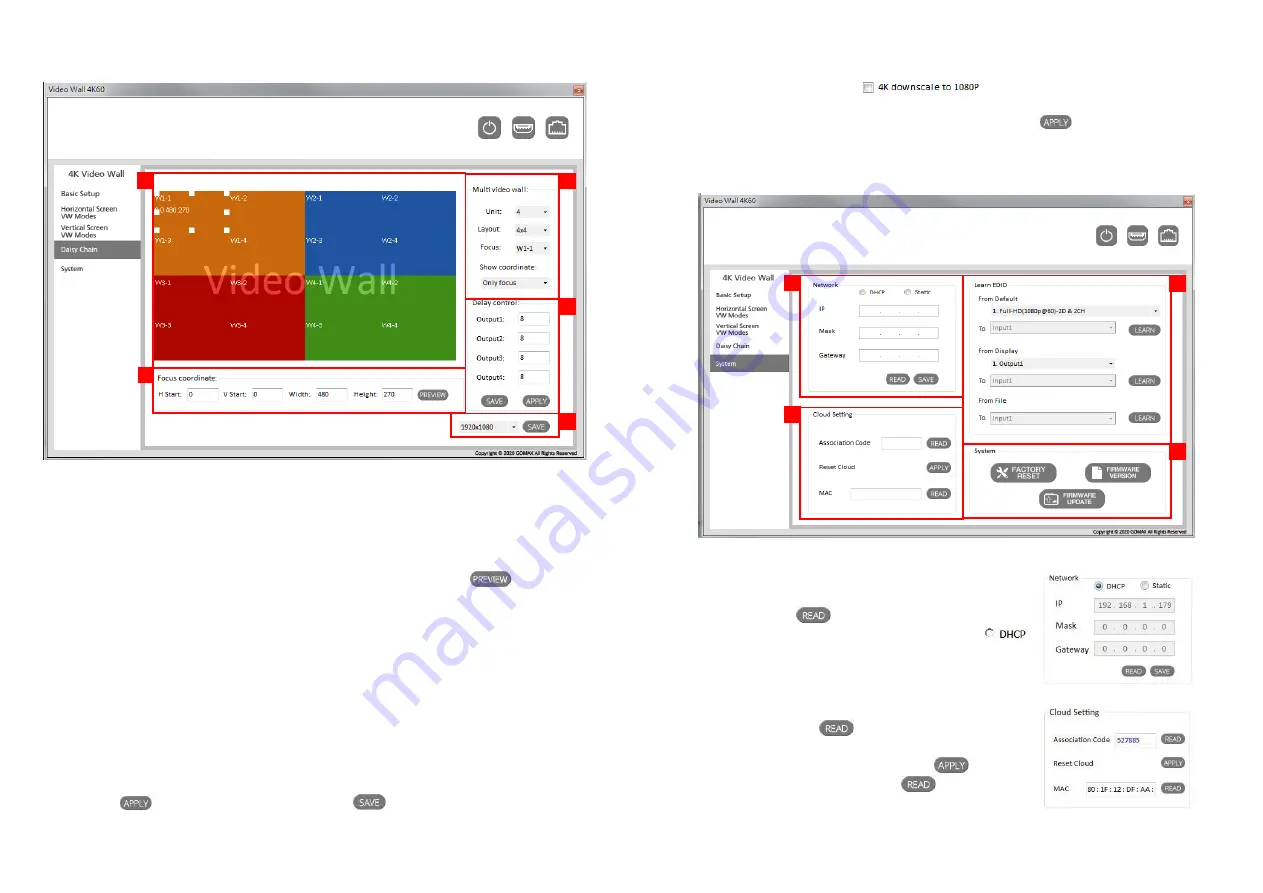
Daisy Chain:   


(1)


Output Layout Window: 

You can select the area by double left click of your mouse to adjust in the window. Then you can 
move  the  area  position  and  change  size  directly.  The  different  colors  of  window  represent  the 
different output TVs. 

(2)


Focus coordinate:   

You  can  set  the  coordinates  and  size  of  the  selected  area,  and  click 


button  after 

completing the settings. 


H Start / V start: Set the starting pixel value of the area. 


Width / Height: Set the width and height value of the area. 

(3)


Multi Video Wall: 


Unit: Video amount setting. Up to 4 units. 


Layout: Select video wall layouts. Max up to 4x4. 


Focus: Select the area you want to set. 


Show coordinate: Select the display coordinate modes. We provide 4 coordinate display modes, 
including No, Only focus, Only focus group, and All. 

(4)


Delay Control: 
Each delay value should be the multiple of 8. You can apply your current settings to the output by 
clicking 


button or you can save it by clicking 

  button. 


-

12-


(5)


Video Resolution: 

If you have clicked the option 

  to downscale the resolution to 1080p in other 

modes, please select 1920x1080 output resolution. If you haven’t clicked, please select 3840x2160 
output resolution. After completing the settings, you can click 


button to save all settings 

with the current selected focus area.   

6.


System:   


(1)


Network: 

You can use the Ethernet to control software program. First, 
you should click


button to read the Ethernet setting 

from  device  and  manually  set  to  device  or  click 


option to automatically get the IP address. After the step of IP 
configuration, please restart the machine. 


(2)


Cloud Setting: 

First,  click  the  first


button  to  get  an  “association 

code”. The device can use this code to pair with cloud server. 
After  a  successful  pairing,  you  can  click 


button  to 

reset  cloud.  Then,  click  the  second


button  to  get  a 

string of codes to confirm if the paired device is correct. 


Содержание VW-1404ZH-C

Страница 1: ...ual rev 210119 Made in Taiwan TABLE OF CONTENTS INTRODUCTION 1 FEATURES 1 SPECIFICATIONS 2 PACKAGE CONTENTS 2 HARDWARE INSTALLATION 3 CONNECTION DIAGRAM 3 PANEL DESCRIPTIONS 4 SUPPORTED RESOLUTION 5 O...

Страница 2: ...1080p60 TV 2x2 layout only Supports individual propagation delay on each display to have the best visual perception HDMI Stereo output support 2 channel PCM audio S PDIF output supports Digital 2 cha...

Страница 3: ...tion is 4K the LED indicator will shine Source Source signal indicator LED 2 IR SENSOR IR sensor for receiving the IR commands from IR remote 3 Control buttons Button 1 In Out resolution and IP addres...

Страница 4: ...1680x1050 60Hz 1920x1080 60Hz 1920x1200 60Hz 1600x1200 60Hz 6 OPERATION APPROACH Method A IR Remote Control Button Function INFO Display device status IN OUT Resolution EDID Layout MUTE Turn off the s...

Страница 5: ...ace 1 2 3 4 5 6 8 Control Interface 1 Connection Status Show the connect information and status When you successfully connect to the device the graph of the power and connection way will change from b...

Страница 6: ...ide 4 preset spaces to save the frequently used scenarios into the device 1 2 3 4 5 10 4 Vertical Screen VW Modes 1 Output Layout Window You can view the screen status and control the position of outp...

Страница 7: ...le of 8 You can apply your current settings to the output by clicking button or you can save it by clicking button 1 2 3 4 5 12 5 Video Resolution If you have clicked the option to downscale the resol...

Страница 8: ...software and firmware version FIRMWARE UPDATE I Use CAT 5 5e 6 cable to connect the device s Ethernet port and router II Set up the computer and device in the same domain III Click button then the upd...

Страница 9: ...io and then log in your account on the right top corner Click Add device to add the device which you just got its association code 3 Enter the Installer Email for online support in the future and the...

Страница 10: ...Then please executing the software with the device and confirm that the software is connected 2 Click READ to get the IP address then browse it 3 Enter the password admin to login 18 Control Interface...

Страница 11: ...rizontal Start Vertical Start Horizontal End Vertical End and rotation method Besides you can move the area position and change size in the window directly 20 3 HPD You can re plug input and output by...

Страница 12: ...r On In standby mode The device is in standby mode Click button to turn on the power 22 Method E APP Control through Ethernet Port Download the APP The first time to use the video wall APP please sear...

Страница 13: ...in playing audio and video the general principle is that the source will output the lowest standards in terms of audio format and video resolutions to be commonly acceptable among all HDMI displays I...

Страница 14: ...sume the risk of loss or damage in transit Under no circumstances will a unit be accepted without a return authorization number The warranty is in lieu of all other warranties expressed or implied inc...

Отзывы: