GoMax Electronics MA-5544H Скачать руководство пользователя страница 6

4


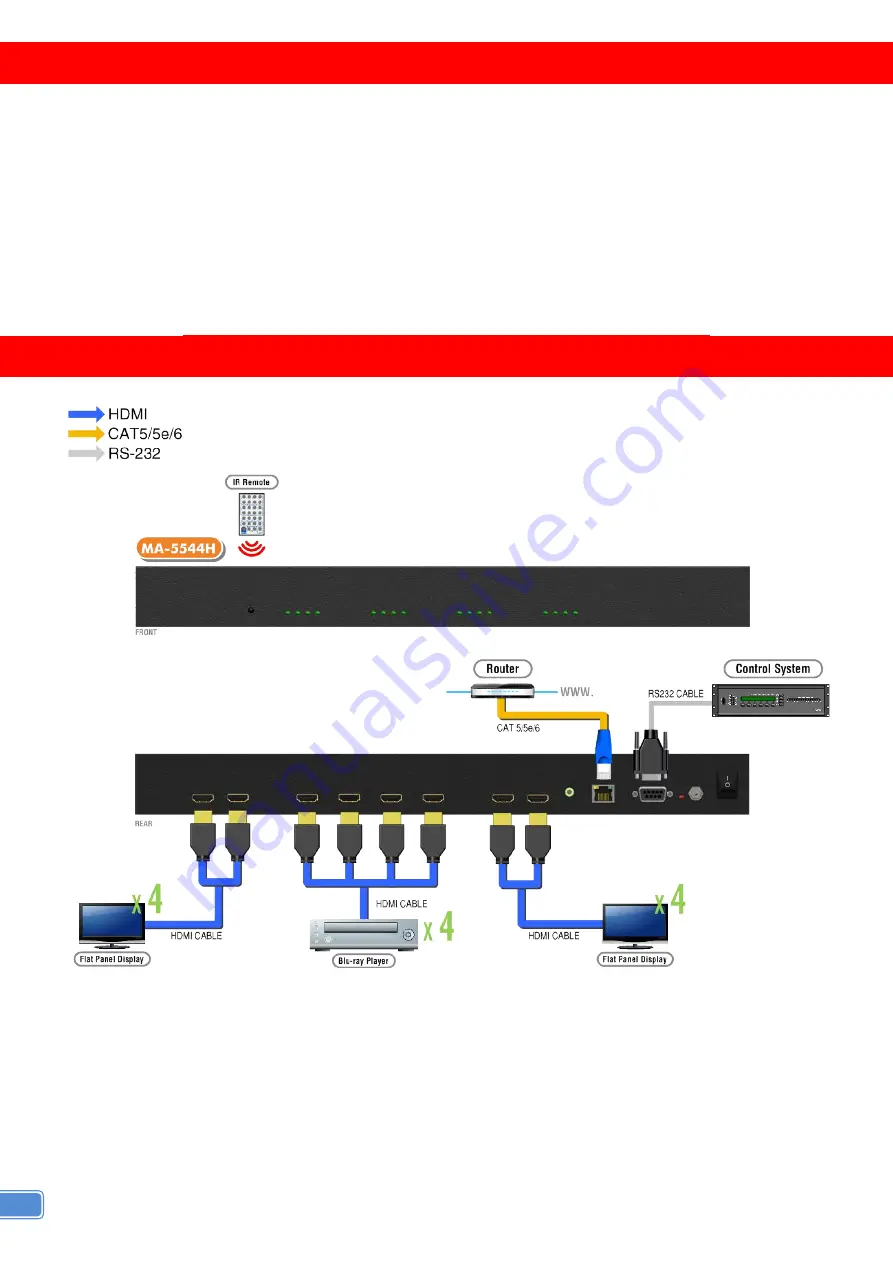
HARDWARE INSTALLATION 

MA-5544H as master 

1.  Connect all sources to HDMI Inputs on the 4x4 HDMI Matrix MA-5544H. 

2.  Connect all display to HDMI Outputs on the 4x4 HDMI Matrix MA-5544H 

4.  Connect the +5V 6A DC power supply to the 4x4 HDMI Matrix MA-5544H. 


CONNECTION DIAGRAM 


Содержание MA-5544H

Страница 1: ...4X4 HDMI 2 0a Matrix User Manual rev 161116 Made in Taiwan MA 5544H...

Страница 2: ...to service this unit yourself except where explained in this manual Provide proper ventilation and air circulation and do not use near water Keep objects that might damage the device and assure that...

Страница 3: ...a compliant Supports 4K2K 60 4 4 4 8bits Supports HDR which is 4K2K 60 4 2 0 10bits HDCP 2 2 compliant Allows any source to be displayed on multiple displays at the same time Allows any HDMI display t...

Страница 4: ...IR remote control RS 232 control Ethernet control IR remote control Electro optical characteristics 25 Carrier frequency 38kHz HDMI connector Type A 19 pin female RJ 45 connector WE SS 8P8C with 2 LED...

Страница 5: ...cator LED shows selected source 4 Output3 Selected Source Status LED the indicator LED shows selected source 5 Output4 Selected Source Status LED the indicator LED shows selected source Rear Panel 6 I...

Страница 6: ...s master 1 Connect all sources to HDMI Inputs on the 4x4 HDMI Matrix MA 5544H 2 Connect all display to HDMI Outputs on the 4x4 HDMI Matrix MA 5544H 4 Connect the 5V 6A DC power supply to the 4x4 HDMI...

Страница 7: ...o select Input Output port Ex Select Input 3 to Output 2 Push the red circle button as below to select Input 3 to Output 2 2 Function Key Button Function OFF Standby mode ON Power on the matrix switch...

Страница 8: ...ss TAKE button Preset Mapping Preset A H 1 8 storage site Take Ex Preset saved mapping from 5 1 Press PRESET button 2 Press number key E to select the storage site 5 3 Press TAKE button Learn default...

Страница 9: ...S Information MS WinXP 7 8 10 2 Baud rates 9600 3 Software size 3 MB 4 Minimum RAM requirement 256 MB 2 Control interface 1 Power ON Standby mode 5 I O Mapping Tab 2 Control SW via RS 232 6 EDID Tab 3...

Страница 10: ...a Switch the input for each output 2 Recall Mapping a Select the stored Mapping 1 8 b Click Recall button to recall previous mapping which are saved 3 Save Mapping a Select Mapping 1 8 b Click Save bu...

Страница 11: ...DID 2 Learn EDID from Display to Input a Select output b Select designated Input c Click Apply button to learn from display EDID 3 Load EDID File to Input a Click Load File button to select the EDID f...

Страница 12: ...10 3 Rename I O Button 1 Rename I O a Rename the Inputs b Rename the Outputs 2 Rename Mapping a Rename the Mappings...

Страница 13: ...fter setting IP Address please click Save to save IP address Info c Save button Save the key in IP address d Read button Read the IP address from the device Note The default IP address is 192 168 1 11...

Страница 14: ...de please does not click button to connect software Click button to do firmware update The firmware update window of main board shows up as below Click the button to select the file which you want to...

Страница 15: ...ton and the chip firmware will start to update Because of the chip update one after the other the running time will take about 15 minutes please wait patiently Method C Cloud Control Eagleyes through...

Страница 16: ...ail and password information to create your private account Add Device to Eagleyes 1 Firstly please make sure the device is connected to the Ethernet Then please executing the software with device to...

Страница 17: ...e device which you just got its association code 3 Enter the Installer Email for online support in the future and the Association Code for pairing with your device 4 After adding the device the list o...

Страница 18: ...splay among others to make sure all displays are capable to play the HDMI signals normally There are TWO methods to do EDID Learning as below 1 IR Remote Control Please refer to the Operation Approach...

Страница 19: ...would get the HDMI signals from every HDMI input please learn EDID information from output3 to all four HDMI inputs For more information about EDID Learning please refer to EDID LEARNING section Q My...

Страница 20: ...the risk of loss or damage in transit Under no circumstances will a unit be accepted without a return authorization number The warranty is in lieu of all other warranties expressed or implied includi...

Отзывы: