background image

Customer Service Support: 1800 224 278 

www.goliath-outdoor.com


Page 21 of 23


5. Attach the sewn in loops at the top of net to the 

ball caps at the pole top, as shown. 

6. When the assembly is finished, the trampoline 

looks as shown below. 


13  Disassembly


To disassemble, simply follow ASSEMBLY STEP - FRAME, JUMP MAT, ENCLOSURE in reverse 
order, until you have disassembled the trampoline. 

Содержание COLOSSUS TR-10-P21-B

Страница 1: ...anual carefully Failure to comply with this warning may result in injury and or property damage WARNING This trampoline is intended for users aged 6 years and above This trampoline contains small part...

Страница 2: ...tation 7 3 Safe Use Instructions 8 4 How To Use Your Trampoline 9 5 Installation Instructions 14 6 Care And Maintenance Instructions 14 7 Potential Hazards of Trampoline Components 15 8 Parts List 16...

Страница 3: ...ation via the website we they cannot guarantee thatthis information is current Please contact the authorised Australian subsidiary and exclusive distributor Crown Andrews Pty Ltd on 1800 224 278 if yo...

Страница 4: ...or tortuous acts or omission breach of duty breach of contract or breach of statutory duty on the part of Goliath its office bearers directors employees or agents 2 Title Risk Title to risk and owners...

Страница 5: ...ction of their Instruction Guide Furthermore the warranty does not cover installation provided by any third party assembly service 4 2 4 Damage through insufficient care or maintenance This warranty d...

Страница 6: ...ath will replace thedamaged parts free of charge Goliath will also cover any costs associated with shipping the replacement parts 4 3 3 Refunds In all instances of successful warranty claims Goliath o...

Страница 7: ...and product design associated with Goliath products print material and websiteare copyright from and or registered by Goliath BV 2019 10 Privacy Policy Goliath will not pass your personal information...

Страница 8: ...Smaller children are at increased risk when jumping with adults and or larger children for example a double bounce dramatically increases the energy transferred to the smaller body and children s legs...

Страница 9: ...than one person on the trampoline at any time Do not use the trampoline and enclosure when wet Do not jump onto or off the trampoline and enclosure Do not use a trampoline and enclosure while under th...

Страница 10: ...poline bed Learn this skill before you attempt any others Climb on and off the trampoline do not jump It is dangerous to jump from the trampoline to the floor or ground when dismounting or onto the tr...

Страница 11: ...ame pad or grasp the frame pad when mounting or dismounting the trampoline Users should always place their hands on the frame while mounting or dismounting To dismount jumpers should walk to the side...

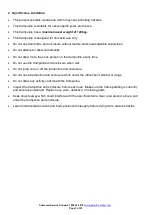
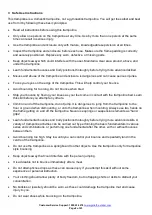
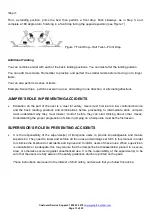
Страница 12: ...ehind the hips ready to lift again as you bounce up see Figure 1 Figure 1 Arm Action Bounce variations Figures 2 3 and 4 show three variations the tuck the pike and the straddle pike respectively Thes...

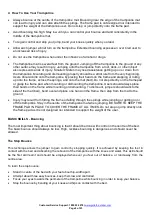
Страница 13: ...earn the hands and knees drop Get down on your hands and knees on the bed Make sure you have weight on both your hands and your knees Do not sit on your heels Remain in this position and try to bounce...

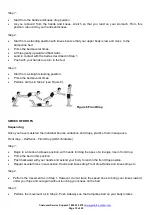
Страница 14: ...Perform skill as in Step 2 see Figure 6 Figure 6 Front Drop SERIES OF DROPS Sequencing Once you have mastered the individual bounce variations and drops practice them in sequence Front drop Half twist...

Страница 15: ...d the basic landing positions and combinations before proceeding to intermediate skills Jumpers must understand why they must master control before they can start thinking about other moves Understand...

Страница 16: ...ea should not include concrete bitumen brick or other hard surfaces as these can cause serious injuries if users fall off the trampoline Do not locate the trampoline on top of other objects or store a...

Страница 17: ...tem elements where required Missing improperly positioned or insecurely attached frame padding Punctures frays tears or holes in the frame padding Deterioration of the stitching or fabric of the frame...

Страница 18: ...TEM PARTS QTY 1 T JOINT 6 2 TOP RAIL TUBE 6 3 W SHAPED LEG 3 4 VERTICAL LEG TUBE 6 5 JUMPING MAT 1 6 SPRING 54 7 SPRING HOOK TOOL 1 8 UPPER POLE TUBE 6 9 LOWER POLE TUBE 6 10 POLE SLEEVE 6 11 BALL CAP...

Страница 19: ...G HAZARD Small Parts Not for children under 3 years ADULT ASSEMBLY REQUIRED Contains small parts sharp points and sharp edges 1 Connect the Top Rail Tube 2 with T Joint 1 as shown in the picture below...

Страница 20: ...connect the Springs opposite to each other to get an even result in tensioning the Trampoline Mat as shown in the below diagram 4 Lay the safety net on the jumping mat spreading out the net Ensure the...

Страница 21: ...Frame Pad NOTE CHOKING HAZARD Small Parts Not for children under 3 years ADULT ASSEMBLY REQUIRED Contains small parts sharp points and sharp edges 1 Place the Frame Pad 16 onto the top of trampoline f...

Страница 22: ...SSEMBLY STEP ENCLOSURE 1 Connect all Upper Pole Tubes 8 to theLower Pole Tubes 9 2 Insert the Ball Cap 11 to the top of upper pole tube 8 and fixed by Ball Cap Screw 12 3 Locate the 6 T joints Align h...

Страница 23: ...e sewn in loops at the top of net to the ball caps at the pole top as shown 6 When the assembly is finished the trampoline looks as shown below 13 Disassembly To disassemble simply follow ASSEMBLY STE...

Страница 24: ...utine maintenance and consumable items such as but not limited to fuel lubricants vacuum bags blades belts sandpaper bits fluids tune ups or adjustments 5 this warranty will not apply where damage is...

Страница 25: ...Customer Service Support 1800 224 278 www goliath outdoor com Page 23 of 23 DATE OF PURCHASE ATTACH RECEIPT HERE...

Отзывы: