background image

                                                                                                                                                                                                                  Buzzaround XL_SG_REVA_100711 


92 


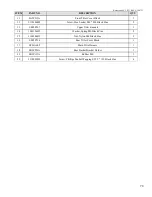
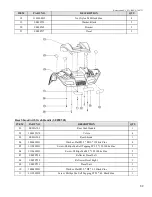
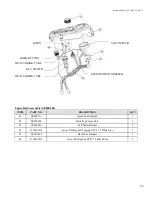
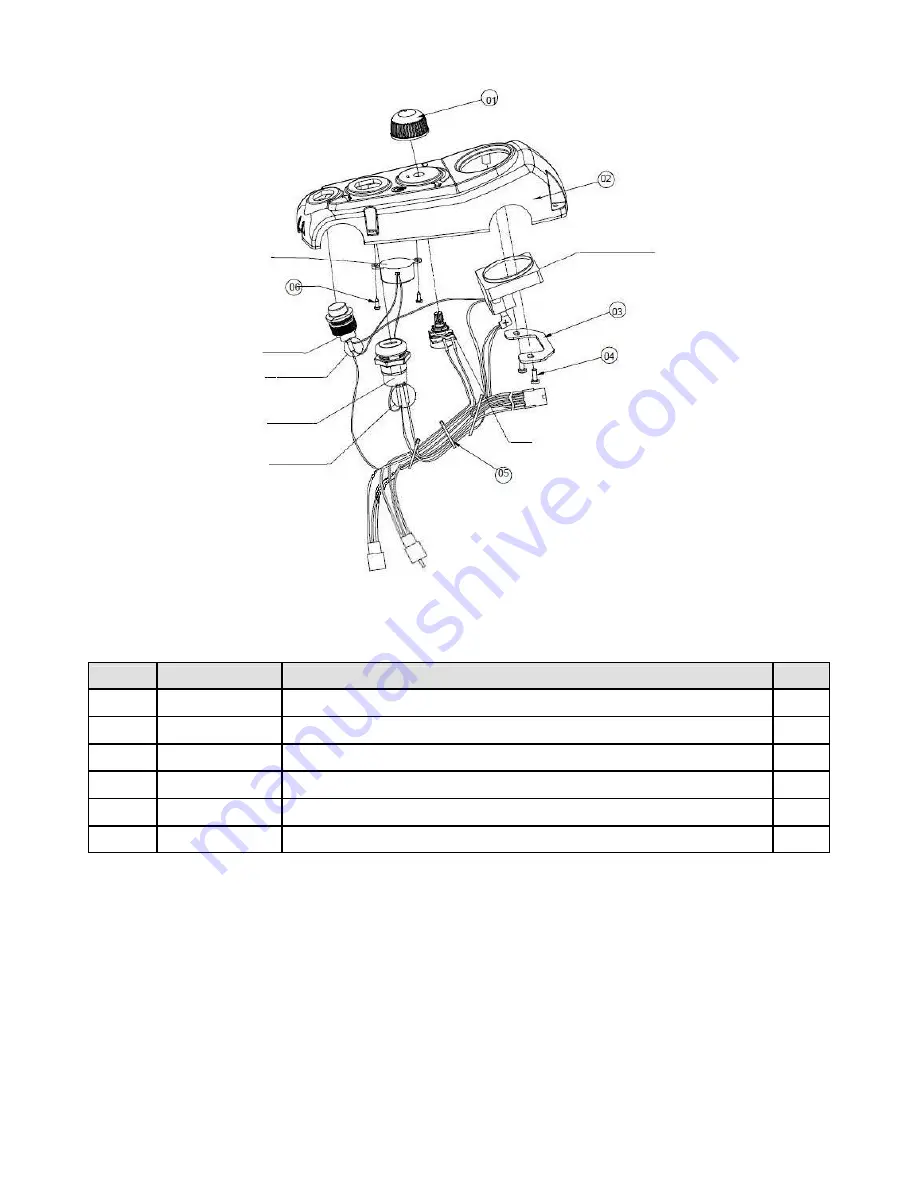
Upper Dash Assembly (SE05E602) 

ITEM 

PART NO. 

DESCRIPTION 

QTY 

01 

SE06P511 

Speed Control Knob 

02 

SE05P509 

Dash Top Plastic Only 

03 

SB3P608A 

Volt Meter Bracket 

04 

3110103011 

Screw, Phillips Self Tapping ST2.9 * 8 White Zinc 

05 

SE05A601 

Dash Wire Harness 

06 

3110902012 

Screw, Phillips Pan ST2.2 * 8 Black Zinc 


HORN BUTTON 

KEY SWITCH 

HEAT SHRINK


TUBE


HEAT SHRINK TUBE 

SPEED POTENTIOMETER 

VOLT METER 

HORN  

Содержание Buzzaround XL GB116

Страница 1: ...Buzzaround XL Service Guide This Service Guide contains Troubleshooting Replacement Instructions Illustrated Parts Breakdown Model GB116 Model GB146 ...

Страница 2: ...Buzzaround XL_SG_REVA_100711 1 ...

Страница 3: ... CODE 5 Brake Fault 14 15 BEEP CODE 6 Paddle Fault out of neutral 15 BEEP CODE 7 Paddle Fault Speed Control Fault voltage error 16 17 BEEP CODE 8 Motor Voltage Fault Open Shorted 17 18 BEEP CODE 9 Controller Fault 18 BUZZAROUND XL REPLACEMENT INSTRUCTIONS 19 Drive Wheel 19 Drive Train 19 Throttle Pot 19 20 Battery 21 Circuit Breaker 21 Battery Harness Fuse 21 Controller 21 Main Harness 22 Control ...

Страница 4: ...inside panel under frame 9 Removable Carpet 10 Front Wheel 11 Tiller 12 Front Basket 13 Seat Post 14 Detent Pin 15 Lockup Handle Figure 1 Buzzaround XL Model GB116 Contact Information Golden Technologies 401 Bridge Street Old Forge PA 18518 Toll free 800 624 6374 Fax 800 628 5165 Lift Chair Bed Tech x645 Mobility Tech x648 VA Tech x647 Email parts goldentech com 5 6 7 8 9 3 4 2 1 10 11 12 13 14 15...

Страница 5: ...ections are secure Unplug the connectors and make sure all of the pins are seated properly Push the pins back into the connector housing if necessary Make sure that the battery terminals are tight NOTE If you get to a point during troubleshooting where you cannot continue call tech support at 800 624 6374 BUZZAROUND XL COMPONENTS The Buzzaround XL is a battery operated scooter with a controller th...

Страница 6: ...4c and 4d Refer to figure 11 on page 10 Failure Signs Batteries drain quickly Scooter runs slowly or not at all Batteries will not charge but charger is working properly Beep Code 1 or 2 Tests Fully charge the batteries first and load test Make sure charging system is working See Battery Charging Test Make sure the contacts are not corroded See figure 4 below and figure 19 on page 14 for quarter tes...

Страница 7: ... in the system is out of range Connections Connected to the main harness 7a the charger inhibit 5b the motor brake 8b the front intermediate motor harness negative 8c the front intermediate motor harness positive 8d the power harness negative 5c and the power harness positive 5d Refer to figure 11 on page 10 Failure Signs Beep Code 9 No power to the control panel or the motor Tests Test for voltag...

Страница 8: ...eck connectors Make sure the contacts are not corroded Expected readings Continuity less than 10 ohms Serviceable Replace as necessary Component Motor Brake Assembly 10 Location Mounted on the transaxle See 1 on figure 8 Function Drives the scooter Connections Connected to the rear intermediate motor Figure 7 Rear Intermediate Harness harness 9b and the brake 11a Refer to figure 11 on page 10 Failu...

Страница 9: ...Throttle Pot 13 Location Under the control panel See 1 on figure 10 Function The throttle pot potentiometer uses variable resistance to control speed and direction of travel by varying voltage Connections Connected to the control panel harness 12a Figure 9 Control Panel Back Refer to figure 11 on page 10 Failure Signs Beep Codes 6 and 7 Tests Test resistance across the pins 1 2 and 3 and on 13a Exp...

Страница 10: ...igns Charger power LED does not go on Batteries will not charge Tests Charger tests vary Some chargers may be tested by measuring positive and negative leads on the charger connector Other chargers need to see battery voltage before charging Expected reading Varies with charger See charger test on page 11 Test charger harness and fuse for continuity Serviceable Replace if necessary NOTE Some Off B...

Страница 11: ...SS 9 10a FRONT RED BLACK BLUE ORANGE BLUE ORANGE RED ORANGE ORANGE BLUE YELLOW PURPLE BLACK WHITE WHITE RED PURPLE ORANGE YELLOW GREEN BLACK BLUE BLUE ORANGE YELLOW RED BLACK BLUE ORANGE GREEN BLACK RED GREEN BLACK RED RED MAIN HARNESS 7 MOTOR BRAKE ASSEMBLY 10 BRAKE 11 12a 13a 7b 12b 4c 4d 4b 14a 14b 4a 5a 7a 5b 8b 8c 8d 5c 5d 8a 9a 9b 10a 10b 11a 7a FRONT 7b FRONT Figure 11 Buzzaround XL Wiring ...

Страница 12: ... batteries Load test and replace if necessary 0VDC Check main circuit breaker 1 and battery harnesses for continuity 4a terminals 1 to 4c and 4a terminals 3 to 4d Check Voltage at Power Harness 3 Remove the four screws that fasten the controller cover to the underside of the scooter frame 4 Remove the cover 5 Disconnect the power harnesses 5c and 5d from the controller 6 Reinstall the battery pack...

Страница 13: ...3 Measure voltage across terminal 1 and terminal 3 on 4a See figure 16 Does the voltage increase Yes Load test the batteries and replace as necessary No But there is voltage If the voltage is lower than 16VDC then replace the batteries If the voltage is 16VDC or greater then go to the next step No And there is no voltage Open the battery pack and check the circuit breaker and the battery harnesses ...

Страница 14: ...GE This Beep Code occurs when the battery voltage climbs above 26VDC 1 Insert the key into the key switch and turn it to the on position Allow the battery level to drop Do not allow the battery voltage to fall into the red area on the battery meter 2 Check the battery charger Make sure it is an approved charger BEEP CODE 4 CURRENT LIMIT TIMEOUT This Beep Code occurs when the motor has been exceedi...

Страница 15: ...xt step 15 Check the front intermediate motor harness and the rear intermediate motor harness for continuity 10 ohms or less Replace the controller Figure 19 Quarter Test Open Replace as necessary BEEP CODE 5 BRAKE FAULT This Beep Code occurs because the park brake release switch is active or the park brake may be faulty Check the Park Brake Position 1 Turn the key to the off position 2 Disengage ...

Страница 16: ...ake 11a from the motor harness 10b Refer to figure 11 on page 10 Check the pins on the park brake connector 11a Make sure they are seated properly 16 Measure resistance across pin 1 and pin 2 on the park brake 11a with park brake engaged See figure 21 80 ohms or less but not shorted Replace the drivetrain assembly Shorted or open Replace the park brake Figure 21 Connector 11a BEEP CODE 6 PADDLE FAU...

Страница 17: ...nnector 7a at pin 1 and pin 8 blue wire and yellow wire See figure 23 Note the resistance reading Insert the multimeter probe into the main harness connector at pin 1 and pin 2 yellow wire and orange wire See figure 24 Note the resistance reading Figure 23 Connector 7a Are both readings within 500 ohms of each other Replace the controller Are either of the readings outside that range Go to the next ...

Страница 18: ...our screws that fasten the controller cover to the underside of the scooter frame 4 Disconnect the front intermediate motor harnesses 8c and 8d from the controller Refer to figure 11 on page 10 5 Measure resistance across the front intermediate motor harness 8c and 8d See figure 28 50 ohms but not shorted NOTE Can be as low as 0 2 ohms replace the controller Out of that range Go to the next step Ch...

Страница 19: ... from 9b if necessary Refer to figure 11 on page 10 13 Measure resistance across pin 1 thick red wire and pin 2 thick black wire on 10a See figure 29 50 ohms or less but not shorted NOTE Can be as low as 0 2 ohms Replace the controller Out of that range Replace the drivetrain assembly BEEP CODE 9 CONTROLLER FAULT This Beep Code means that the controller has an internal fault 1 Remove the key from t...

Страница 20: ...oosen the drive wheel nuts on both the left and right sides which fasten the wheels to the axle 6 Separate the front and rear frames 7 Remove the drive wheels Make sure you retain the axle keys 8 Remove the drive train from the rear frame 9 Install the drive wheels onto the new drive train 10 Install the new drive train onto the rear frame 11 Connect the rear and front frames 12 Reinstall the batt...

Страница 21: ...osition it in the exact same place during assembly 10 Disconnect one of the batteries from the battery harness and the circuit breaker and remove it 11 Disconnect the other battery from the battery harness and the circuit breaker and remove it 12 Place a new battery into the bottom half of the Figure 33 Inside Battery Pack battery pack Make sure that the terminals are facing as shown See figure 33...

Страница 22: ...attery pack together 6 Open the battery harness fuse holder 7 Remove the old fuse from the fuse holder 8 Install a new fuse into the fuse holder Note Fuse must be replaced with exact type and rating 9 Reinstall the bottom half of the battery pack onto the top half 10 Tighten the circuit breaker button cover 11 Reinstall the battery pack CONTROLLER REPLACEMENT Tools needed Phillips screwdriver and ...

Страница 23: ...ud cover to the underside of the scooter frame 11 Disconnect the main harness 7a from the controller See 1 on figure 35 on page 21 13 Remove the main harness 14 Thread the 8 pin connector on the new main harness through the rubber grommet See 1 on figure 39 15 Thread the 8 pin connector on the new main harness through the tiller 16 Connect the control panel to the new main harness 17 Reinstall the c...

Страница 24: ...einstall the control panel shroud BRAKE REPLACEMENT Tools needed 19mm Socket and Phillips screwdriver 1 Place the freewheel lever in the engaged position 2 Remove the key from the key switch Figure 40 Brake Removal 3 Remove the seat 4 Remove the battery pack 5 Loosen the right side drive wheel nut 6 Separate the front and rear frames 7 Remove the right drive wheel Make sure you retain the axle key...

Страница 25: ...m the APP connector and remove the harness 14 Thread the new harness through the frame and reinstall the two screws to secure the APP connector to the frame Tighten the screws until the connector is flush with the frame Do not over tighten the screws 15 Connect the M red M black and the brake orange blue wires to the controller 16 Place the floor shroud onto the frame thread the B red B black and ...

Страница 26: ... harness through the frame and reinstall the bottom screw into the APP connector and tighten the screw until the APP connector is flush with the frame Do not over tighten 9 Insert the top screw into the APP connector and tighten until the connector is flush with the frame Now back the screw out one and one half turns This will leave the connector float free from the frame by approximately one eigh...

Страница 27: ...ll outlet use ACV Step 3 Choose the range setting The dial may have options from 5 to 1000 on the DCV side and 10 to 1000 on the ACV side The setting should be the top end of the voltage you are reading Not all voltmeters have this setting Step 4 Turn the meter on Step 5 Hold the probes by the insulated handles and touch the red probe to the positive side of a DC circuit or either side of an AC ci...

Страница 28: ...1 Disconnect completely and or turn OFF all power to the circuit you are testing You must have a completely dead wire or circuit in order to ensure accuracy in measurement as well as your own safety Your ohmmeter will supply the voltage and current for your circuit so NO other power is necessary Testing a powered circuit can cause damage to the meter circuit and you Step 2 Connect testing wires to...

Страница 29: ...INTERMEDIATE HARNESS 9 10a FRONT RED BLACK BLUE ORANGE BLUE ORANGE RED ORANGE ORANGE BLUE YELLOW PURPLE BLACK WHITE WHITE RED PURPLE ORANGE YELLOW GREEN BLACK BLUE BLUE ORANGE YELLOW RED BLACK BLUE ORANGE GREEN BLACK RED GREEN BLACK RED RED MAIN HARNESS 7 MOTOR BRAKE ASSEMBLY 10 BRAKE 11 12a 13a 7b 12b 4c 4d 4b 14a 14b 4a 5a 7a 5b 8b 8c 8d 5c 5d 8a 9a 9b 10a 10b 11a 7a FRONT 7b FRONT BLACK Fuse Bu...

Страница 30: ...ale Connector male RED Horn Button Battery Voltage Meter Power Key Switch 24VDC RED RED BLK Connector 12a female Buzzer 24VDC 25K Ohm Speed Pot Connector 12b TO CHARGER HARNESS CONNECTOR TO 5K OHM T POT TO MAIN HARNESS 3 BLK 1 TO CONTROL PANEL CONNECTOR 12a 3 pin connector male 2 Connector 13a ...

Страница 31: ...ESS 7 MOTOR BRAKE HARNESS CHARGER HARNESS 14 Connector 7b Connector 7a TO DYNAMIC R SERIES CONTROLLER TO CONTROL PANEL TO BRAKE TO MOTOR TO CHARGER TO BATTERY HARNESS TO REAR INTERMEDIATE HARNESS 9 3 2 1 1 7 14 8 5 1 4 8 1 3 2 4 1 2 FUSE 1 2 3 ...

Страница 32: ...Buzzaround XL_SG_REVA_100711 31 BATTERY BOX CIRCUIT BREAKER 1 TO BATTERY TO BATTERY TO CHARGER HARNESS TO FRONT INTERMEDIATE HARNESS 8 1 2 3 ...

Страница 33: ...or continuity 4a terminals 1 to 4c and 4a terminals 3 to 4d Remove the four screws that fasten the controller cover to the underside of the scooter frame Remove the cover Disconnect the power harness 5c and 5d from the controller Reinstall the battery pack Measure voltage across 5c and 5d Check power harness for continuity Replace as necessary Reconnect the power harness to the controller Open the...

Страница 34: ...Buzzaround XL_SG_REVA_100711 33 0VDC 24VDC or battery voltage Measure voltage across pin 3 black wire and pin 8 red wire on connector 7b See figure 15 Replace the main harness Replace the control panel ...

Страница 35: ... Does the voltage increase Load test the batteries and replace as necessary If the voltage is lower than 16VDC then replace the batteries If the voltage is 16VDC or greater then go to the next step Open the battery pack Check the battery harness fuse for continuity Open the battery pack and check the circuit breaker and the battery harness for continuity Replace the individual components as necess...

Страница 36: ...embly or rear intermediate motor harness as necessary Disconnect the motor 10a from the rear intermediate motor harness 9b Measure resistance across the two pins on connector 10a that have the thick black wire and the thick red wire internal resistance of the motor Replace the drivetrain assembly Remove the four screws that fasten the controller cover to the underside of the scooter frame Disconne...

Страница 37: ...ey discolored or corroded Replace as necessary Take a quarter and slide it into each contact on the bottom side of the battery pack See figure 19 Does each contact hold the quarter firmly in place Replace the battery harness See figure 17 on page 12 Check the front intermediate motor harness and the rear intermediate harness for continuity Replace the controller Replace as necessary ...

Страница 38: ...e four screws that fasten the controller cover to the underside of the scooter frame Disconnect the front intermediate motor harness 8b from the controller Make sure that the pins on 8b are seated properly Measure resistance across pin 1 and pin 2 on the front intermediate motor harness 8b with park brake engaged Unplug the motor harness 10a from the rear intermediate motor harness 9b Replace the ...

Страница 39: ...aged Replace harness es as necessary Separate the front frame from the drivetrain Check the front intermediate motor harness and the rear intermediate motor harness for continuity Replace as necessary Check the pins on the motor brake assembly harness connector 11a Make sure they are seated properly Measure resistance across pin 1 and pin 2 small black wires on the motor brake assembly harness 11a...

Страница 40: ...eturn to the neutral center position Move the throttle pot forward and then reverse Make sure that it is not obstructed Does it spring back to the neutral position Turn the key to the on position Check for obstructions Adjust if necessary Replace if the adjustment does not work or if there are no obstructions Does the code return Go to FLASH CODE 7 to test the paddle pot OK ...

Страница 41: ...rame Turn the speed pot to full rabbit Set your multimeter to measure resistance Disconnect the main harness 7a from the controller Insert multimeter probes into the main harness connector 7a at pin 8 and pin 2 blue wire and orange wire See figure 22 Insert the multimeter probes into the main harness connector 7a at pin 1 and pin 8 blue wire and yellow wire See figure 23 Note the resistance readin...

Страница 42: ...Replace the throttle pot Insert the multimeter probes into the throttle pot connector 13a at the orange wire and the yellow wire See figure 26 Note the resistance reading Insert the multimeter probes into the main harness connector at the yellow wire and the orange wire See figure 27 Note the resistance reading Are both readings within 500 ohms of each other Check the orange blue and yellow wires ...

Страница 43: ...nnect the front intermediate motor harness 8c and 8d from the controller Measure resistance across the front intermediate motor harness 8c and 8d See figure 28 Replace the controller Unplug the motor brake assembly from the rear intermediate motor harness Make sure that the pins are seated properly on 9b Check the continuity between 8c 8d and 9b Remove the battery pack Separate the drivetrain from...

Страница 44: ...ep Replace the drivetrain assembly Measure resistance across pin 1 thick red wire and pin 2 thick black wire on 10a See figure 29 Replace the controller Check the front intermediate motor harness and the rear intermediate harness for continuity Replace as necessary Make sure that the pins are seated properly on 10a Disconnect 10a from 9b if necessary ...

Страница 45: ...Buzzaround XL_SG_REVA_100711 44 ILLUSTRATED PARTS BREAKDOWN Three Wheel Buzzaround XL Model GB116 ...

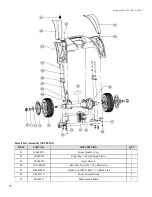
Страница 46: ...uzz XL GB116 1 03 SB3P535A Instruction label 1 04 MBH B2FBASK Basket Front for Buzz GB106 Buzz XL GB116 and LiteRider GL110 1 05 SB3P536A Tiller warning label 1 06 SE09E101 Front Part Assembly 1 07 SE09E601 Box Battery Assembly with 12V 12 AH Batteries for Buzz XL GB116 1 08 SE09E102 Rear part assembly 1 09 SB3A105A Pin Seat Post Φ10 57 1 10 SE09E401 Post Seat with Set Screw and Insert for Buzz XL...

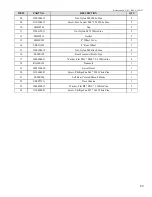
Страница 47: ...lt Hex M10 45 Black Zinc 1 06 SE09P517 Right front cap bumper 1 07 3000405032 Washer Flat Φ5 5 Φ10 1 Black Zinc 4 08 3110605052 Screw Phillips Pan Head M5 16L Black Zinc 2 09 SE09P516 Left front cap bumper 1 10 3100305011 Nut Nylon M5 White Zinc 2 11 3100304011 Nut Nylon M4 White Zinc 8 12 SE09E103 Front Frame Assembly with Front Fork and Wheel 1 13 SE09E501 Deck with Front Fender and Colored Side...

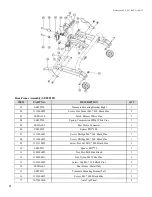
Страница 48: ...ar Right Plastic Colored 1 03 SE09E502 Shroud Black Rear Assembly for Buzz Xl GB116 1 04 3110308042 Bolt Hex Head Socket M 45L Black Zinc 4 05 3000408042 Washer Flat Φ8 4 Φ16 1 6 Black Zinc 8 06 SB3P137A Motor Bracket 2 07 SE09P127 Brake Handle A3 1 08 3100304012 Nut Nylon M4 White Zinc 4 09 3110304012 Bolt Hex Head Socket M4 12L White Zinc 2 ...

Страница 49: ...l Assembly Rear Complete Solid Black for Buzz GB106 January 2010 and Buzz XL GB116 2 15 3100308012 Nut Nylon M8 Black Zinc 1 16 SE09E105 Frame Rear with Anti Tips for Buzz XL GB116 1 17 3000404051 Washer Flat Φ4 3 Φ90 0 8 White Zinc 6 18 RA02E101 Transaxle Assembly with Brake and Handle for Buzz XL GB116 1 19 3002330030 Transaxle Serial Sticker 30 13 1 20 3110604091 Screw Phillips Pan Head M4 20L ...

Страница 50: ...z XL GB116 1 02 SB2P505A Collar Rubber for Lower Tiller 1 03 3000406072 Washer Flat Φ6 2 Φ13 1 5 Black Zinc 2 04 3003106012 Washer Spring Φ6 Black Zinc 2 05 3100206012 Nut Cap M6 Black 2 06 3090400010 Nut BC1 24 Black 1 07 3110306012 Screw Hex Head Socket M6 35L Black Zinc 2 08 3090400020 Washer Black 1 09 3090400030 Cap Bearing Top 1 10 3090400040 Ring Bearings 2 ...

Страница 51: ...Φ16 1 6 Black Zinc 2 24 SB2P209A Bolt Axle M8 88L 45 White Zinc 1 25 3051600180 Controller DR50 A01 50A for Buzz Xl GB116 1 26 3002330030 Sticker Barcode 30 13 1 27 3100106012 Nut Hex M6 2 28 SE09P145 Cover Controller for Buzz XL GB116 1 29 3003105011 Washer Spring Φ5 White Zinc 4 30 3110605111 Screw Phillips Pan Head M5 8L White Zinc 4 31 3111506032 Screw Hex Head Socket Set M6 25L Black Zinc 2 3...

Страница 52: ...ound XL_SG_REVA_100711 51 Release Handle SE09E104 ITEM PART NO DESCRIPTION QTY 01 SE09P513 Cover Handle 1 02 SE09A103 Handle Metal only 1 03 3110904081 Screw Phillips Head Self Tapping ST4 2 16L White Zinc 4 ...

Страница 53: ... Φ15 20L 1 07 3111006042 Screw Phillips M6 35L Black Zinc 1 08 3111006052 Screw Phillips M6 20L Black Zinc 1 09 3110210012 Screw Hex M10 40L Black Zinc 1 10 SE09P531 Spacer Φ15 7L 1 11 3100106012 Nut Hex M10 Black Zinc 1 12 3100308011 Nut Nylon M6 White Zinc 2 13 3110206022 Screw Hex Head M6 40L Black Zinc 4 14 SE09A102 Frame Rear Metal Only 1 15 SE09P131 Cover Mounting Bracket Right A3 1 16 31101...

Страница 54: ... Hardware SE09E201 ITEM PART NO DESCRIPTION QTY 01 SE09E202 Tiller Assembly 1 02 SB3P521A Plate Front Basket Mounting Plastic 1 03 SB3P119A Bracket Front Basket 1 04 3111005302 Screw Phillips M5 30 Black Zinc 4 05 SB3A503A Shell Front Basket Mounting Plastic 1 ...

Страница 55: ...A202 Tiller Metal only 1 07 SA2P519A Cover Tiller Front for LiteRider GL110 Same on Front and Rear on Buzz GB106 and Buzz XL GB116 2 08 3110306102 Screw Hex Head Socket M6 10 8 8 Black Zinc 4 09 30003106012 Washer Spring Φ6 White Zinc 4 10 SA2P215A Knuckle Upper 1 11 SE09A604 Harness Main Wire From Controller to Dash for Buzz XL GB116 1 12 SE05E601 Dash Bottom with Paddle 1 13 SE05E602 Dashboard T...

Страница 56: ...6080 Bearing 608 2Z 1 02 SB2P208A Spacer 2 03 SB05A201 Wheel Front 8 2 04 SB05P503 Cover Wheel Front for Buzz GB106 January 2010 and Buzz XL GB116 1 ITEM PART NO DESCRIPTION QTY 01 311408022 Screw Hex Head M8 40L 8 8 Black Zinc 1 02 SE05A205 Handle Delta Tiller with Molded Grip for Buzz XL GB116 1 03 SB05A205 Post Tiller 1 ...

Страница 57: ...002300020 Label Fire 1 04 3002300030 Label Material 1 05 WC9P453A End Cap 32 32 2 5 1 06 3111308010 Accessory Knob M8 20L 1 07 3000406032 Washer Flat Ø8 4 Ø24 2 White Zinc 4 08 3003108011 Washer Lock Ø8 White Zinc 4 09 3110408081 Bolt Hex M8 25 White Zinc 4 10 SE1E403B Seat Swivel Assembly 1 11 SB05E402 Arm Assembly Right for LiteRider GL110 and Buzz GB106 after January 2010 TS09J0001 and Buzz XL ...

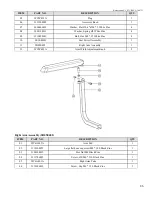
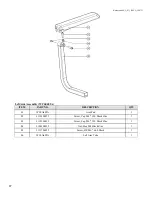
Страница 58: ...C6A405A Pad Arm for LiteRider GL110 Buzz GB106 and Buzz XL GB116 1 02 3110308072 Screw Flat Head Socket M8 30L Black Zinc 1 03 3100108012 Nut Hex M8 Black Zinc 1 04 3111706052 Screw Lock Ø8 M6 33L Black Zinc 1 05 WC6A401A Tube Right Arm 1 06 3110106032 Screw Socket Flat Head M6 12L Black Zinc 3 ...

Страница 59: ...C6A405A Pad Arm for LiteRider GL110 Buzz GB106 and Buzz XL GB116 1 02 3110308072 Screw Flat Heat Socket M8 30L Black Zinc 1 03 3110106032 Screw Flat Head Socket M6 12L Black Zinc 1 04 3100108012 Nut Hex M8 Black Zinc 1 05 3111706052 Screw Lock Ø8 M6 66L Black Zinc 1 06 WC6A402A Tube Left Arm 1 ...

Страница 60: ...uzzaround XL_SG_REVA_100711 59 Seat Post Assembly SE09E401 ITEM PART NO DESCRIPTION QTY 01 SE099A401 Seat Post Metal Only 1 02 SA2P419A Insert Seat Post PA66 1 03 3000604022 Pin Spring Φ4 6L Black Zinc 1 ...

Страница 61: ...Only for Buzz XL GB116 1 03 SE09P51 Panel Right Colored 1 04 SB3P526A Anchor Carpet 4 05 SE09P502 Deck Front Black Plastic Only for Buzz XL GB116 1 06 SE09A601 Block Terminal Blade Connector 1 07 31110050852 Screw Hex M5 16 Black Zinc 2 08 3100305012 Nut Nylon M5 Black Zinc 2 09 SE09P515 Panel Left Colored 1 10 3000325180 Velcro Loop 25 20 4 11 3000325170 Velcro Hook 25 20 4 ...

Страница 62: ...000325170 Velcro Hook 25 20 4 03 SE09A504 Shroud Rear Black for Buzz XL GB116 1 04 3000405031 Washer Flat Φ5 5 Φ10 1 White Zinc 4 05 3110903032 Screw Phillips Pan Head Self Tapping ST3 5 12L White Zinc 2 06 3110605052 Screw Phillips Pan Head M5 16L White Zinc 2 07 SE09P550 Sticker Left Rear Reflector 1 08 SE09P551 Sticker Right Rear Reflector 1 ...

Страница 63: ...sembly SE09E503 Left Rear Panel Assembly SE09E504 ITEM PART NO DESCRIPTION QTY 01 SE09P510 Panel Right Rear Colored 1 02 3000325180 Velcro Loop 25 20 2 ITEM PART NO DESCRIPTION QTY 01 SE09P511 Panel left Rear Colored 1 02 3000325180 Velcro Loop 25 20 2 ...

Страница 64: ...Buzzaround XL_SG_REVA_100711 63 Carpet Assembly SE09E505 ITEM PART NO DESCRIPTION QTY 01 SB3P524A Carpet Clip 4 02 SE09P519 Carpet 1 03 SB3P525A Carpet Anchor 4 ...

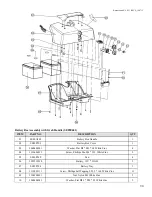
Страница 65: ...GB116 1 02 SE09P503 Cover Battery Box 1 03 3000404031 Washer Flat Φ4 Φ8 0 8 White Zinc 4 04 3110604011 Screw Phillips Pan Head M4 12L White Zinc 2 05 SE09P540 Pad Φ26 5 4 06 3052512010 Battery 12V 12AH 2 07 SE09P504 Tray Battery Box 1 08 3110903111 Screw Phillips Pan Head ST3 5 16L White Zinc 11 09 3100304011 Nut Nylon M4 White Zinc 2 ...

Страница 66: ...hite Zinc 2 12 3100511010 Nut Waterproof 1 13 3000411010 Pad t 0 5 1 14 MBE B2CHARPC Cover Charger Port for Buzz GB106 and Buzz XL GB116 1 15 3110602022 Screw M2 5 12L Black Zinc 1 16 MBE B2CHARP Port Charger for Buzz GB106 and Buzz XL GB116 1 17 3000402022 Washer Flat Φ2 7 Φ6 0 5 Black Zinc 2 18 3100102022 Nut Hex M2 5 2 19 SE09E602 Fuse 1 ...

Страница 67: ... 01 3110103031 Screw Flat Head Self Tapping ST3 5 16 White Zinc 2 02 SE05E603 Paddle Assembly 1 03 SE05P519 Panel Lower Dashboard for Buzz XL GB116 1 04 3100102022 Nut Hex M2 5 Black Zinc 2 05 SE05A612 Port Programming on Dash for Buzz XL GB116 1 06 3111002022 Screw Phillips Head M2 5 12L Black Zinc 2 ...

Страница 68: ... Speed control 1 02 SE05P509 Cover Upper Dash 1 03 SB3P608A Bracket 1 04 3110103011 Screw Flat Head Self Tapping ST2 9 8 White Zinc 2 05 SE05A601 Harness Dash 1 06 3110902012 Screw Phillips Pan ST2 2 8 Black Zinc 2 VOLT METER SPEED POTENTIOMETER HEAT SHRINK TUBE KEY SWITCH HORN BUTTON HEAT SHRINK TUBE HORN ...

Страница 69: ...711 68 TOCOS 5KVR SE05E603 ITEM PART NO DESCRIPTION QTY 01 3111504022 Screw Hex Set M4 6L Black Zinc 2 02 Bracket 1 03 SE05A602 Potentiometer 1 04 SE05P511 Paddle Plastic Only 1 05 3110704081 Screw Flat Head M4 12 White Zinc 2 ...

Страница 70: ...Buzzaround XL_SG_REVA_100711 69 ILLUSTRATED PARTS BREAKDOWN Four Wheel Buzzaround XL Model GB146 ...

Страница 71: ...B3P535A Scooter manual instructions stickers 1 04 SB3A106A Basket 1 05 SB3P536A Tiller Warning Decal 1 06 SF01E101 Front body assembly 1 07 3000325130 Velcro 4 08 SB3A613A Battery Decal 1 09 3000325120 Velcro 4 10 SE09E601 Battery box assembly 1 11 SE09E102 Rear part assembly 1 12 SB3A105A Seat Post Pin 1 13 SE09E401 Seat Post 1 14 SB05E401 Seat Assembly with Arms 1 ...

Страница 72: ... Spring Compression Φ2 Φ13 24 White Zinc 1 06 3110410452 Bolt Hex M10 45L Black 1 07 SF01E102 Front frame assembly 1 08 3000404041 Washer Flat Φ4 3 Φ8 0 5 White Zinc 8 09 3110904051 Screw Phillips Pan Self Tapping ST4 2 12L White Zinc 2 10 SF01P504 Carpet 1 11 SE09P556 Serial Label 1 12 3110604121 Screw Phillips Pan M4 35L White Zinc 6 13 SF01E501 Deck 1 14 3100304011 Nut Nylon M4 White Zinc 8 15 ...

Страница 73: ... NO DESCRIPTION QTY 01 SE05P208 Tiller Knuckle Bottom 1 02 SB2P505A Collar 1 03 3000406072 Washer Flat Φ6 2 Φ13 1 5 Black 2 04 3003106012 Spring washers Φ6 Black 2 05 3100206012 Nut Cap M6 Black 2 06 3090400010 Nut Black 1 07 3090400020 Gasket 1 08 3090400030 Cap Bearing 1 ...

Страница 74: ...g Φ27 Φ0 8 7 White Zinc 1 23 SF01A204 Steering Beam 1 24 3100308012 Nut Nylon M8 Black 2 25 SF01E103 Front Steering Bar 1 26 3110312059 Screw Hex Socket Head M12 85L Black 1 27 3000412012 Washer Flat Φ12 5 Φ23 2 5 Black 1 28 SF01A101 Front Frame Metal Only 1 29 3051600180 Controller 1 30 3111506032 Screw Hex Socket M6 20 Black 2 31 3002330030 Serial Sticker 1 32 3100106012 Nut Hex M6 Black 2 33 SE...

Страница 75: ...her Flat Φ6 Φ19 1 5 White Zinc 2 48 SF01E104 Wheel 8 2 49 3100305012 Nut Nylon M5 Black 2 Steering Assembly SF01E103 ITEM PART NO DESCRIPTION QTY 01 SF01A202 Right Steering Arm Bracket 1 02 SD01E203 Steering Rod Assembly 2 03 3110310102 Bolt Hex Socket M10 75L Black 2 04 3090162001 Bearing 6200 2Z 4 05 3100308012 Nut Nylon M8 Black 2 06 3100310012 Nut Nylon M10 Black 2 07 SF01A201 Front Steering B...

Страница 76: ...Buzzaround XL_SG_REVA_100711 75 8 Front Wheel Assembly SF01E104 ITEM PART NO DESCRIPTION QTY 01 3090160010 Bearing 6001 2Z 2 02 SF01A501 Wheel 8 1 03 SF01E502 8 Wheel Cover 1 04 SF01P204 Spacer 1 ...

Страница 77: ...0711 76 Frame Release Handle Assembly SE09E104 ITEM PART NO DESCRIPTION QTY 01 SE09P513 Release Handle Plastic Only 1 02 SE09A103 Release Handle Metal Only 1 03 3110904081 Screw Phillips Pan Self Tapping ST4 2 16L White Zinc 4 ...

Страница 78: ...1 Key 1 02 SE05P508 Dash Cover 1 03 3110803042 Screw Phillips Self Tapping ST2 9 13L Black Zinc 4 04 SE05E602 Dash Top 1 05 SE06P221 Plug 2 06 SF01A205 Tiller Assembly without Plastic 1 07 SE05E601 Dash Bottom 1 08 SB3A503A Front Basket Bracket Holder 1 09 SB3P119A Basket Bracket 1 10 3111005032 Screw Phillips M5 30L Black Zinc 4 ...

Страница 79: ...L Black Zinc 2 13 SE05P207 Upper Tiller Knuckle 1 14 3003106012 Washer Spring Φ6 Black Zinc 2 15 3100306012 Nut Nylon M6 Black Zinc 2 16 SE05P514 Rear Tiller Cover Black 1 17 SF01A602 Main Wire Harness 1 18 SB3P521A Rear Basket Bracket Holder 1 19 SB3P133A Rubber Pad 1 20 3110903032 Screw Phillips Pan Self Tapping ST3 5 12L Black Zinc 4 ...

Страница 80: ...TION QTY 01 WE03P510 Brake Handle Cover 1 02 SE09E503 Right Rear Colored Shroud Plastic 1 03 SE09E502 Rear Shroud 1 04 3110308042 Bolt Hex Socket M 45L Black Zinc 4 05 3000408042 Washer Flat Φ8 4 Φ16 1 6 Black Zinc 8 06 SB3P137A Motor Bracket Black 2 07 SE09P127 Brake Handle Black 1 ...

Страница 81: ...eel Cover 2 14 SB05A203 8 Rear Wheel 2 15 3100308012 Nut Nylon M8 Black Zinc 4 16 SE09E105 Rear Frame with Anti Tips 1 17 3000404051 Washer Flat Φ4 3 Φ90 0 8 White Zinc 4 18 RA02E101 Transaxle 1 19 3002330030 Serial Decal 1 20 3110604091 Screw Phillips Pan M4 20L White Zinc 2 21 SE09E504 Left Rear Colored Shroud Plastic 1 22 SB3P539A Decal Brake 1 23 3000405011 Washer Flat Φ5 Φ10 1 White Zinc 2 24...

Страница 82: ...otor Connector 1 06 SE09P530 Spacer Φ15 20L 1 07 3111006022 Screw Phillips M6 30L Black Zinc 1 08 3111006052 Screw Phillips M6 20L Black Zinc 1 09 3111510052 Screw Hex Set M10 40L Black Zinc 1 10 SE09P531 Spacer Φ15 7L 1 11 3100106022 Nut Hex M10 Zinc Black 1 12 3100308011 Nut Nylon M6 White Zinc 2 13 3110106052 Screw Cap M6 35L Black Zinc 4 14 SE09A102 Rear Frame Metal Only 1 15 SE09P131 Transaxl...

Страница 83: ...ar Grab Handle 1 02 3000325170 Velcro 4 03 SE09A504 Rear Shroud 1 04 3000405031 Washer Flat Φ5 5 Φ10 1 White Zinc 4 05 3110903031 Screw Phillips Pan Self Tapping ST3 5 12L White Zinc 2 06 3110605011 Screw Phillips Pan M5 12L White Zinc 2 07 SE09P550 Reflector Decal Left 1 08 SE09P552 Reflector Decal Right 1 09 SE09P551 Decal Unit 1 10 3000402021 Washer Flat Φ2 2 Φ5 0 3 Black Zinc 1 11 3110902012 S...

Страница 84: ...Colored Plastic SE09E503 ITEM PART NO DESCRIPTION QTY 01 SE09P510 Right Rear Colored Plastic 1 02 3000325180 Velcro 2 Left Rear Colored Plastic SE09E504 ITEM PART NO DESCRIPTION QTY 01 SE09P511 Left Rear Colored Plastic 1 02 33000325180 Velcro 2 ...

Страница 85: ...1 04 SSF01P502 Front Deck Colored Plastic 1 05 SD01P550 Decal 1 06 SE09P514 Right Colored Plastic Deck Piece 1 07 3000325180 Velcro 4 08 3000325170 Velcro 4 09 SE09P502 Mid Deck Black Plastic Only 1 10 SE09A601 Battery Connector 1 11 31110050852 Screw Hex M5 16 Black Zinc 2 12 SE09P541 Pad 4 13 3100305012 Nut Nylon M5 Black Zinc 2 14 SE09P515 Left Colored Plastic Deck Piece 1 ...

Страница 86: ...ART NO DESCRIPTION QTY 01 3003610010 Gasket 1 02 SF01P511 8 Front Wheel Cover without Gasket 1 Seat Assembly with Arms SB05E401 ITEM PART NO DESCRIPTION QTY 01 WC6E401A Left Arm Assembly 1 02 WWS61E100 Seat 17 Raw 1 03 3002300020 Fire Decal 1 04 3002300030 Seat Material Decal 1 ...

Страница 87: ... Hex M8 25 White Zinc 4 10 SE1E403B Seat Swivel Assembly 1 11 SB05E402 Right Arm Assembly 1 12 WC9P401A Arm Width Adjustment Knob 2 Right Arm Assembly SB05E402 ITEM PART NO DESCRIPTION QTY 01 WC6A405A Arm Pad 1 02 3110308072 Large flat head cap screw M8 30L Black Zinc 1 03 3100108012 Hex Nut M8 Black Zinc 1 04 3111706052 Screw Ø8 M6 33L Black Zinc 1 05 WC6A401A Right Arm Tube 1 06 3110106032 Screw...

Страница 88: ...WC6E401A ITEM PART NO DESCRIPTION QTY 01 WC6A405A Arm Pad 1 02 3110308072 Screw Cap M8 30L Black Zinc 1 03 3110106032 Screw Cap M6 12L Black Zinc 1 04 3100108012 Nut Hex M8 Black Zinc 1 05 3111706052 Screw Ø8 M6 66L Black 1 06 WC6A402A Left Arm Tube 1 ...

Страница 89: ...2 3000608012 Pin Spring Ф 8 63 5 Black Zinc 1 03 SE1P530A Paddle Style Push Down Handle Cover 1 04 SE1A404B Seat Swivel Lever 1 05 SE1P413B Spacer 1 06 SE1P424A Spring Double Torsion φ 2 5 Black Zinc 1 07 WC9P453A Plug 1 08 SE1P529A Decal 1 09 3110605092 Screw Phillips Pan M5 35 Black Zinc 1 10 3100105012 Nut Hex M5 Black Zinc 1 ...

Страница 90: ...Buzzaround XL_SG_REVA_100711 89 Seat Post Assembly SE09E401 ITEM PART NO DESCRIPTION QTY 01 SE09A401 Seat Post Metal Only 1 02 SA2P419A Seat Post Insert 1 03 3000604022 Pin Spring Φ4 6L Black Zinc 1 ...

Страница 91: ...attery Box Cover 1 03 3000404031 Washer Flat Φ4 Φ8 0 8 White Zinc 4 04 3110604011 Screw Phillips Pan M4 12L White Zinc 2 05 SE09P540 Pad 4 06 3052512010 Battery 12V 12AH 2 07 SE09P504 Battery Tray 1 08 3110903111 Screw Phillips Self Tapping ST3 5 16L White Zinc 11 09 3100304011 Nut Nylon M4 White Zinc 2 10 3000404041 Washer Flat Φ4 3 Φ8 0 5 White Zinc 2 ...

Страница 92: ...5 Charger Port 1 17 3000402022 Washer Flat Φ2 7 Φ6 0 5 Black Zinc 2 18 3100102022 Nut Hex M2 5 Zinc Black 2 19 SE09E603 Circuit Breaker 1 20 SE09P553 Buzz XL Decal 2 Lower Dash Assembly SE05E601 ITEM PART NO DESCRIPTION QTY 01 3110103031 Screw Phillips Self Tapping ST3 5 16 White Zinc 2 02 SE05E603 Paddle Assembly 1 03 SE05P519 Lower Dash Plastic Only 1 04 3100102022 Nut Hex M2 5 Black Zinc 2 05 S...

Страница 93: ...Knob 1 02 SE05P509 Dash Top Plastic Only 1 03 SB3P608A Volt Meter Bracket 1 04 3110103011 Screw Phillips Self Tapping ST2 9 8 White Zinc 2 05 SE05A601 Dash Wire Harness 1 06 3110902012 Screw Phillips Pan ST2 2 8 Black Zinc 2 HORN BUTTON KEY SWITCH HEAT SHRINK TUBE HEAT SHRINK TUBE SPEED POTENTIOMETER VOLT METER HORN ...

Страница 94: ...Buzzaround XL_SG_REVA_100711 93 Paddle Assembly SE05E603 ITEM PART NO DESCRIPTION QTY 01 SE05A502 Plastic Paddle Only 1 02 3111504022 Screw Hex Set M4 6L Black Zinc 1 03 SE05A602 Potentiometer 1 ...

Страница 95: ...Buzzaround XL_SG_REVA_100711 94 ...

Страница 96: ...Buzzaround XL_SG_REVA_100711 95 BUZZAROUND XL_SERVMAN_REVA_100711 Golden Technologies 401 Bridge Street Old Forge PA 18518 www goldentech com Model GB146 Model GB116 ...

Отзывы: