background image

5 | 

P a g e


Ambulo


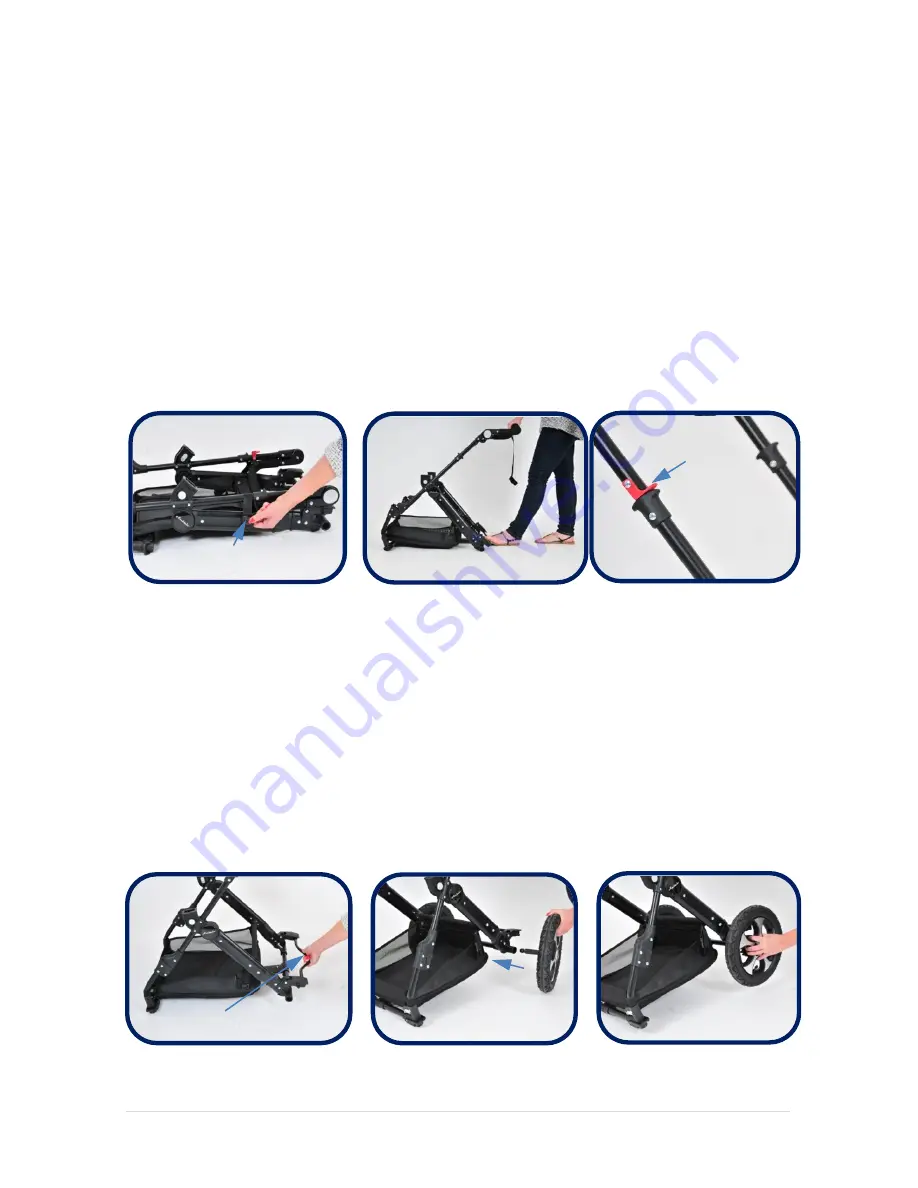
Opening the Frame  

  Open the frame clip on the strap. 

  Place your foot on the rear axle tube to stabilise the chassis as 

you lift the handlebar. 


  Lift  the  handlebar  until  you  hear an audible  “click”.  Confirm  that 

the frame is locked in the open position. 

  Close the red frame safety lock to avoid unexpected folding of 

the chassis.


Fitting and Removing the Rear Wheels 

  Lift the brake to allow the wheel to be fitted. 

  Insert  the  rear  wheel  axle  until  you  hear  an  audible  “click”  to 

confirm  that  the  wheel  is  locked  into  position.  Repeat  for  the 
second wheel. 

  Pull the wheel in the opposite direction to confirm that the wheel 

has been fitted properly. 


Red frame  
  Safety lock 

Brake connecting lever 

Frame Clip 

Содержание Ambulo

Страница 1: ...Golden Baby Ambulo ...

Страница 2: ...ting the handle height Adjusting the seat unit Adjusting the bassinet Using the safety harness Folding the stroller chassis CARRY COT Important Safety Information Primary features Assembling the carry cot Fitting the carry cot Operating the carry cot hood Removing the carry cot CAR SEAT Fitting the car seat to the chassis Removing the car seat from the chassis Car seat options ACCESSORIES Rain cov...

Страница 3: ...rt is broken torn or missing To avoid injury to fingers take care when unfolding and folding the frame To avoid injury never attempt to remove or adjust the seat unit when a child is occupying the seat Put the brake on whenever you park the pram stroller Do not let children play unattended near the pram stroller The pram bassinet is only suitable for a child who cannot sit up unaided Do not add a ...

Страница 4: ...ck Absorber 40 PSI Tyre Wheel Hub Adjusting Spring Rod Handrail release Button Frame release locks Handle Adjustment Button Velcro Straps Bassinet Frame Rear Wheel Front Wheel Storage Basket Hinge Central Adapter Release Button Seat Adjustment Button Canopy Cover 6Primary Features ...

Страница 5: ... position Close the red frame safety lock to avoid unexpected folding of the chassis Fitting and Removing the Rear Wheels Lift the brake to allow the wheel to be fitted Insert the rear wheel axle until you hear an audible click to confirm that the wheel is locked into position Repeat for the second wheel Pull the wheel in the opposite direction to confirm that the wheel has been fitted properly Re...

Страница 6: ...heel Pull the wheel in the opposite direction to confirm that the wheel has been fitted properly Operating the Brake To engage the brake firmly press down with your foot on the brake connecting lever Check that the brake is fully engaged into the rear wheel before letting go of the handle To release the brake lift up the brake connecting lever with your foot until the wheels move freely ...

Страница 7: ...heel lock levers with the wheels pointing as illustrated below Lift the lever to return to the swivel wheel position Adjusting the Shock Absorber Press down on the adjustable spring rods with your thumbs while your forefingers are lifting against the wheel cover Push the adjustable spring rods to the needed position 1 2 3 Swivel position Locked position ...

Страница 8: ...ugh the holes on the seat cover Close the 4 zippers Press and secure the Velcro straps at each end Always secure the fasteners to the bassinet support bar Close the 3 clips under the bottom of the seat unit as pictured To fit the seat unit to the chassis lower the central adapters into the attachment devices and push down until it locks into position 1 2 3 ...

Страница 9: ...the 2 canopy supports bars through the canopy cover Insert the 2 canopy supports simultaneously to the canopy bases Fix the canopy cover to the seat with the elastic loops as illustrated Secure the back of the canopy cover over the top of the frame To avoid injury remove the two canopy bases from the stroller when the canopy is not in use Outer Inner ...

Страница 10: ...erly To release the handrail press the handrail release button as illustrated below Adjusting the Handle Height The handle height is adjustable to multiple positions To adjust the handle height press in and hold in the handle adjustment buttons on the outside of the handle Rotate to the desired position To enable the stroller to stand independently when folded put the handle in the parking positio...

Страница 11: ...achment devices and push down until it locks into position To remove rotate the seat unit press the central adapter release buttons on both sides and lift the seat unit To avoid injury never attempt to fit or remove the seat unit while the seat is occupied Depress the seat adjustment buttons to adjust the seat to the 6 different positions as illustrated below 1 2 3 4 5 6 ...

Страница 12: ...sition 6 Open the 3 clips at the back of the seat unit as illustrated below Never open the fasteners on the bassinet support bar Lay the buckles flat and insert the mattress into the bassinet Re clip the 3 clips at the back of the bassinet unit to use in the seated position ...

Страница 13: ...hould be placed between the child s legs The waist belts shoulder straps should be clipped into the centre buckle at the end of the crotch strap The harness can be adjusted to suit your child by sliding the adjusters along the shoulder straps waist belts and crotch strap Ensure that both shoulder straps are at the same level and that both are secure To release the safety harness push the button on...

Страница 14: ...th hinges are fully open before folding the chassis Push down on the handle bar to fold the chassis Secure using the parking clip as illustrated below For your Ambulo stroller to be self supporting place the handle in the parking position before folding the chassis To remove the wheels slide the grey locking tabs as illustrated below ...

Страница 15: ...arry cot Do not use if any part is broken torn or missing Do not overload the pocket at the front of the carry cot Total maximum load is 1kg Never allow children to climb into the carry cot unassisted the carry cot may tip over and injure your child Never place parcels bags or accessories on the handle or canopy Always keep the child away from moving parts when being erected for use or folded or d...

Страница 16: ...16 P a g e Ambulo Carry Handle Hood Hood adjustment button Apron Base Toggle Central adapter Primary Features ...

Страница 17: ... of the bracing bar Pull the nylon strap towards the baseboard clip until the bracing bar is securely fixed and repeat on the remaining corners Put the inner lining back over the cot frame Secure the inner lining using the Velcro tension straps Put the apron over the front of the carry cot and secure using the Velcro tabs ...

Страница 18: ...down until it locks into position 2 8 Operating the Carry Cot Hood Push the hood adjustment buttons on both sides and rotate the canopy to one of the 5 desired positions WARNING Always keep the child away from moving parts when being erected for use or folded or during adjustments made by the carer Removing the Carry Cot To remove the carry cot press the central adapter release buttons on both sid...

Страница 19: ...ar seat adaptors into the Ambulo chassis attachment device While in front of the chassis locate the adaptor marked R on the right and L on the left Hold the car seat by the carry handle and lower into the car seat adaptors Push the car seat down firmly until the car seat clicks and locks into position Check that the car seat is secure and locked by pulling up on the car seat ...

Страница 20: ...at not the handle adjustment buttons used to operate the handle recline and lift the car seat away from the chassis To remove adapters press the central adapter release buttons on both sides and lift away Car Seat Options The Ambulo multi adaptors can be combined with car seats from other leading brands For details see the table below ...

Страница 21: ...of the chassis frame Pull the elasticated front of the rain cover down over the bottom of the chassis frame Fitting the Rain Cover to the Carry Cot The rain cover needs the carrycot hood to be in the upright position for support Place the back of the rain cover over the carry cot starting at the pocket end Pull the elasticated front of the rain cover down over the bottom of the carry cot ...

Страница 22: ...the seat unit as illustrated below Secure the short elastic over the canopy cover and pull the long elastic down over the bottom of the chassis frame Fitting the Mosquito Net to the Carrycot The mosquito net needs the carrycot hood to be in the upright position for support Place the black toggles through the loops on the seat unit as illustrated below Secure the short elastic over the hood and pul...

Страница 23: ...a g e Ambulo FOOTMUFF Fitting the Footmuff Press in the harness release button to unclip the straps Press in the waist strap button and unthread the waist straps from the harness clips Remove the crotch pad ...

Страница 24: ...arness straps through holes 1 2 and 3 Rethread the waist straps through the harness clips Replace the crotch pad Fasten the harness together and check it is safely secured Close the popper buttons Fold the front of the footmuff over the hand rail Thread the toggle bars through the elastic loops ...

Страница 25: ...25 P a g e Ambulo Fitting the Seat Apron Put the apron over the bottom of the seat frame Fold the top of the apron over the hand rail Thread the toggle bars through the elastic loops ...

Страница 26: ...chanism Lubricate adjust and check for signs of wear Rear footbrake Lubricate pivot point adjust and check for signs of wear Tyres Check tyres regularly for proper inflation Inflate to 40 PSI range Lower pressures give a softer ride Always use a hand or foot pump to inflate the tires Cleaning Cleaning the Fabric Dust or slight stains can be cleaned using a damp cloth The seat cover and the canopy ...

Страница 27: ...abnormal use not following your instructions A child left unattended safety harness not used excessive load transport damage i e airline or freight damage Customer costs within the warranty include inward freight charges to return the product to the manufacturer s representative for warranty and or service The manufacturer s representative reserves the right to charge a service fee and or charge f...

Отзывы: