background image


30 


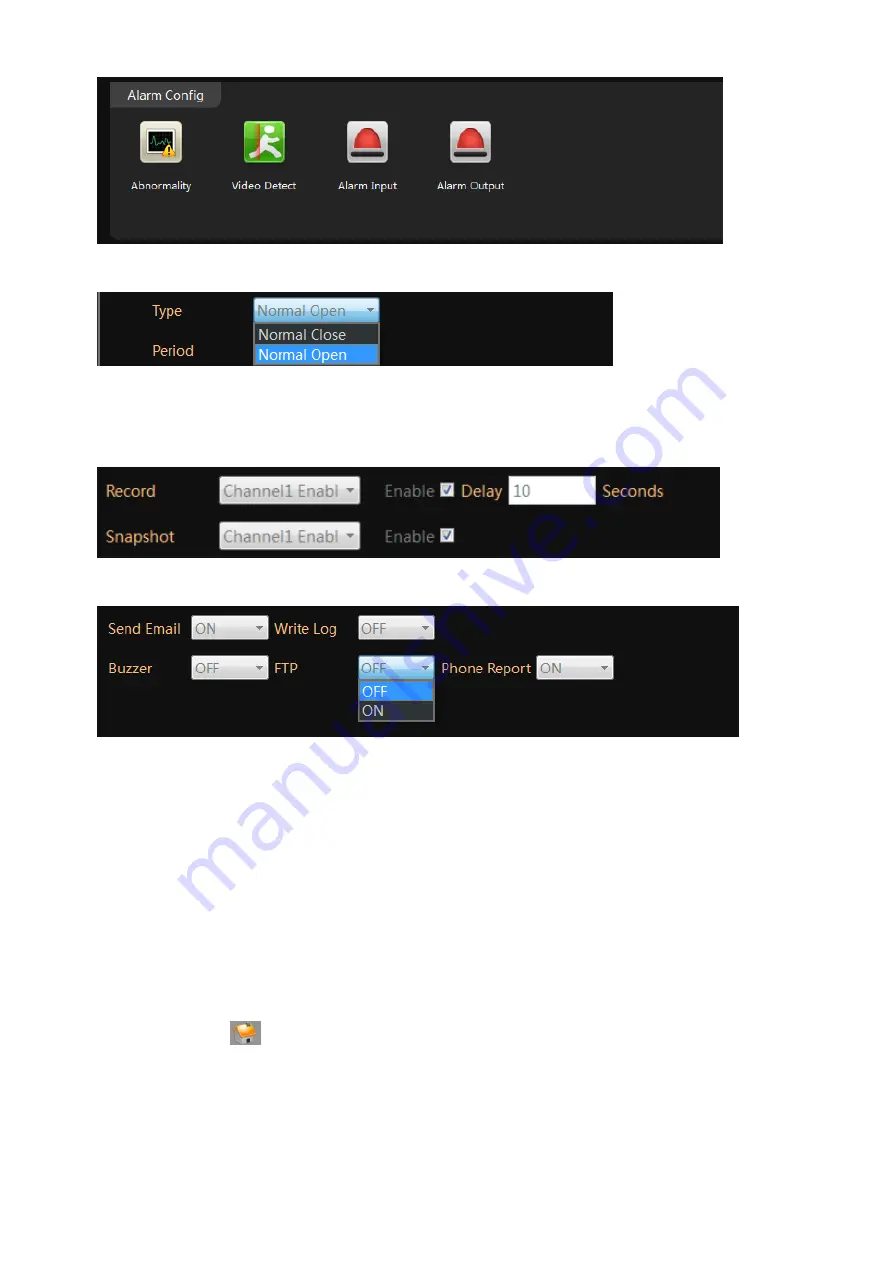
2.  Select the alarm type. 


NOTE: Normal Open means the alarm device stays OPEN, it generates digital signal to the camera 
when the status change to closed.   

3. 

Enable the “Record” and “snapshot” 


4. 

Choose “ON” for FTP, click OK to save. 


NOTE: The alarm input FTP upload requires external alarm devices such as door contact is connected to the 
camera properly. 


Email notification 

Email Notification is popular function in IP camera and NVR. The user can set the email notification thru 
event such as motion detection, video masking, alarm input, video loss… 


Set email account 

1.  In the "Main" 

Enter the “Device Config”, Click icon “Network” 

Содержание 2252-23

Страница 1: ...1 en Operation and Installation Manual VandalProof IP Dome Camera Model 2252 23 2252 30 2252 73...

Страница 2: ...eo on your computer 17 Recording live to TF memory card cameras with microSD only 19 Format TF memory card 19 Turn on the TF memory card recording 20 Enable Motion recording 21 Enable network dis conn...

Страница 3: ...smart phone or tablet 55 Live view interface 57 Optional1 How to change the video quality to adapt to low bandwidth network 59 Set a Password for the Camera 60 Saving live stream to your smart phone...

Страница 4: ...gtoday For access to the quick start guide and other support information go to http www golbong com support asp To contact GOLBONG support please do one of the following a Visit http www golbong com c...

Страница 5: ...l of the NVR using Cat5e or higher grade Ethernet cable The cameras will appear on the NVR without any additional configuration when the system starts up Connect Cameras to Local Network Option 1 Conn...

Страница 6: ...Memory 2GB Video 512 MB of video memory and above Network LAN 10 100 Base T Network Network WAN 1 Mbps upstream High speed Internet service is required to remotely connect to your system Installing S...

Страница 7: ...in console NOTE The default username and password of the software is admin If you want to revise the login username and password of the software go to the Main click User Manager change the new passwo...

Страница 8: ...8 4 Mark the checkbox in front of the IP address click Add button The IP camera will move to right 5 Click the pen icon under operation a new dialog pop up name the camera Click OK to save...

Страница 9: ...gin device modify IP automatically at the lower right corner NOTE once you mark the checkbox the software will change the IP camera automatically to avoid the conflicts 2 Return back to step 3 Click I...

Страница 10: ...3 How to Configure the network setting of the camera manually 1 In the Main Click Device Config a new screen appear 2 Select the camera from the list in the top left All the icon will be activated wi...

Страница 11: ...email notification may not be working NOTE If you don t know you network setting mark enable DHCP to receive the IP setting from your local network Click OK the IP camera has to reboot to receive the...

Страница 12: ...ll start receiving the live NOTE Double click the name again can close the video Digital ZOOM 1 Right the video you want to operate digital zoom on the screen select Digital Zoom 2 Hold the left butto...

Страница 13: ...e the zoom operation Activate the audio camera supports audio and connect to the audio pick up only 1 In the live Click headset icon on the top right corner to hear the voice from the IP camera Import...

Страница 14: ...2 Click the panel button you can pan tilt zoom with camera Change the Password of the Camera Set a new password for admin 1 In the Main click Device Config Enter Tool Manager on the right screen A ne...

Страница 15: ...account for operator 1 Click Add User a new screen pop up 2 Key in the Username Password NOTE Mark Sharable will allow more than one operator use the same account 3 Allocate the authority to this acco...

Страница 16: ...TE this is the switch button to turn on off recording 5 Return to the live interface double click camera on the list CMS5 will start recording from the live NOTE the CMS5 only will start recording whe...

Страница 17: ...17 Playback the video on your computer 1 In the Main Click Playback icon a new screen appear 2 Select the channel from the camera list in the upper right corner...

Страница 18: ...oftware will start playing NOTE Click can locate the files in the PC computer 6 Choose the Time over File at the left corner the time frame will appear 7 Move the mouse to the time frame time will dis...

Страница 19: ...r Device Config and Click Disk Manager 2 Select the memory disk from the list NOTE Only the model with TF memory card slot and the TF memory card is installed will display memory information NOTE Clas...

Страница 20: ...will be erased with format operation NOTE The TF memory card can not be viewed by windows PC directly Turn on the TF memory card recording 1 In the Main Click Device Config Enter Record Config 2 Choo...

Страница 21: ...the Main Click Device Config enter Video Detect a new screen appear 2 Click the enable to turn on the motion detection 3 Choose sensitivity level from Sensitivity Important Over sensitivity could cau...

Страница 22: ...ave Enable network dis connection recording The IP camera can initial on board recording when the network is dis connected 1 In the Main Enter Device Config Click icon Abnormality 2 Select Network Abo...

Страница 23: ...turn on the external alarm detection 3 Select the alarm type NOTE Normal Open means the alarm device stays OPEN it generates digital signal to the camera when the status change to closed 4 Click Perio...

Страница 24: ...ack the video from TF memory card cameras with microSD only 1 In the Main Click Playback 2 Click Device to playback the footage on TF memory card NOTE If choose Local The CMS5 will try to search the f...

Страница 25: ...ge from the list click play button the software will start play 6 Choose the Time over File at the left corner the time frame will appear 7 Move the mouse to the time frame time will display in white...

Страница 26: ...n will change to red flag when download is completed 2 Click the red flag to view the downloaded file in your PC computer 3 Return to Main Click the Backup icon 4 Click the browser next to H 264 Recor...

Страница 27: ...TP server when alarm event is triggered Upload footage require TF memory card installed it successfully Setup the FTP server 1 In the Main Enter the Device Config Click icon Network 2 Click the FTP 2...

Страница 28: ...ection The camera can not continuous upload the snapshot to a ftp server Enable the on board storage recording 1 In the Main Enter Device Config Click Record Config 2 Select the auto make sure the det...

Страница 29: ...FTP click OK to save NOTE The camera will upload the video or snapshot to the FTP server when it catch a motion detection NOTE Upload video to FTP requires TF memory card installed Optional Enable FTP...

Страница 30: ...click OK to save NOTE The alarm input FTP upload requires external alarm devices such as door contact is connected to the camera properly Email notification Email Notification is popular function in...

Страница 31: ...ch as abc gmail com 6 Click the Test NOTE The system may still show failed even the email setting has been done correctly If you are sure about your email setting just ignore the warning message Impor...

Страница 32: ...n the email notification Configure alarm event for email notification Motion detection Notification The camera or NVR will send an email when it detects a alarm event such as motion external alarm vid...

Страница 33: ...Click OK to save Video Masking Event The camera or NVR will send an email when it detects camera masking front end 1 In the Main Enter the Device Config Click icon Video Detect 2 Click Camera Masking...

Страница 34: ...Enter the Device Config Click icon Alarm input 2 Click the enable 3 Enable the snapshot 4 Turn on Send email Click OK to save Storage Device Not Existed Event The IP camera or NVR will send an email...

Страница 35: ...ick OK to save Other options Video View User can record the current video layout and recall it later 1 In the Main click icon Live 2 Click this icon in down corner to save currect video layout 3 Name...

Страница 36: ...Click the View to find the saved layout 5 Click name to view the call up the saved layout Video Tour User can pre set the video layout and make it displays sequentially 1 In the Main click icon Video...

Страница 37: ...o select the main stream or sub stream for that window 5 repeat step 3 until you finish all the binding 6 Click Save and continue to add a new layout 7 Repeat step 1 until you add all the layout 8 Ret...

Страница 38: ...larm to your PC computer 3 Mark the sound CMS5 will play the audio file when alarm is triggered 4 Return Main click icon Alarm Info you can check the alarm log Check the log 1 In the Main click Log 2...

Страница 39: ...ame 4 Click Search the result will appear NOTE Some of the log may requires turn on the write log in the Main Device Config Alarm Config Setting Camera Parameters 1 In the Main click Device Config ico...

Страница 40: ...or reproduction and generate more noise in low light condition 5 IR_CUT select auto switch the camera will switch to black and white and sense the infrared basing on the visible light illumination NOT...

Страница 41: ...st IMPORTANT Different model could use different firmware unless you are sure all the mode share the same firmware don t check Select All 3 Click the Browser to find the firmware 4 Click Upgrade to up...

Страница 42: ...nection Quick Set 1 Right click and select Quick Set 2 The NVR connects to your camera automatically Click Apply to confirm NOTE Input the username and password at the bottom of the dialog box if it r...

Страница 43: ...list It becomes highlighted and appears on the below list When Connection Status change to Connected Click Apply NOTE Insert the username and password at the bottom of the dialog box if it requires N...

Страница 44: ...ght click and select Full Screen 4 Leave Full Screen double click the on screen or right click and select Leave Full Screen 5 Digital Zoom Left click your mouse and draw a yellow square to the targete...

Страница 45: ...45 Set Camera Image Quality 1 In the live Click the icon on right top corner A new dialog appear 2 Click the camera in the list it turn to highlighted Click Encode button on the right side...

Страница 46: ...for remote viewing it can save bandwidth NOTE Frame Rate Frame per seconds User can select the value of the frame rate the bigger the value the better the video fluency Optional How to activate the a...

Страница 47: ...it to activate Optional Change the IP address of the camera from NVR 1 In the live Click the icon a new dialog appear NOTE You can click the cross icon to delete channels directly 2 Click the camera...

Страница 48: ...Input the camera s password if it requires Optional Switch PAL NTSC at front end device video format If your device video format makes conflicts with your recorder the icon appears Double click the i...

Страница 49: ...ification message to the recorder Discover the onvif port 1 In the Main click Device Config 2 Select the camera from list click icon Network 3 Find the port number next to onvif NOTE you can change on...

Страница 50: ...50 2 Click Add camera 3 Fill in the IP address HTTP port NOTE HTTP port is the onvif port in the camera 4 Fill in the username and password...

Страница 51: ...n create a password for the IP camera 5 Select protocol from brand list 6 Select Onvif from device video profile will pop up in the screen 7 Click OK to save Now you can assign the camera to a specifi...

Страница 52: ...e User can enable PTZ panel for PTZ camera 1 Click icon System configure and select Accessories 2 Find the PTZ Devices click PTZ Device setup a new screen pop up 3 Check the PTZ control click OK to sa...

Страница 53: ...53...

Страница 54: ...nload app 1 Download Search and install the app XMEYE in app store or Google play Registration 1 Register click login problems press register to create a new account 3 Input E mail press the icon get...

Страница 55: ...e code The mail box also will use to recover the password in future 4 Login return to the login page input your username and password click Cloud Login Connecting to your ip camera on an smart phone o...

Страница 56: ...56 NOTE Make sure your phone has connected to your the local network 3 Select the check box then press the button icon Add NOTE Input the password if required the default password is blank...

Страница 57: ...ra name in the device list the live view will display 2 Press the square icon on the upper right corner to enlarge the video to full screen NOTE The users can zoom in out on the screen with fingers 3...

Страница 58: ...definition 4 4 channels In the live video page choose the number 4 click to add new channel to live NOTE User can select 1 4 9 16 channel 5 Touch the tick icon on right to select the camera NOTE The...

Страница 59: ...7 Press speaker button to hear the voice from the camera NOTE Your camera must support audio and connects to audio pick up Optional1 How to change the video quality to adapt to low bandwidth network...

Страница 60: ...the sub stream to adapt to your network bandwidth NOTE higher frame rate and resolution require higher bandwidth Set a Password for the Camera 1 In the Live Video page click the Home icon 2 In the Men...

Страница 61: ...61 3 Input old password and a new password Click Save NOTE default password is blank No need 4 Click return icon to enter Device list 5 click the edit icon a new dialog pop up 6 Select Edit...

Страница 62: ...ord Click OK to save Saving live stream to your smart phone 1 In Live Video page press camcorder button to start recording NOTE Camcorder button will change to Blue when recording is activated 2 Press...

Страница 63: ...eo on your smart phone Press the snapshot will start play the video on your phone 6 Press the edit icon on top right corner press snapshot to select the video 7 Press the save icon to save the video t...

Страница 64: ...t 4 Press the edit icon on top right corner select the snapshot to view the picture 5 Press the save icon to save the snapshot to your phone Playback footage on TF memory card cameras with microSD onl...

Страница 65: ...65 2 Press Remote playback from the menu 3 The playback video will display Press the button on right corner you can select the time unit h m s...

Страница 66: ...e yellow block 4 Press the speaker icon to activate the sound NOTE Your camera must support audio and connects to audio pick up Optional How to enable the motion recording from your smart phone 1 Sele...

Страница 67: ...card Cameras with microSD only 1 In the live press Home to enter Menu press Download 2 Choose either download by file or by time 3 Click the Download icon the app start downloading by file 4 Click ic...

Страница 68: ...enu 6 Touch local record to view the download video Enable Push Notification 1 In the live view page Touch home icon 2 Press Alarm Config from the menu a new dialog pop up 3 Press the Motion detection...

Страница 69: ...69 4 Click icon twice to return to device list 5 Press the icon to enter the main menu 6 Press Alarm Push Slide the icon to right turn on alarm push notification...

Страница 70: ...see the motion detection detail of the camera 8 In push setting if the open failed pop up on screen that mean we need to give this app authority to receive push message It usually happens with iOS 9...

Страница 71: ...71 10 Touch Notifications and find XMEYE 11 In the XMEYE page slide the icon to right to enable the notification function from you smart phone...

Страница 72: ...to receive the push message 1 Touch home icon in the live view page 2 Touch set Network from the menu enter a new screen 3 slide the enable to right turn on DHCP The camera will reboot and receive the...

Страница 73: ...heck the security level of your PC so that you are able to interact with the cameras over the web and if necessary modify the Active X settings IMPORTANT The ActiveX plugin only support 32bit version...

Страница 74: ...for Windows 7 or above operating systems have increased security measures to protect your PC from any malicious software being installed To have complete functionality of the web browser interface wit...

Страница 75: ...e Require server verification https for all sites in this zone box 6 Enter the IP address in the Add this website to the zone field 7 Click Add and then click Close 8 Click OK in the Internet Options...

Страница 76: ...the camera s IP address default is 192 168 1 10 The Login dialog box appears NOTE Ensure that the Active X controls are enabled 2 Enter your user name and password Username admin Password no require 3...

Страница 77: ...interface All the designs and software here are subject to change without prior written notice All trademarks and registered trademarks mentioned are the properties of their respective owners To cont...

Отзывы: