background image

2

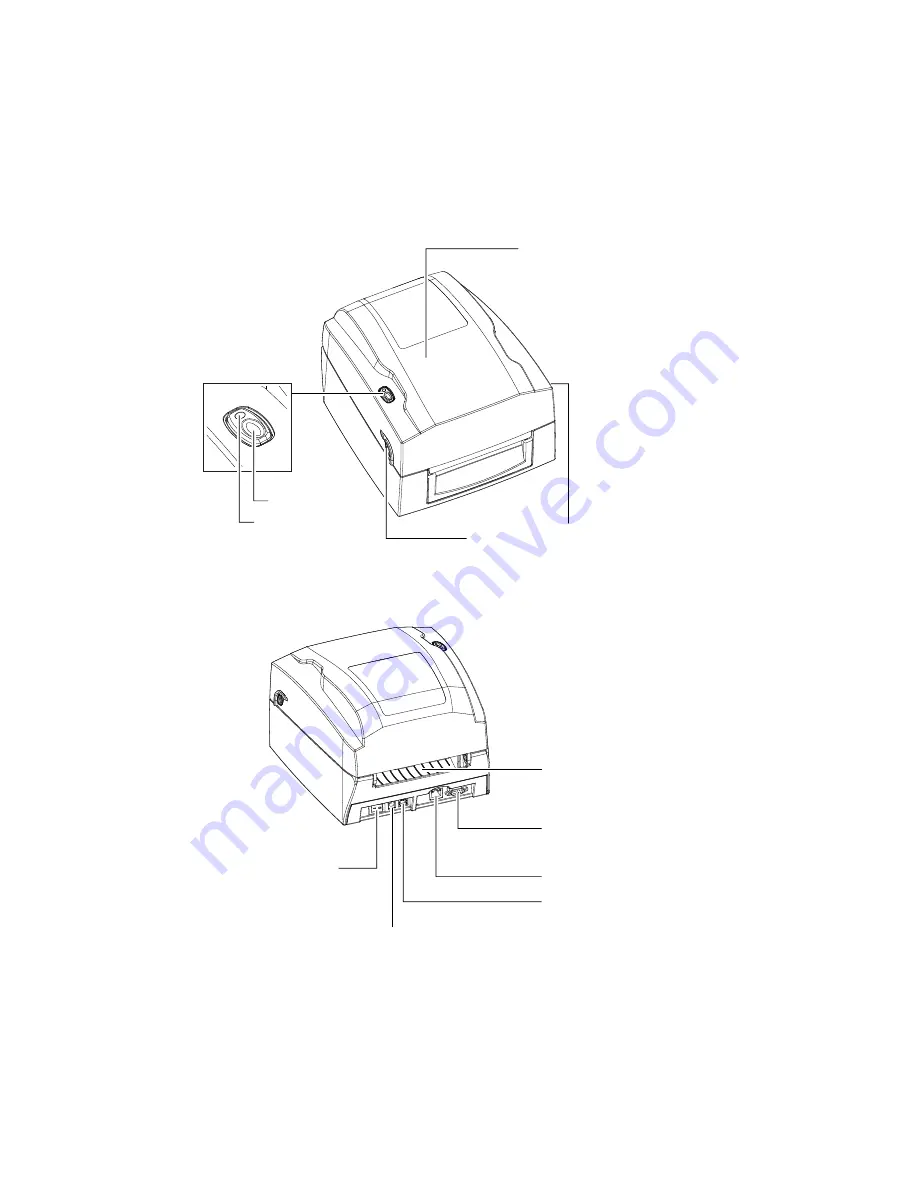
Front View

1

    Barcode Printer

1.2    

Getting To Know Your Printer

002

Device Overview

Rear View

TOP COVER

COVER OPEN BUTTONS

Release buttons for opening the printer cover 

LED INDICATOR

FEED BUTTON

LED OPERATION PANEL

ETHERNET PORT

POWER SLOT

POWER SWITCH 

- ON
- OFF

FAN-FOLD LABEL INSERT

Feed slot for continuous labels

USB PORT

SERIAL PORT

Содержание G300

Страница 1: ...1 G300 G330 BARCODE PRINTER USER MANUAL User Manual Version Issue Date P N G300 series Rev 1 3 2013 07 09 920 014111 00 ...

Страница 2: ...The Printer To The Host Computer Installing The Driver 004 004 005 009 012 013 015 3 Operation Panel 018 3 1 3 2 3 3 LED Operation Panel Error Alerts Label Calibration and Self Test Page 018 019 020 4 NetSetting For Ethernet 021 4 1 4 2 Installing The NetSetting Software The Interface of NetSetting 021 022 5 Maintenance and Adjustment 029 5 1 5 2 5 3 5 4 Cleaning The Print Head Adjusting The Print...

Страница 3: ...MENT FOR EUROPEAN USERS This equipment has been tested and passed with the requirements relating to electromagnetic compatibility based on the standards EN 55022 2010 Class A EN61000 3 2 2006 A2 2009 EN 61000 3 3 2008 and EN 55024 1998 A1 2001 A2 2003 IEC 61000 4 2 2008 series The equipment also tested and passed in accordance with the European Standard EN55022 for the both Radiated and Conducted ...

Страница 4: ...careful not to get liquid on the equipment to avoid electrical shock 6 For safety and warranty reasons ONLY qualified service personnel should open the equipment 7 Do not repair or adjust energized equipment under any circumstances Danger of explosion if battery is incorrectly replaced Replace only with the equivalent type recommended by the manufacturer Dispose of used batteries according to the ...

Страница 5: ... following items are included with your printer USB Cable CD Including QLabel software and G300 user manual Ribbon Module Empty Ribbon Core Ribbon Power Adapter Power Cord AC Adapter Label Supply Module Label Supply Hub Label Guide Plates Set of 2 Label Stock G300 Quick Guide G300 G330 ...

Страница 6: ...Device Overview Rear View TOP COVER COVER OPEN BUTTONS Release buttons for opening the printer cover LED INDICATOR FEED BUTTON LED OPERATION PANEL ETHERNET PORT POWER SLOT POWER SWITCH ON OFF FAN FOLD LABEL INSERT Feed slot for continuous labels USB PORT SERIAL PORT ...

Страница 7: ...GUIDE PLATES Set of 2 RELEASE CATCH Right SCREW Right Screw for adjusting the print head pressure RIBBON REWIND WHEEL HOLDER OF RIBBON REWIND CORE Open The Printing Mechanism PLATEN LABEL GUIDE Right LABEL SENSOR LABEL GUIDE Left ADJUSTMENT SCREW Screw for adjusting the printer line PRINTING MECHANISM RIBBON SUPPLY WHEEL HOLDER OF RIBBON SUPPLY CORE PRINT HEAD ...

Страница 8: ...uttons on both sides of the printer housing and lift the cover Lift the printer cover backward COVER OPEN BUTTONS Release buttons for opening the printer cover Pressing the button Pressing the button Lift the printing mechanism Pressing Pressing RELEASE CATCHES 2 2 Open The Printing Mechanism Pressing The Release Catches Release and lift the printing mechanism ...

Страница 9: ...ibbon around the core 1 Attach the ribbon to the empty ribbon core with the adhesive strip at the end of the ribbon 2 Wind the ribbon around the empty ribbon core for 2 to 3 circles Stick on empty ribbon core Notch on left side A NEW RIBBON MODULE RIBBON SUPPLY RIBBON REWIND 3 A ribbon module is assembled as below ...

Страница 10: ... 1 Place the right hand side of ribbon first RIBBON SUPPLY MODULE Right side Push the ribbon to tighten the spring of the holder HOLDER SPRING OF HOLDER Align the ribbon core to the holder Left side NOTCH OF RIBBON CORE SPOKE GEAR Rotate the gear for alignment if necessary Align the notch of the ribbon core to the spoke ...

Страница 11: ...ad The Ribbon On The Printer For Ribbon Rewind Module RIBBON REWIND MODULE 1 Place the right hand side of empty ribbon core first Right side Align the empty ribbon core to the holder HOLDER Push the empty ribbon core to tighten the spring of the holder SPRING OF HOLDER Close the printing mechanism ...

Страница 12: ...he empty ribbon core 4 Ribbon loading completed 3 Turn the ribbon rewind wheel to tighten the ribbon until it has no wrinkles RIBBON REWIND WHEEL Wind to back Left side Left side SPOKE NOTCH OF RIBBON CORE Align the notch of empty ribbon core to the spoke ...

Страница 13: ...le Installation LABEL STOCK LABEL SUPPLY HUB LABEL GUIDE PLATES Set of 2 1 Place the label stock on the label supply hub attach the label guide plates to the label stock holder Place on the ribbon hub A NEW LABEL ROLL MODULE 2 A label roll module is assembled as below ...

Страница 14: ... Module On The Printer 1 Release the printing mechanism and lift it 2 Place the label roll module on the printer Place on the printer Open the printing mechanism 3 Pass the label through the printing mechanism Through the printing mechanism ...

Страница 15: ...el guides and adjust the label guide to the label width The label guide will help to prevent the label swaying 5 Close the printing mechanism and top cover to complete the label loading LABEL GUIDES Through the label guides Close the printing mechanism ...

Страница 16: ...12 2 Printer Setup 2 5 Loading The Label Supply Hub 1 Cores Loading the label supply hub for 1 cores 1 5 Cores Loading the label supply hub for 1 5 cores ...

Страница 17: ...e that the printer is switched off 2 Connect the power cord to the AC adapter AC ADAPTER POWER CORD Connect the jack of the power adapter to the printer and connect the plug of the power adapter to the socket of the wall G300 BARCODE PRINTER POWER ADAPTER THE WALL SOCKET SLOT JACK PLUG ...

Страница 18: ...tup 3 Connect the USB parallel cable to the printer and host computer 4 Switch on the printer The LED indicator should now lights up G300 BARCODE PRINTER USB CABLE PC SOCKET USB PORT PLUG PLUG Switch on LED INDICATOR ...

Страница 19: ...omputer and open the Seagull Drivers folder on the CD Select the icon for the driver file and click it to start the installation 2 Follow the instructions on the screen The Driver Wizard guides you through the installation procedure Select Install printer drivers 3 Specify your printer model Godex G300 ...

Страница 20: ...on is complete a summary of the printer settings is displayed Check whether the printer settings are correct and click Finish to start copying the driver files Wait until copying is complete then finish the installation 5 Enter a printer name and assign the appropriate rights Godex G300 Godex G300 Godex G300 ...

Страница 21: ...17 2 Printer Setup 7 Once the driver installation is complete the new printer should appear in the Printers and Faxes folder Godex G300 Godex G300 ...

Страница 22: ... are using individual labels pressing the FEED button will move only one label If the label does not stop at the correct position you need to run the auto detection function on the label stock please see Section 3 3 Label Calibration and Self Test LED INDICATOR FEED BUTTON LED OPERATION PANEL LED Indicator Status Description Green Standby The printer is ready for operation Red Orange Error The pri...

Страница 23: ...gs Error No ribbon is loaded but thermal transfer mode is selected as printing mode 1 To work in thermal transfer mode load a ribbon 2 Alternatively select the direct thermal printing mode Memory Error The memory is full The printer also prints the message Memory full Delete data you no longer need from the printer memory Unable to find file The printer also prints the message Filename cannot be f...

Страница 24: ...below Model Version USB ID setting Serial port setting MAC address of Ethernet port IP protocol setting IP address of Ethernet port Gateway setting Netmask setting Number of DRAM installed Image buffer size Number of forms Number of graphics Number of fonts Number of Asian fonts Number of Databases Number of Scalable fonts Free memory size Speed Density Ref Point Print direction Label width Form l...

Страница 25: ...lease follow below steps 5 Click Next to start the installation 6 Once the installation is completed you will see the NetSetting icon on your desktop 1 Insert the product CD in the CD DVD drive of the host computer and open the Ethernet folder on the CD 2 Select the icon for the NetSetting installation file and click it to start the installation 3 Follow the instructions on the screen The Setup Wi...

Страница 26: ...he top of interface which can configure different types of network settings But for the data security reason you need correct password to enter the configuration pages Click the magnifier icon to search the Godex printers which are connected via Ethernet port in you network environment Once a connected Godex printer is detected it will be listed on the start page The default password is 1111 you c...

Страница 27: ...work administrator for related network setting information You can press Set button to apply the settings and ReGet button to refresh the setting values IP Setting The IP Setting tab can change the printer name Port number Gateway setting and the password for configuring the printer You can also set the printer s IP address ether by DHCP or by Static IP ...

Страница 28: ...es Alert Path Setting NetSetting will send the alert messages to designated mail account when the error happened on printer The alert messages are sent by SMTP Simple Mail Transfer Protocol or SNMP Simple Network Management Protocol You can set or change the configurations of SMTP and SNMP on this Alert Path Setting tab ...

Страница 29: ...the settings and ReGet button to refresh the setting values Alert Message Setting For the alert message notification function you can decide which error cases need to be sent out to the operator Moreover the alert messages can be set to be sent by SMTP SNMP or both ...

Страница 30: ...ress Set button to apply the settings and ReGet button to refresh the setting values Printer Configuration Set or change the configurations of connected printer Most of key settings for the printer operation can be done by this setting page ...

Страница 31: ...otely User Command The User Command tab provides a communication interface for operator to control the printer Input printer commands in Input Command window and press Send Command button the commands will be sent to the printer For some commands that will return response message the message will be displayed in Output Message window ...

Страница 32: ...ns back to factory default Firmware Download On Firmware Download tab the current version of printer firmware will be showed on the screen If you need to update the printer firmware just specify the file location of firmware file and press Start Download Firmware button The printer firmware then can be updated remotely BOOT 1 000a1 F W G300 1 000a ...

Страница 33: ...er lifespan of the print head Cleaning Steps Here is how you clean the print head 1 Switch off the printer 2 Open the printer cover 3 Release the printing mechanism and lift it 4 Remove the ribbon 5 To remove any label residue or other dirt from the print head see red arrow please use a soft lint free cloth dipped in alcohol The print head should be cleaned once a week Please make sure that there ...

Страница 34: ...o adjust the print head pressure Adjustment Steps 1 Open the printer cover 2 Remove the ribbon 3 Use a screw driver and slowly turn the adjustment screws for the print head to increase or reduce the print head pressure SCREW Right Screw for adjusting the print head pressure on right side SCREW Left Screw for adjusting the print head pressure on left side Turn the adjustment screws ...

Страница 35: ...parallel to the paper feed roller Adjustment Methods 1 To move the print head in Direction A as indicated by the red arrow turn the adjustment screw anticlockwise see Arrow 1 2 To move the print head in Direction B as indicated by the red arrow turn the adjustment screw clockwise see Arrow 2 ADJUSTMENT SCREW Screw for adjusting the printer line Arrow 1 Turn the adjustment screw Arrow 2 PRINT HEAD ...

Страница 36: ...e cloth dipped in alcohol Please see the Section 5 1 There is no printed image on some parts of the label Check whether any label material or ribbon is stuck to the thermal print head Check for errors in the application software Check whether the starting position has been set incorrectly Check the ribbon for wrinkles There is no printed image on part of the label or the image is blurred Check the...

Страница 37: ...tatable Bitmap fonts 8 times expandable in horizontal and vertical directions Scalable Fonts 90 180 270 rotatable Download Fonts Bitmap Fonts Bitmap fonts 90 180 270 rotatable single characters 90 180 270 rotatable Asian Fonts Asian fonts 90 180 270 rotatable and 8 times expandable in horizontal and vertical directions Scalable Fonts Scalable fonts 90 180 270 rotatable Barcodes 1 D Bar codes Code ...

Страница 38: ...g consumables Options USB Device Parallel interfaces factory install External label roll holder for 10 250mm O D label rolls External label rewinder Specifications are subject to change without notice All company and or product names are trademarks and or registered trademarks of their respective owners Minimum print height and maximum print speed specification compliance can be dependent on non s...

Страница 39: ... sent to the printer BUSY to the host computer Interface Cable Parallel cable compatible with IBM computers Pinout See below Pin NO Function Transmitter 1 2 9 10 11 12 13 14 15 16 17 18 19 30 31 32 33 34 35 36 Strobe Data 0 7 Acknowledge Busy Paper empty Select Auto Linefeed N C Signal Gnd Chasis Gnd 5V max 500mA Signal Gnd Initialize Error Signal Ground N C Select in host printer host printer pri...

Отзывы: