background image


10

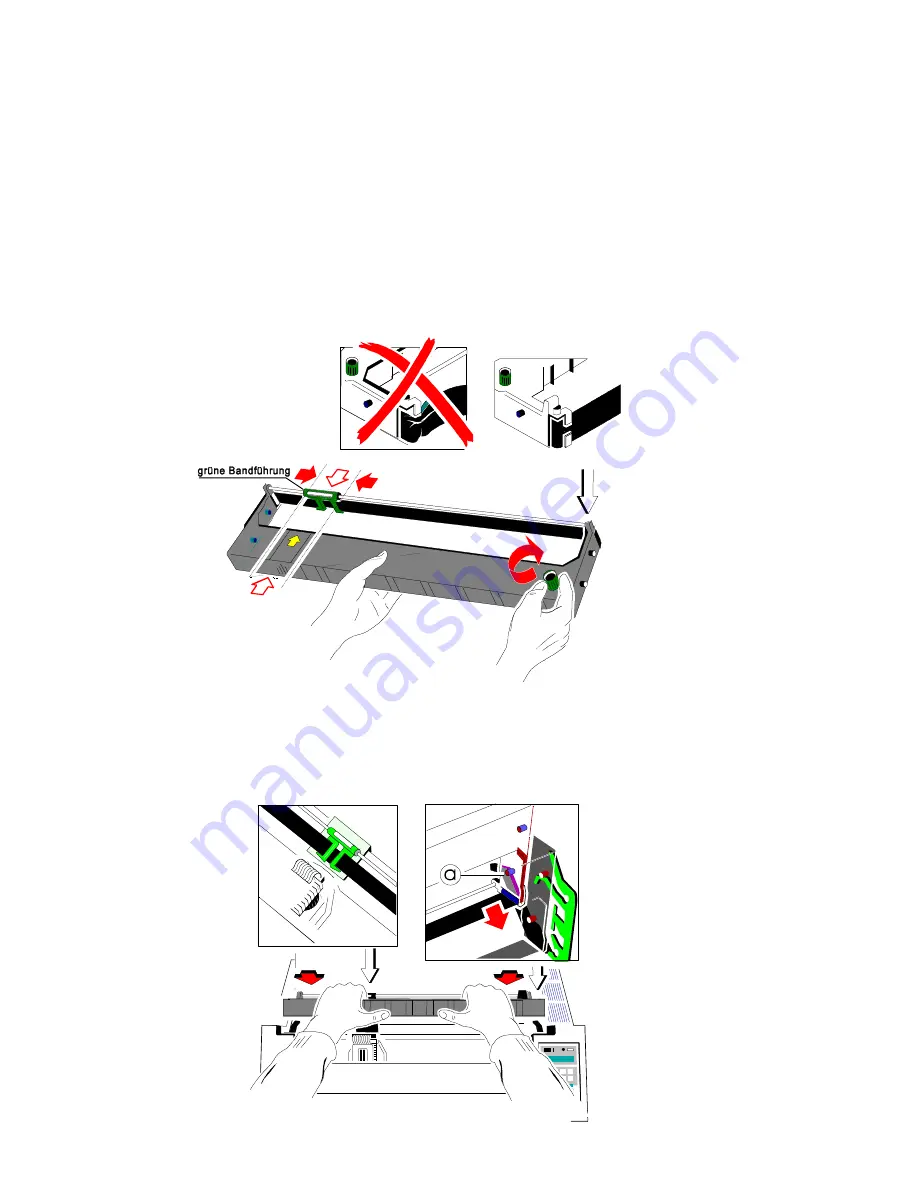
Farbband einlegen

S

Schalten Sie den Drucker am Netzschalter EIN.

S

Den Drucker durch betätigen der 

[START/STOP]

 Taste in den 

STOP

 Modus

setzen.

S

Obere Abdeckung öffnen. Der Druckkopf fährt in die richtige Position.

S

Das Farbband durch Drehen des Knopfes in Uhrzeigerrichtung straffen.

Schieben Sie die grüne Bandführung in die auf dem Kunststoffgehäuse

gezeigte Position (siehe Abbildung).

S

Die Farbbandkassette mit dem Farbband nach unten in den Drucker führen.

Danach die oberen Montagestifte der Kassette auf den oberen Teil der

grünen Farbbandhalterung legen. In dieser Position berührt die grüne

Farbbandführung die grüne Kunststoffklemme.

Содержание CI-4040

Страница 1: ...Quick Reference Guide Kurzanleitung C I 4 0 4 0 C I 4 0 5 0 ...

Страница 2: ... 19141 Great care has been taken to ensure that the information in this handbook is accurate and complete However should any errors or omissions be discovered or should any user wish to make suggestions for improving this handbook please feel encouraged to send us the relevant details The contents of this manual are subject to change without notice Copyright by Output Solutions GmbH All rights str...

Страница 3: ...1 Step 1 Contents of Delivery Printer CI 4040 Lieferumfang ...

Страница 4: ... Power Cord Socket Power Switch Tear Off Edge Personality Module PM Rear Side Top Cover Output Stacker Ribbon Cassette Front Cover Operator Panel Tractor Front Side Manual Insertion Guide CD ROM Power Cord 2 CI 4050 ...

Страница 5: ...3 Step 2 Removing the Transport Lock Transportsicherung entfernen ...

Страница 6: ...4 Step 3 Installing the Personality Module PM only for CI 4050 Schnittstelle PM installieren nur bei CI 4050 ...

Страница 7: ...nnection to the System Systemanbindung Connect the printer either with paral Der Drucker wird mit dem parallelen lel or serial or both interface cables oder dem seriellen Anschlusskabel to the host system oder mit beiden an das Rechnersystem angesclossen ...

Страница 8: ...ON OFF 6 6 or 6 Step 5 Mains Connection and Power On Netzanschluss und Einschalten ...

Страница 9: ...7 Step 6 Installing the Ribbon Cassette Farbband einlegen ...

Страница 10: ...8 ...

Страница 11: ...Quick Reference Guide C I 4 0 4 0 C I 4 0 5 0 ...

Страница 12: ......

Страница 13: ... Keys 7 Install Ribbon 10 Mounting the Output Stacker only for CI 4050 12 Paper Loading 12 Manual Front Insertion Guide 15 Optional ASF Cassettes only for CI 4050 17 Platen 18 Print Head 18 Configuration Printout 19 Standard Configuration for Printer CI 4040 20 Standard Configuration for Printer CI 4050 21 Macros 22 Macro Configuration 22 Quick Macro Selection 23 Emulation Selection 23 Vertical Po...

Страница 14: ......

Страница 15: ...ng conditions in which the printer will be placed see next page During a thunderstorm you should never attempt to connect or disconnect any data transfer cables The power supply should only be opened and checked by authorized personnel Repairs and maintenance beyond the descriptions of chapter 4 Maintenance see Users Manual on the CD ROM may only be attempted by authorized personnel as well Repair...

Страница 16: ...no guarantee that interference will not occur in a particular installation If this equipment does cause harmful interference to radio or television reception it can be determined by turning the equipment off and on The user is encouraged to try to correct the interference by one or more of the following measures S Reorient or relocate the receiving antenna S Increase the separation between the equ...

Страница 17: ... Automatic only printer CI 4050 Sheet Feeder ASF 30 to 70 Slots and openings in the printer s housing are provided for ventilation Always ensure that these openings are not obstructed Also ensure that the cables at the rear of the printer do not interfere with the output paper path When processing fanfold paper always place the printer with its front edge slightly off the edge of the table ...

Страница 18: ...IV ...

Страница 19: ...re always depicted in brackets Operator Panel Key functions indicated by a key symbol Acronyms and Abbreviations AGC Automatic Gap Control space between printhead and platen ASF Automatic Sheet Feeder cassette for cut sheet paper BIN Paper source name for cut sheet cassette EE Eastern European LCD Liquid Crystal Display to display Operators Panel messages LED Light Emitting Diode Light indicator o...

Страница 20: ...2 The Printer CI 4040 ...

Страница 21: ...3 The Printer CI 4050 ...

Страница 22: ... Installing the Personality Module only Printer CI 4050 S Insert the Personality Module with the component side upwards until the connector fully engages Hand tighten the two lock screws Note S To avoid damage due to electrostatic discharge do not touch the pins or components of the PM S Never attempt to install or remove a PM while the printer is switched ON ...

Страница 23: ...puter must be powerd OFF S Connect the interface cable coming from the computer to the printer s parallel or serial port Power switch Voltage range S Before powering ON Check correct voltage range S Power ON is indicated by a green LED on the operator panel ...

Страница 24: ...keys are active in the STOP mode To enter the STOP mode press START STOP After having presed one of the top row keys the keys function as a cursor to navigate through thr menu tree up down left or right To reactivate the basic finction i e Menu Paper Source Font or Pitch press START STOP twice ...

Страница 25: ...the printer enters into the LOCAL MENU mode The selection must be confirmed with RIGHT or can be canceled by pressing the START STOP key In both cases the printer changes to the READY mode PAPER SOURCE This key is a shortcut into the PAPER SOURCE position of the configuration menu see page 34 UP This key can be used as a cursor to go up in the Menu mode Macro 3 FONT DOWN Macro 3 By pressing this k...

Страница 26: ...ined as offset to the actual Top of Form position The TOP MARGIN and BOTTOM MARGIN settings are taken into account as well The correction is inch 0 42 mm where is up the page and 1 60 is further down the page The values can be selected by using the UP and DOWN keys like in LOCAL MENU MODE The parameter is part of the printer s configuration set up memory and can be activated for the runtime with R...

Страница 27: ...forwards Holding down the key 1 90 results a continuous feeding Forward movement of paper at the park position is stopped at the print position Forward movement of paper at the print position is stopped at the tear off position PAPER DOWN PAPER DOWN By pressing the key the paper moves 0 28 mm backwards and 1 90 after a short delay it results a continuous feeding Backward movement of paper is stopp...

Страница 28: ...er The printhead moves to the insert position S Move the ribbon feed guide of the cassette to the indicated position picture below and turn the green knob to remove any excess slack S Position the lower mounting pin a on the guide to the right Slide the cassette downward In this position the green ribbon feed guide touches the green plastic clip ...

Страница 29: ... clicks inicate that the mounting pins have engaged properly click click Note When installed correctly the ribbon cassette has a sloping position S Move the print head back and forth to settle the ribbon in the correct position S If necessary remove excess ribbon slack by turning the green knob clockwise S Close the top cover and press START STOP ...

Страница 30: ...serting Fanfold Paper for the First Time S Ensure that the printer is placed in the depression on the top of the stand option If the printer is used without a stand align the printer with the front edge of the table The cables at the back of the printer should be tucked into the cable clips in order not to block the paper path Note only for printer CI 4040 If the manual front insertion guide Optio...

Страница 31: ...the resistance and remove by pulling forward for both printer S Pull the green tractor lock levers toward you to release the tractors S Lock the left tractor at the new position by pressing the green tractor level backward S Roughly adjust the right tractor to the paper width and space out the paper supports evenly ...

Страница 32: ...il the printer prints within the desired margins Configuration Printout see pages 20 21 KEY Display 1 Switch the printer ON READY 1 ELQ 2 START STOP LOCAL 3 MENU MACRO SELECT 6 4 DOWN INSTALLATION 6 5 RIGHT Y 7 INTERFACE 6 6 UP 7 SELF TEST 6 7 RIGHT Y 7 PRINT TEST 1 Use DOWN to select PRINT TEST 2 or 3 8 RIGHT Y 7 PRINT TEST 1 9 START STOP PRINT TEST 1 The printer starts to print using paper from ...

Страница 33: ...ont Isertion Guide 1 above the tractors and push it down S Release the screw 2 of the left hand paper guide 3 Adjust the guide 3 to the position of the left margen and fix it with the screw 2 Note If continuous form paper is in print position on the platen and has not been teared off it will be moved forward and TEAR OFF PAPER will be displayed ...

Страница 34: ...y the following sequence of keys KEY Display 1 Switch the printer ON READY 1 ELQ 2 START STOP LOCAL 3 PAPER SOURCE TRACTOR 4 DOWN MANUAL 6 5 RIGHT Y MANUAL If continuous form paper is in print position on the platen and has not been torn off it will be moved forward and TEAR OFF PAPER will be displayed on the LCD Tear off the paper from left to right and press START STOP Continuous form paper is p...

Страница 35: ...s for cut sheet paper can be adapted to the printer Two different types of cassettes are available S Cassette type A for standard paper S Cassette type B for heavy paper and envelopes For detailed information refer to chapter 7 Automatic Sheet Feeder Cassettes in the User s Manual ...

Страница 36: ...vy roller with a rubber surface It is used as a counterpart for the printhead neadles below the paper Print head Note Detailed informations about Platen and Printhead replacement please refer to Chapter 4 Maintenance of the User s Manual ...

Страница 37: ... 2 START STOP LOCAL 3 MENU MACRO SELECT 6 4 UP PRINT OUT 6 5 RIGHT Y 7 PRINT OUT 6 RIGHT Y 7 PRINT OUT 7 START STOP 7 PRINT OUT After feeding paper from the defined paper source the printer starts to print When printing is completed the following message will be displayed 8 7 PRINT OUT 9 START STOP READY 1 ELQ Note If the printout of the configuration fails please call your local Support Center ...

Страница 38: ...GE LENGTH 72 LINES 72 LINES 72 LINES 72 LINES 72 LINES TRACTOR V POS 0 0 0 0 0 MANUAL V POS 0 0 0 0 0 LEFT MARGIN 1 COLUMNS 1 COLUMNS 1 COLUMNS 1 COLUMNS 1 COLUMNS RIGHT MARGIN 136 COLUMNS 136 COLUMNS 136 COLUMNS 136 COLUMNS 136 COLUMNS TOP MARGIN 1 LINES 1 LINES 1 LINES 1 LINES 1 LINES BOTTOM MARGIN 1 LINES 1 LINES 1 LINES 1 LINES 1 LINES PERF SKIP YES YES YES YES YES PAPER SOURCE TRACTOR TRACTOR...

Страница 39: ...POS 0 0 0 0 0 BIN 3 V POS 0 0 0 0 0 LEFT MARGIN 1 COLUMNS 1 COLUMNS 1 COLUMNS 1 COLUMNS 1 COLUMNS RIGHT MARGIN 136 COLUMNS 136 COLUMNS 136 COLUMNS 136 COLUMNS 136 COLUMNS TOP MARGIN 1 LINES 1 LINES 1 LINES 1 LINES 1 LINES BOTTOM MARGIN 1 LINES 1 LINES 1 LINES 1 LINES 1 LINES PERF SKIP YES YES YES YES YES PAPER SOURCE TRACTOR TRACTOR TRACTOR TRACTOR TRACTOR PAPER EXIT BATCH BATCH BATCH BATCH BATCH ...

Страница 40: ...ommands effect the currently selected MACRO The currently selected MACRO is shown by a next to the MACRO number in the Configuration print see pages before When switching on the printer the last saved macro will be the current active MACRO Once a MACRO setting parameter has been changed it must be saved before the printer is powered off or all changes will be lost See page 25 how to save MACROs Th...

Страница 41: ...y 1 MACRO 2 MACRO 2 6 2 RIGHT Y MACRO 2 3 START STOP READY 2 IPP Emulation Selection The following emulations are included in the PM S EPSON LQ ESC P2 Default in Macro 1 S IBM Proprinter XL 24 in Macro 2 S IBM Proprinter XL 24 AGM in Macro 3 S EPSON LQ ESC P2 in Macro 4 The default configuration is ELQ Emulation in macro 1 The display shows the selected macro and Emulation for example READY 1 ELQ ...

Страница 42: ...OR V 0 2 UP TRACTOR V 1 6 3 UP TRACTOR V 2 6 4 UP TRACTOR V 2 5 START STOP READY 1 ELQ Vertical Position Displacement for fanfold applications In READY mode the printer provides a quick adjustment for the vertical position within printjobs using fanfold paper and no Form Feed commands at the end of every page Pressing FANFOLD ADJ enters the adjustment procedure The displacement value performs a ve...

Страница 43: ...DOWN MANUAL 6 4 DOWN BIN 1 6 5 RIGHT Y BIN 1 6 START STOP READY 1ELQ How to Save Settings Only MACRO changes that have been saved will be kept after the printer has been powered off The following key sequence show the MAIN FUNCTION SAVE KEY Display 1 START STOP LOCAL 2 MENU MACRO SELECT 6 3 UP PRINT OUT 6 4 UP SAVE 6 5 RIGHT Y SAVING NOW 6 START STOP READY 1 ELQ Note The values of the current sett...

Страница 44: ...V defective give light but CI 4050 no reaction PSU defective Control Unit defective Firmware does not PM not inserted work PM not correctly inserted no firmware on PM PROMs not correctly installed TEST Initializing of the After first POWER ON flashing EEPROM with PM Change of the PM Contents of the EEPROM faulty I O OK EEPROM located on EEPROM the Control Unit not not installed addressable not cor...

Страница 45: ...to 115V Control Unit PBC Printer Base Controller on Control Unit damaged SPC Speed Controller on Control Unit damaged Transport lock not removed Note OK Indication for previous test step was OK If all tests have been passed successfully the following message will be displayed Display That means Cause Action READY 1ELQ The Printer is OK Printer ready for BUSY 1ELQ operation ...

Страница 46: ...ert paper and press CI 4050 cassette START STOP to continue LOAD No paper in tractor Insert paper and press TRACTOR START STOP to continue LOAD Paper should be fed Printer starts automatically MANUAL manually after receiving the paper PAPER JAM No paper movement To remove paper jam please refer to section Toubleshooting on page 30 TEAR OFF Paper path is not free Tear off paper and press PAPER to c...

Страница 47: ...blocked without function Paper jam Distance of platen gap too narrow AGC procedure not in workable position Platen incorrectly installed No AGC ADJUST after print head or platen replacement Device electronic fault Encoder strip missing Horizontal drive fault BUFFER OVERFLOW Handshake Check CTR CTS or protocol error XON XOFF protocol Repeat data transfer PARITY ERROR Protocol error Check protocol s...

Страница 48: ...30 Troubleshooting Note DO NOT turn the printer off for paper jam recovery in order not to lose any data PAPER JAM TRF fanfold paper jam ...

Страница 49: ...31 PAPER JAM ASF or MANUAL single sheets jammed PARKING PAPER AND RESETTING TOP OF FORM ...

Страница 50: ...32 NO PRINTOUT NO PRINTING ...

Страница 51: ...33 PRINT FAINT OR OF POOR QUALITY see Configuration Menu on the next page and User s Manual see CD ROM ...

Страница 52: ...34 CI 4040 CI 4050 CONFIGURATION MENU ...

Страница 53: ...Kurzanleitung C I 4 0 4 0 C I 4 0 5 0 ...

Страница 54: ......

Страница 55: ...nsetzen der oberen Abdeckung nur für CI 4050 12 Auswahl der Landessprache für das Bedienfeld 12 Papier laden 13 Manuelle Handeingabe 16 Optionale ASF Kassetten nur für CI 4050 18 Schreibwalze 19 Druckkopf 19 Standardkonfiguration 20 Standardkonfiguration für Drucker CI 4040 21 Standardkonfiguration für Drucker CI 4050 22 Makros 23 Makro Konfiguration 23 Schnelle Makroauswahl 24 Auswahl einer Emula...

Страница 56: ......

Страница 57: ...cht zugänglich sein Zur Trennung von der Netzspannung muß das Gerät durch Ziehen des Netzsteckers spannungslos geschaltet werden Beim Aufstellen müssen die Umgebungsbedingungen beachtet werden Auch sollten während Gewitter die Datenübertragungsleitungen weder angeschlossen noch gelöst werden Die Stromversorgung darf nur von Fachpersonal geöffnet werden Reparaturen die über die in Kapitel 4 beschri...

Страница 58: ...ifikationen und Änderungen die nicht ausdrücklich vom Hersteller geneh migt sind können zum Erlöschen der Betriebserlaubnis führen Betriebsumgebung Den Drucker nicht an Orten aufstellen an denen er Feuchtigkeit oder Wärme ausgesetzt ist z B in direktem Sonnenlicht S Temperatur 10EC bis 35EC 50EF bis 95EF S relative Feuchte 20 bis 80 S rel Feuchte bei automatischer S Papierzuführung 30 bis 70 Das D...

Страница 59: ... zu vermeiden START STOP Tastenfunktionen werden durch das entsprechende Symbol z B oder in eckigen Klammern angegeben Abkürzungen und Akronyme AGC Automatische Druckspaltkontrolle Automatic Gap Control ASF Automatische Papierzuführung Kassette für Einzelblätter Automatic Sheet Feeder KAS Papierquelle für ASF Kassette EE Osteuropa Eastern European LCD Flüssigkristallanzeige LiquidCrystal Display L...

Страница 60: ...2 Der Drucker CI 4040 ...

Страница 61: ...3 Der Drucker CI 4050 ...

Страница 62: ...PM nur für Drucker CI 4050 S Das Personality Modul mit oben liegender Bauteilseite einführen bis der Stecker vollständig einrastet Die beiden Verriegelungsschrauben handfest anziehen Hinweis S Vermeiden Sie jede Berührung mit den Anschlußstiften und Bauteilen des Personality Moduls um elektrostatischer Entladung vorzubeugen S Niemals bei eingeschaltetem Drucker das Personality Modul ein oder ausba...

Страница 63: ...chaltet sein S Das vom Computer kommende Schnittstellenkabel mit dem parallelen bzw dem seriellen Anschluß des Druckers verbinden Die Stromversorgung S Vor dem Einschalten die richtige Netzspannung überprüfen S Nach dem Einschalten leuchtet die grüne LED am Bedienfeld ...

Страница 64: ... In den STOP Modus gelangt man durch Drücken der START STOP Taste Nach Betätigung einer der Tasten in der oberen Reihe werden die Funktionen nach links auf ab oder nach rechts zur Navigation durch das Menü wirksam Um die Basisfunktionen Menü Papierquelle Font oder Zeichenabstand zu deaktivieren die START STOP Taste noch einmal mal Betätigen ...

Страница 65: ... wechselt der Drucker in den STOP Modus Das gewählt Makro 2 kann durch die Taste RECHTS aktiviert werden Im Falle eines Bedienungsfehlers drückt man START STOP Taste noch einmal In beiden Fällen kehrt der Drucker in den BEREIT Modus zurück PAPIERQUELLE Zur schnellen Einstellung des Papierweges im MENUE siehe Seite 34 AUF Diese Teste nutzt man um im Menü weiter nach oben zugelangen Makro 3 FONT AB ...

Страница 66: ...Menü Modus um die vertikale Positionierung anzupassen Verändert wird die Einstellung im aktuellen Makro für den z Zt selektierten Papierweg TRAKTOR V für den Traktor MANUELL V für die manuelle Papierzuführung Der von dieser Einstellung abgedeckte Bereich beträgt bis 15 60 Zoll 0 42 mm wobei minus eine Verschiebung 240 1 60 60 nach oben und plus nach unten bedeutet Eine Selektion der Werte erreicht...

Страница 67: ... 0 28 mm Wenn eine dieser Tasten niedergehalten wird erfolgt ein kontinuierlicher Vorschub Beim Vorschub stoppt Endlospapier wenn es aus der Parkposition kommt an der Druckposition oder wenn es aus der Druckposition kommt an der Abreißposition PAPIERRÜCK SCHUB PAPIERRÜCKSCHUB Das Papier bewegt sich rückwärts zuerst in Schritten von Zoll 1 90 0 28 mm Wenn eine dieser Tasten niedergehalten wird erfo...

Страница 68: ...s Farbband durch Drehen des Knopfes in Uhrzeigerrichtung straffen Schieben Sie die grüne Bandführung in die auf dem Kunststoffgehäuse gezeigte Position siehe Abbildung S Die Farbbandkassette mit dem Farbband nach unten in den Drucker führen Danach die oberen Montagestifte der Kassette auf den oberen Teil der grünen Farbbandhalterung legen In dieser Position berührt die grüne Farbbandführung die gr...

Страница 69: ...altestifte ebenfalls hörbar einrasten klick klick Hinweis Wenn die Farbbandkassette richtig eingesetzt ist sitzt sie leicht schräg im Drucker S Durch Hin und Herziehen des Druckkopfes das Farbband in die richtige Position bringen S Das Farbband durch Drehen des Knopfes in Uhrzeigerrichtung glattziehen S Die obere Abdeckung wieder schließen und START STOP drücken ...

Страница 70: ... Auswahl der Landessprache für das Bedienfeld Durch die folgenden Schritte erhalten sie die Anzeige im Bedienfeld in Deutsch Taste Anzeige 1 Schalten Sie den Drucker ein 2 STOP 93 LOCAL 3 MENUE 94 MACRO SELECT6 4 AB INSTALLATION 6 5 RECHTS Y 7 INTERFACE 6 6 AB 7 LANGUAGE 6 7 RECHTS Y 7 ENGLISH 8 AB 7 DEUTSCH 9 RECHTS Y 7 DEUTSCH 10 LINKS Z 7 SPRACHE 6 11 LINKS Z INSTALLATION 6 12 AB MENÜ SICHERN 6...

Страница 71: ...er Weg der Papierausgabe nicht durch Kabel an der Rückseite des Druckers behindert wird Hinweis nur für Drucker CI 4040 Wenn die Handeingabe Option benutzt wird diese gegen den Widerstand anheben und nach vorne herausnehmen Hinweis nur für Drucker CI 4050 Die Handeingabe vorne an beiden Seiten festhalten gegen den Widerstand nach oben ziehen und nach vorne herausnehmen ...

Страница 72: ...ls arretieren S Den rechten Traktor ungefähr auf die Breite des Papiers einstellen und die Papierstützen in gleichmäßigem Abstand verteilen S Die Traktorklappen 1 öffnen und das Papier einlegen S Traktorklappen schliessen S Den rechten Traktor etwas nach rechts schieben um die obere Kante des Endlospapiers zu spannen aber nicht zu straff S Die grünen Fixierhebel wieder zurückstellen um die Traktor...

Страница 73: ...Taste Anzeige 1 Drucker einschalten BEREIT 1 ELQ 2 STOP STOP 3 MENUE MAKRO AUSWAHL 6 4 AB INSTALLATION 6 5 RECHTS Y 7 SCHNITTSTELLE 6 6 AUF 7 DRUCKERTEST 6 7 RECHTS Y 7 DIAGONALTEST Nutze AB um DR GRAUERT oder HW AUSBAU zu wählen 8 RECHTS Y 7 DIAGONALTEST 9 START DIAGONALTEST Der Drucker startet den Ausdruck Druckertest beenden 1 STOP 7 DIAGONALTEST 2 LINKS Z 7 DRUCKERTEST 6 3 START BEREIT 1 ELQ ...

Страница 74: ...manuelle Handeingabe 1 von vorne über die Traktoren einschieben und nach unten drücken S Die Schraube 2 der linken Papierführung 3 lösen auf die Position des linken Randes einstellen und mit der Schraube 2 fixieren Hinweis Wenn sich nach Änderung der Papierquelle noch Endlospapier im Druckbereich befindet wird es vorgeschoben und die Meldung PAP ABREISSEN wird angezeigt ...

Страница 75: ...für beide Drucker S Die Papierquelle MANUELL mit Hilfe der folgenden Schritte wählen Taste Anzeige 1 Drucker einschalten BEREIT 1 ELQ 2 STOP STOP 3 PAPIER QUELLE TRAKTOR x 4 AB MANUELL 6 5 RECHTS Y MANUELL x Hinweis Wenn sich nach Änderung der Papierquelle noch Endlospapier im Druckbereich befindet wird es vorgeschoben und die Meldung PAP ABREISSEN wird angezeigt S Wenn jetzt ein Ausdruck gestarte...

Страница 76: ...e automatische Papierzuführung bestückt werden S Typ A für normales Papier und Formularsätze S Typ B für dickes Papier schwere Formularsätze und Briefumschläge Die ASF Kassette B ist mit einem Briefumschlag Aufkleber gekennzeichnet Für ausführliche Informationen siehe Kapitel 7 2 ASF Kassetten im Benutzerhandbuch auf der CD ROM ...

Страница 77: ...erten Oberfläche Sie wird unter dem Papier für den Gegendruck für die Nadeln des Druckkopfes benötigt Druckkopf Hinweis Ausführliche Informationen über das Auswechseln der Schreibwalze und des Druckkopfes sind im Kapitel 4 Wartung und Pflege im Benutzerhandbuch auf der CD ROM vorhanden ...

Страница 78: ...MAKRO AUSWAHL 6 4 AUF MENUE DRUCKEN 6 5 RECHTS Y 7 MENUE DRUCKEN 6 RECHTS Y 7 MENUE DRUCKEN x 7 START 7 MENUE DRUCKEN x Der Drucker wird den Ausdruck auf das Papier in dem selektierten Papierweg drucken und in den STOP Modus zurückkehren Danach erscheint die folgende Meldung auf dem Display 8 7 MENUE DRUCKEN 9 START BEREIT 1 ELQ Hinweis Wenn der gewünschte Ausdruck nicht fehlerlos abläuft informie...

Страница 79: ...ZEICHEN ZOLL FORMULARLAENGE 72 ZEILEN 72 ZEILEN 72 ZEILEN 72 ZEILEN 72 ZEILEN TRAKTOR V POS 0 0 0 0 0 MANUELL V POS 0 0 0 0 0 ZEILENANFANG 1 POSITION 1 POSITION 1 POSITION 1 POSITION 1 POSITION ZEILENENDE 136 POSITION 136 POSITION 136 POSITION 136 POSITION 136 POSITION ERSTE ZEILE 1 ZEILE 1 ZEILE 1 ZEILE 1 ZEILE 1 ZEILE LETZTE TEILE 1 VON UNTEN 1 VON UNTEN 1 VON UNTEN 1 VON UNTEN 1 VON UNTEN PERF ...

Страница 80: ... 0 0 0 MANUELL V POS 0 0 0 0 0 KAS 1 V POS 0 0 0 0 0 KAS 2 V POS 0 0 0 0 0 KAS 3 V POS 0 0 0 0 0 ZEILENANFANG 1 POSITION 1 POSITION 1 POSITION 1 POSITION 1 POSITION ZEILENENDE 136 POSITION 136 POSITION 136 POSITION 136 POSITION 136 POSITION ERSTE ZEILE 1 ZEILE 1 ZEILE 1 ZEILE 1 ZEILE 1 ZEILE LETZTE ZEILE 1 VON UNTEN 1 VON UNTEN 1 VON UNTEN 1 VON UNTEN 1 Z VON UNTEN PERF SRUNG JA JA JA JA JA PAPIER...

Страница 81: ...werden Auch hier ist eine Änderung durch den Anwender über das Bedienfeld oder durch die Software mit einen Befehl im aktuellen Makro möglich Ein Stern nach der dem Makro folgenden Ziffer zeigt das aktuelle Makro an Nach dem Einschalten des Druckers wird das zuletzt gesicherte Makro aktiv Das bedeutet wenn in einem Makro einige Werte verändert werden so muß das Makro auch gesichert werden siehe Se...

Страница 82: ... 1 ELQ 2 MAKRO 2 MACRO 2 6 3 RECHTS Y MACRO 2 x 4 START BEREIT 2 IPP Auswahl einer Emulation Folgende Emulationen sind auf dem PM gespeichert S EPSON LQ ESC P2 Standard in Makro 1 S IBM Proprinter XL 24 in Makro 2 S IBM Proprinter XL 24 AGM in Makro 3 S EPSON LQ ESC P2 in Makro 4 Die Standard Konfiguration ist die Epson LQ Emulation in Makro 1 Die Anzeige zeigt welches Makro und welche Emulation a...

Страница 83: ... BEREIT 1 ELQ Endlosverschiebung mit der Taste Handradfunktion Endlosformulare können mit dieser Funktion manuell verschoben werden wenn sie sich an der Parkposition befinden oder bereits Daten im Puffer sind bzw ein Formular teilweise bedruckt ist Die Endlospapier Verschiebung kann nur im BEREIT oder AKTIV Modus aktiviert werden Nach Betätigung der Taste erscheint im Anzeigefeld die Meldung ENDLO...

Страница 84: ...Anzeige 1 STOP STOP 2 PAPiERQUELLE TRAKTOR x 3 AB MANUELL 6 4 AB KASSETTE 1 6 5 RECHTS Y KASSETTE 1 x 6 START BEREIT 1 ELQ Sicherung der ausgewählten und aktivierten Werte Soll die Auswahl permanent sein d h nach Aus und Einschalten des Druckers erhalten bleiben so wird dies mit der Funktion MENUE SICHERN erreicht Die folgenden Schritte sind dafür notwendig Taste Anzeige 1 STOP STOP 2 MENU MAKRO A...

Страница 85: ...teil defekt Reaktion Kontrolleinheit defekt Firmware arbeitet nicht PM nicht eingebaut PM nicht richtig eingebaut keine Firmware auf dem PM PROMs nicht richtig installiert TEST Initialisierung des Drucker wurde erstmalig mit blinkend EEPROM einem PM eingeschaltet Ein anderes PM wurde installiert Inhalt des EEPROM fehlerhaft I O OK EEPROM auf der Kon EEPROM trolleinheit nicht adres ist nicht eingeb...

Страница 86: ...ller PCB auf der Kontrolleinheit fehlerhaft Speed Controller SPC auf der Kontrolleinheit fehlerhaft Transportsicherung nicht ent fernt Hinweis OK bedeutet dass der vorhergehende Schritt noch fehlerfrei war Wenn alle Tests erfolgreich abgeschlossen sind erscheint die folgende Mel dung ANZEIGE Das bedeutet Ursache BEREIT 1 ELQ oder Der Drucker ist in Ord Drucker einsatzbereit AKTIV 1 ELQ nung ...

Страница 87: ... Modus KAS LADEN kein Papier in der ASF Papier einlegen und CI 4050 Kassette START STOP drücken TRAKTOR LADEN kein Papier im Traktor Papier einlegen und START STOP drücken PAPIER ANLEGEN Papieranforderung für Papier zuführen Drucker die manuelle Zuführung zieht nach kurzer Verzögerung ein PAPIERSTAU keine Papierbewegung zur Fehlerbehebung siehe mehr Fehlerdiagramm Seite 31 32 PAP ABREISSEN Endlosp...

Страница 88: ...AGC Prozedur auf unzulässiger Position ausgeführt Druckwalze falsch eingebaut Keine AGC JUSTIEREN Prozedur nach Druckkopf Druckwalzenwechsel durchgeführt Abtastlineal fehlt Horizontalantrieb defekt PARITÄTSFEHLER Protokollfehler Die Protokolleinstellung von Drucker und Host Computer überprüfen Datentransfer wiederholen SPEICH ÜBERLAUF Fehler im CTR CTS oder XON XOFF Handshake Protokoll überprüfen ...

Страница 89: ...31 Fehlerbehebung Hinweis Den Drucker im Falle eins Papierstaues nicht ausschalten denn ein Datenverlust ist möglich PAPIERSTAU TRF Stau beim Endlospapier ...

Страница 90: ...32 PAPERSTAU ASF oder MANUELL PARKING PAPER AND RESETTING TOP OF FORM ...

Страница 91: ...33 kein Ausdruck ...

Страница 92: ...34 schlechte Druckqualität siehe Menüstruktur auf der nächsten Seite und im Benutzerhandbuch auf der CD ROM ...

Страница 93: ...35 CI 4040 CI 4050 Menüstruktur ...

Страница 94: ......

Отзывы: