background image


16 

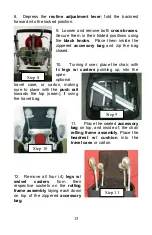
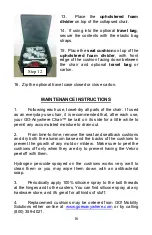
 13.    Place  the 

upholstered  foam 

divider

 on top of the collapsed chair.   

 
14.  If  using into the optional 

travel  bag

secure  the  contents  with  the  elastic  bag 
straps. 
 
15.  Place the 

seat cushion

 on top of the 

upholstered  foam  divider

,  with  front 

edge of the cushion facing down between 
the  chair  and  optional 

travel  bag

  or 

carton.  


16.  Zip the optional travel case closed or close carton.  


MAINTENANCE INSTRUCTIONS 

 
1. 

Following each use, towel-dry all parts of the chair.  If used 

as an everyday-use chair, it is recommended that, after each use, 
your  GO-

Anywhere Chair™ be laid on its side for a little while to 

permit any accumulated moisture to drain out.   
 
2. 

From time-to-time, remove the seat and seatback cushions 

and dry both the aluminum base and the backs of the cushions to 
prevent the growth of any mold or mildew.  Make sure to peel the 
cushions off only  when they are dry to prevent having the Velcro 
peel off with them. 
 
Hydrogen  peroxide  sprayed  on  the  cushions  works  very  well  to 
clean  them  or  you  may  wipe  them  down  with  an  antibacterial 
soap. 
 
3. 

Periodically  apply  100%  silicone  spray  to  the  bolt  threads 

at the hinges and to the casters. You can find silicone spray at any 
hardware store, and it's great for all kinds of stuff.


4. 

Replacement  cushions may  be  ordered from  GO!  Mobility 

Solutions  either  on-line  at 

www.goesanywhere.com

  or  by  calling 

(800) 359-4021. 

Step 12 
Содержание CS-A

Страница 1: ...OWNER S MANUAL THE GO ANYWHERE COMMODE n SHOWER CHAIR ADJUSTIBLE CS A ...

Страница 2: ...ior to use of your GO Anywhere Chair We would also appreciate receiving any feedback and comments that you may have to offer so that we may continue to monitor and improve our customers quality of life WARRANTY NOTICE WARNING AND DISCLAIMER Please see LIMITED WARRANTY below If this warranty is not acceptable return the chair for a full refund PRIOR TO USE Contact GO Mobility Solutions for shipping...

Страница 3: ...assembly operating and disassembly instructions as specified below For additional assistance please view the corresponding videos at www GoesAnywhere com PRODUCT OVERVIEW The GO Anywhere Commode n Shower Chair Adjustable has four 5 diameter total lock casters which enables its occupant to be wheeled from his or her bed to over a commode and or into a roll in shower Additionally it has a one of a k...

Страница 4: ... Footrest support height and depth are adjustable as are the knee angles The footrest paddles have adjustable heel straps to accommodate different sized feet Additional standard features included with the CS A are a calf strap and 2 way adjustable headrest Although it was initially designed to meet the needs of the disabled traveler this portable commode shower chair is so comfortable that it is t...

Страница 5: ...m providing for maximum comfort Both are attached to the chair frame with Velcro rendering them easily removable for cleaning or replacement PRACTICE MAKES PERFECT PLEASE do not become discouraged if you have problems either with the assembly or use of the GO Anywhere Chair on your first try Like with anything else familiarity and practice will serve to continually improve your experience with you...

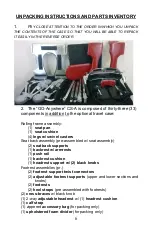
Страница 6: ...hion 4 legs w swivel casters Seat back assembly pre assembled w seat assembly 2 seat back supports 1 backrest w armrests 1 push rail 1 backrest cushion 1 headrest support w 2 black knobs Footrest assemblies pr 2 footrest support twist connectors 2 adjustable footrest supports upper and lower sections and knobs 2 footrests 2 heel straps pre assembled with footrests 2 cross braces w black knob 1 2 w...

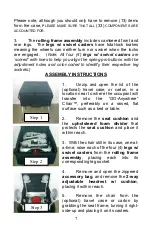
Страница 7: ...id of the optional travel case or carton in a location near to where the occupant will transfer into the GO Anywhere Chair preferably on a raised flat surface such as a bed or table 2 Remove the seat cushion and the upholstered foam divider that protects the seat cushion and place it within reach 3 With the chair still in its case one at a time raise each of the four 4 legs w swivel casters from t...

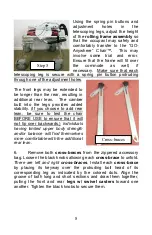
Страница 8: ...rovides added stability If you choose to add rear lean be sure to test the chair BEFORE USE to ensure that it will not tip over backwards Individuals having limited upper body strength and or balance will find themselves more comfortable with the additional rear lean 6 Remove both cross braces from the zippered accessory bag Loosen the black knobs allowing each cross brace to unfold There are left...

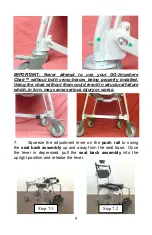
Страница 9: ...thout them could result in structural failure which in turn may cause serious injury or worse 7 Squeeze the adjustment lever on the push rail to swing the seat back assembly up and away from the seat base Once the lever is depressed pull the seat back assembly into the upright position and release the lever Step 7 1 Step 7 2 ...

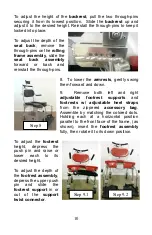
Страница 10: ...wing them forward and down 9 Remove both left and right adjustable footrest supports and footrests w adjustable heel straps from the zippered accessory bag Assemble by matching the colored dots Holding each at a horizontal position parallel to the front face of the frame as shown insert the footrest assembly fully then rotate it to its down position To adjust the footrest height depress the push p...

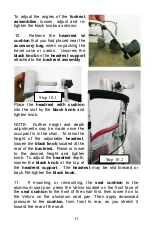
Страница 11: ... chair To raise the height of the adjustable headrest loosen the black knob located at the rear of the backrest Raise or lower to the desired height and tighten knob To adjust the headrest depth loosen the black knob at the top of the headrest support The headrest may be slid forward or back Re tighten the black knob 11 If mounting or remounting the seat cushion to the aluminum seat pan press the ...

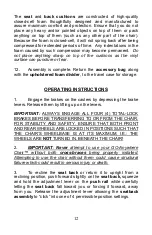
Страница 12: ...ers by depressing the brake levers Release them by lifting up on the levers IMPORTANT ALWAYS ENGAGE ALL FOUR 4 TOTAL LOCK BRAKES BEFORE TRANSFERRING TO OR FROM THE CHAIR FOR STABILITY AND SAFETY ENSURE THAT BOTH FRONT AND REAR WHEELS ARE LOCKED IN POSITIONS SUCH THAT THE CHAIR S WHEELBASE IS AT ITS MAXIMUM I E THE WHEELS ARE NOT TURNED IN BENEATH THE CHAIR 2 IMPORTANT Never attempt to use your GO ...

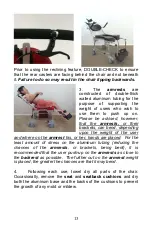
Страница 13: ...can bend depending upon the weight of the user and where on the armrest his or her hands are placed For the least amount of stress on the aluminum tubing reducing the chances of the armrests or brackets being bent it is recommended that the user push up on the armrests as close to the backrest as possible The further out on the armrest weight is placed the greater the chances are that it may bend ...

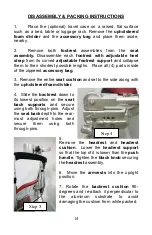
Страница 14: ...emove the entire seat cushion and set to the side along with the upholstered foam divider 4 Slide the backrest down to its lowest position on the seat back supports and secure using both through pins Adjust the seat back depth to the rear most adjustment holes and secure them using both through pins 5 Remove the headrest and headrest cushion Lower the headrest support so that the top of it is lowe...

Страница 15: ...th its legs w casters pointing up into the open optional travel case or carton making sure to place with the push rail towards the top seam if using the travel bag 11 Place the sealed accessory bag on top and inside of the chair rolling frame assembly Place the headrest w cushion into the travel case or carton 12 Remove all four 4 legs w swivel casters from their respective sockets on the rolling ...

Страница 16: ... little while to permit any accumulated moisture to drain out 2 From time to time remove the seat and seatback cushions and dry both the aluminum base and the backs of the cushions to prevent the growth of any mold or mildew Make sure to peel the cushions off only when they are dry to prevent having the Velcro peel off with them Hydrogen peroxide sprayed on the cushions works very well to clean th...

Страница 17: ...s a hassle and can be embarrassing and downright uncomfortable Following the steps in the aforementioned process will not change this fact unfortunately though it will make it a little less miserable And because your rights are protected by the Air Carrier Access Act 14 CFR Pt 382 if you experience any sort of problem that is directed solely to your disability immediately ask for a Complaint Resol...

Страница 18: ...ct GO Mobility Solutions warrants to the holder of a valid proof of purchase Consumer or you that the product and all accessories provided by GO Mobility Solutions in sales package Product are free from material defects in material and workmanship pursuant to the following terms and conditions when used normally and in accordance with operation instructions This limited warranty extends only to th...

Страница 19: ...en damaged due to repair alteration or modification by anyone other than an authorized service representative of GO Mobility Solutions or 3 Product whose warranty quality stickers Product serial numbers plates or electronic serial numbers have been removed altered or rendered illegible or 4 Product purchased used serviced or shipped for repair from outside the United States or used for commercial ...

Страница 20: ...O Mobility Solutions will notify you and will request that you authorize the cost of repair and return shipping costs for the repair of Products that not covered by this limited warranty What must you return with the Product to get warranty service 1 Return the product in whole or in part as was determined during the telephone call you made to report the issue requiring service to GO Mobility Solu...

Страница 21: ...between you and GO Mobility Solutions It supersedes all other written or oral communications related to this product GO Mobility Solutions provides no other warranties for this product The warranty exclusively describes all of GO Mobility Solutions responsibilities regarding the product There are no other expressed warranties No one is authorized to make modifications to this warranty and you shou...

Отзывы: