


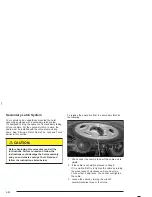


6. After mounting the
spare, put the wheel
nuts back on with
the rounded end of
the nuts toward
the wheel. Tighten
each wheel nut
by hand. Then use the
wheel wrench to
tighten the nuts until
the wheel is held
against the hub.
7. Turn the wheel wrench counterclockwise to lower
the vehicle. Lower the jack completely.
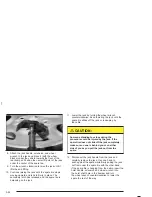
8. Tighten the nuts firmly
in a crisscross
sequence as shown
by turning the
wheel wrench
clockwise.
{
CAUTION:
Incorrect wheel nuts or improperly tightened
wheel nuts can cause the wheel to come loose
and even come off. This could lead to an
accident. Be sure to use the correct wheel
nuts. If you have to replace them, be sure to
get new GM original equipment wheel nuts.
Stop somewhere as soon as you can and have
the nuts tightened with a torque wrench to the
proper torque specification. See “Capacities
and Specifications” in the Index for wheel nut
torque specification.
Notice: Improperly tightened wheel nuts can lead
to brake pulsation and rotor damage. To avoid
expensive brake repairs, evenly tighten the wheel
nuts in the proper sequence and to the proper
torque specification. See “Capacities and
Specifications” in the index for the wheel nut
torque specification.
When you reinstall the regular wheel and tire, you must
also reinstall the center cap. Place the cap on the wheel
and tap it into place until it seats flush with the wheel.
The cap only goes on one way. Be sure to line up the tab
on the center cap with the indentation on the wheel.
5-85
Содержание 2004 Yokon Denali
Страница 5: ...These are some examples of symbols that may be found on the vehicle v...
Страница 6: ...NOTES vi...
Страница 34: ...Put someone on it Get it up to speed Then stop the vehicle The rider doesn t stop 1 28...
Страница 69: ...Yukon Denali Second Row Seat Yukon Denali Third Row 50 50 Split Seat 1 63...
Страница 100: ...NOTES 1 94...
Страница 150: ...NOTES 2 50...
Страница 153: ...NOTES 3 3...
Страница 154: ...Instrument Panel Overview 3 4...
Страница 328: ...Engine Compartment Overview When you open the hood on the VORTEC 6000 V8 engine you will see the following 5 12...
Страница 424: ...5 108...
Страница 430: ...NOTES 5 114...
Страница 445: ...Engine Drive Belt Routing 6 15...
Страница 447: ...Maintenance Record cont d Date Odometer Reading Serviced By Maintenance I or Maintenance II Services Performed 6 17...
Страница 448: ...Maintenance Record cont d Date Odometer Reading Serviced By Maintenance I or Maintenance II Services Performed 6 18...
Страница 462: ...NOTES 7 14...
Страница 480: ...NOTES 18...


