background image

15

 These parameters can 

ONLY be changed

 in the setting mode. 

 If your meter is idle for 3 minutes during the setting mode, it 

will switch off automatically.

NOTE

If you do not want to set an alarm, press SET to skip this step. 

If you want to turn off an alarm, find the alarm number by pressing SET 

in the setting mode. Press M button to change from “ON” to “OFF”. 


At the time of your alarm, the meter will beep and automatically turn 

on.  You can press M button to silence the alarm and insert a test strip 

to begin testing.  If you do not press M button, the meter will beep for 

2 minutes then switch off.  If you do not want to test at this time, press 

M button to switch off the meter.

Congratulations! You have completed all settings!

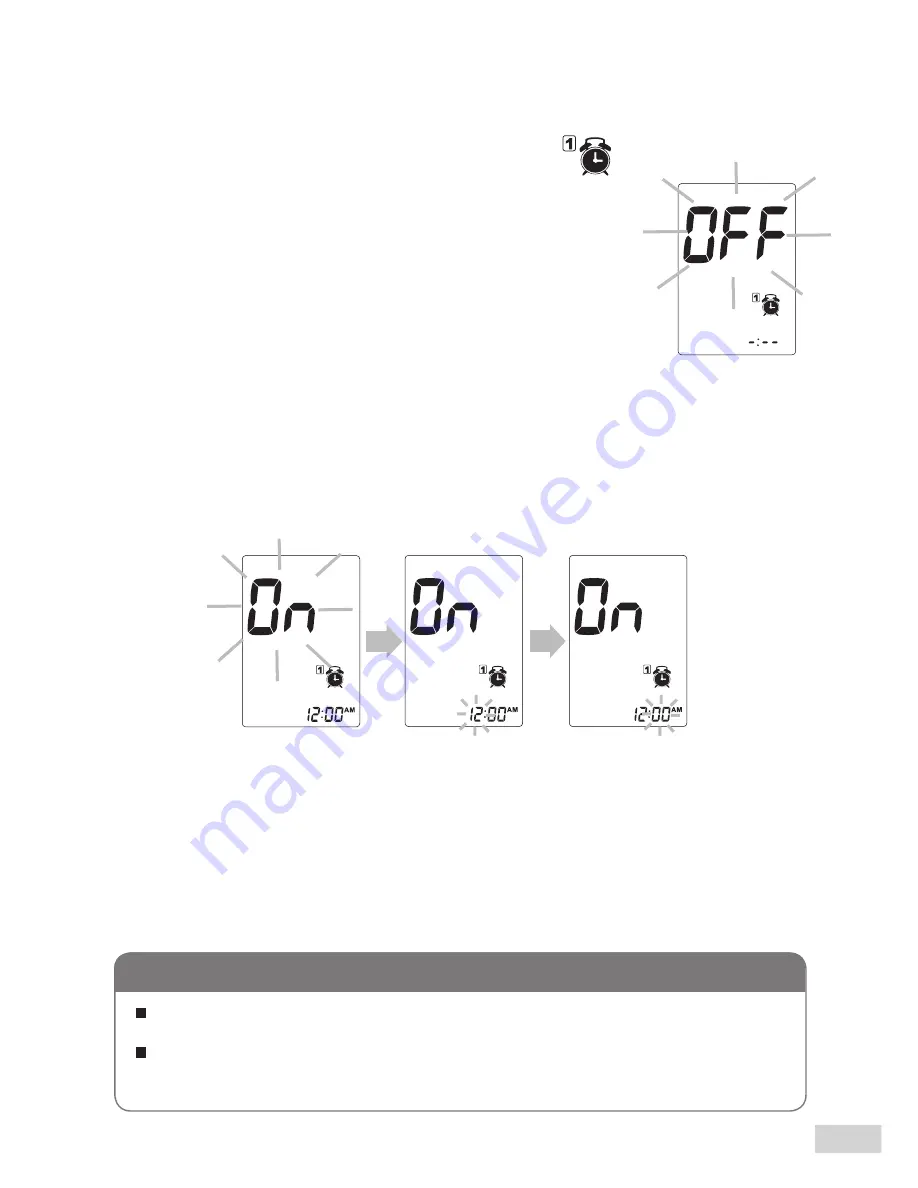
5. Setting a reminder alarm

You may set up any or all of the reminder alarms 
(1-4). The meter displays “On” or “OFF” and 

press M button to turn on or turn off the first 

reminder 

alarm.
Press M button to select “On”, then press SET to 

set  the  hour.  When  the  hour  is  flashing,  press  M 

button to add an hour. Press SET to confirm and go 

to minutes. Press M button to add one minute. Hold 

M button longer to add faster. Press SET to confirm 

and go to the next alarm setting.

Содержание 311-4277100 SERIES

Страница 1: ...311 4277100 XXX L148 W105mm 80P 44 GlucoRx Nexus GlucoRx Nexus Blue DiME K100 JF K80 K40 Part no Product name Spec Designer Color...

Страница 2: ...MANUAL OWNER S TD 4277B TD 4277...

Страница 3: ......

Страница 4: ...nts thoroughly and carefully Regular monitoring of your blood glucose levels can help you and your doctor gain better control of your diabetes Due to its compact size and easy operation you can use th...

Страница 5: ...l quality control checks as directed 7 Keep your device and testing supplies away from young children Small items such as the battery cover batteries test strips lancets and vial caps are choking haza...

Страница 6: ...URING MODES 16 BEFORE TESTING 17 Control Solution Testing 17 Performing a Control Solution Test 17 TESTING WITH BLOOD SAMPLE 20 Preparing your Lancing Device for Blood Testing 20 Preparing the Punctur...

Страница 7: ...or Your Meter 31 Caring for Your Test Strips 32 Caring for Your Carry Case 33 Important Control Solution Information 34 SYSTEM TROUBLESHOOTING 35 Result Readings 35 Error Messages 36 Troubleshooting 3...

Страница 8: ...ults If you are experiencing symptoms that are inconsistent with your blood glucose test results and you have followed all instructions described in this owner s manual contact your healthcare profess...

Страница 9: ...ot be used for the diagnosis of diabetes or testing on newborns Professionals may test with capillary and venous whole blood home use is limited to capillary whole blood testing Test Principle Your sy...

Страница 10: ...AST cap 2 x 1 5V AAA Alkaline Batteries Control Solution 10 Glucose Test Strips 10 Sterile Lancets Meter Owner s Manual Warranty Card Quick Start User Guide Daily Log Book Carry Case If any items are...

Страница 11: ...Enter the meter memory and silence a reminder alarm TEST STRIP SLOT WITH STRIP INDICATION LIGHT Insert test strip here to turn the meter on for testing BLUETOOTH INDICATOR LIGHT for GlucoRx Nexus Blue...

Страница 12: ...op Symbol Buzzer Blood Glucose Test Result Ketone Warning Error Message Memory Mode Symbol Control Solution Mode AC PC Measuring modes Test Strip Symbol Low Battery Symbol Measurement Unit Reminder Al...

Страница 13: ...GlucoRx Nexus Test Strips Using other test strips with your meter can produce inaccurate results NOTE Contact Bars Insert this end of the test strip into the meter Push it in firmly until it will go...

Страница 14: ...settings saved To Enter the Setting Mode Start with the meter off no test strip inserted Press SET to turn on the meter 1 Setting the date With the year flashing press and release M button to choose...

Страница 15: ...SET 3 Setting the time With the hour flashing press and release M button to choose the correct hour Press SET With the minute flashing press and release M button to choose the correct minute Press SE...

Страница 16: ...st strip to begin testing If you do not press M button the meter will beep for 2 minutes then switch off If you do not want to test at this time press M button to switch off the meter Congratulations...

Страница 17: ...C Modes Use when General displays as Gen any time of day regardless of time since last meal AC no food intake for at least 8 hours PC 2 hours after a meal QC testing with the control solution You can...

Страница 18: ...strips you begin using a new vial of test strips you suspect your meter or test strips are not working properly your blood glucose test results are not consistent with how you feel or if you think th...

Страница 19: ...trol solution do not directly apply control solution onto a strip 2 Press M button to mark this test as a control solution test With QC displayed the meter will store your test result in memory under...

Страница 20: ...t is not a recommended range for your blood glucose level See the Maintenance section for important information about your control solution Example results range only Please read the exact range from...

Страница 21: ...efore blood extraction has a significant influence on the glucose value obtained Blood from a site that has not been rubbed exhibits a measurably different glucose concentration than blood from the fi...

Страница 22: ...button to prick your finger A click indicates that the puncture is complete Fingertip testing Choose a different puncture site each time you test Repeated punctures at the same spot may cause soreness...

Страница 23: ...iscard the first drop of blood with a clean cotton swab Gently squeeze the punctured area to obtain another drop of blood Be careful NOT to smear the blood sample The volume of blood sample must be at...

Страница 24: ...uble filling the confirmation window please contact your healthcare professional or GlucoRx Customer care on 01483 755133 for assistance NOTE 5 Read the Result The result of your blood glucose test wi...

Страница 25: ...n as at the fingertip When to use AST Food medication illness stress and exercise can affect blood glucose levels Capillary blood at the fingertip reflects these changes faster than capillary blood at...

Страница 26: ...art with your meter off 1 Press and release M button will appear on the display Press M button again The first reading you see is the last blood glucose result along with date time and the measuring m...

Страница 27: ...measuring mode in the order of Gen AC then PC 3 Exit the meter memory Keep pressing M button and the meter will turn off after displaying the last test result Any time you wish to exit the memory kee...

Страница 28: ...are Software System please visit the GlucoRx website http www glucorx co uk 2 Connecting to a personal computer 3 Data transmission Follow the instructions provided in the software to transfer data Re...

Страница 29: ...for assistance on this Please note that you must complete the pairing between your meter and Bluetooth receiver before transmitting data Pairing with your mobile device 1 Turn on the Bluetooth functi...

Страница 30: ...ugh to do a test Please change your batteries immediately Low Battery Signal Your meter will display one of the below messages to alert you when the meter power is getting low Replacing the Batteries...

Страница 31: ...be kept away from children If swallowed promptly seek medical assistance Batteries may leak chemicals if unused for a long time Remove the batteries if you are not going to use the device for an exte...

Страница 32: ...er with water 2 Do NOT use organic solvents to clean your meter Meter Storage Storage condition 20 C 60 C 4 F 140 F below 95 relative humidity Always store or transport your meter in its original stor...

Страница 33: ...t strip with clean and dry hands Use each test strip immediately after removing it from the vial Write the opening date on the vial label when you first open it Discard remaining test strips after exp...

Страница 34: ...ns when too dirty please remove the sticky sheet lightly 3 Rinse the sticky sheet with tap water gently rubbing the surface with your fingers to remove dirt NOTE To prevent splitting do not forcefully...

Страница 35: ...opening Write the opening date on your control solution vial and discard the remaining solution after 3 months It is recommended that the control solution test be done at room temperature 20 C 25 C 6...

Страница 36: ...t the problem persists or error messages other than the ones below appear please call GlucoRx Customer care on 01483 755133 Do not ever attempt to repair or dissemble your meter Appears When your bloo...

Страница 37: ...omer care on 01483 755133 for assistance Appears when test strip is removed while counting down or insufficient blood volume Review the instructions and repeat test with a new test strip If the proble...

Страница 38: ...ing up Defective meter or test strips Please contact GlucoRx Customer care on 01483 755133 POSSIBLE CAUSE WHAT TO DO Insufficient blood sample Repeat the test using a new test strip with larger volume...

Страница 39: ...e control solution vigorously and repeat the test again Expired or contaminated control solution Check the expiry date of your control solution Control solution that is too warm or too cold Control so...

Страница 40: ...l L Fasting and before meal 4 to 7 mmol L 2 hours after meals 9 mmol L Source Diabetes UK Blood glucose target Balance No 234 2010 April P 69 Please work with your doctor to determine a target range t...

Страница 41: ...ction Auto reaction time count down Auto shutdown after 3 minutes of idleness Temperature Warning Operating condition 10 C to 40 C 50 F to 104 F below 85 R H no condensing Meter Storage Transportation...

Страница 42: ......

Страница 43: ......

Страница 44: ......

Страница 45: ...7 Wugong 2nd Rd Wugu Dist 24888 New Taipei City Taiwan www taidoc com MedNet GmbH Borkstra e 10 48163 M nster Germany Distributed by GlucoRx Ltd 4 Wintonlea Monument Way West Woking Surrey GU21 5EN UK...

Отзывы: