background image

22

Installation and maintenance instructions EASICOM 3 0020239562_04

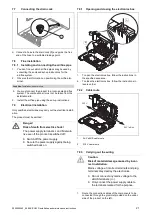
2.

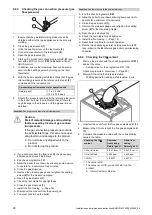
Use strain reliefs.

3.

If required, shorten the connection cables.

30 mm

4.

Strip the flexible line as shown in the figure. In doing so,
ensure that the insulation on the individual conductors
is not damaged.

5.

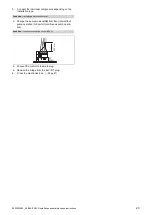
Only strip inner conductors just enough to establish
good, sound connections.

6.

To avoid short circuits resulting from loose individual
wires, fit conductor end sleeves on the stripped ends of
the conductors.

7.

Screw the respective plug to the connection cable.

8.

Check whether all conductors are inserted mechanic-
ally securely in the plug terminals. Remedy this if ne-
cessary.

9.

Plug the plug into the associated PCB slot; see the wir-
ing diagram in the appendix.

7.9.4

Establishing the power supply

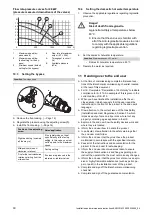
1

1.

Observe all valid regulations.

2.

Make sure that the rated voltage of the mains is 230 V.

3.

Do not interrupt the mains supply with a time switch or
programmer.

4.

Set up a fixed connection and install a partition with
a contact gap of at least 3 mm (e.g. fuses or power
switches).

5.

Isolation should preferably be by a double pole
switched fused spur box having a minimum contact
separation of 3mm on each pole. The fused spur box
should be readily accessible and preferably adjacent to
the boiler. It should be identified as to its use.

6.

Provide one common power supply for the boiler and
for the corresponding control:

Power supply: Single-phase, 230 V, 50 Hz

Fuse protection:

3 A

7.

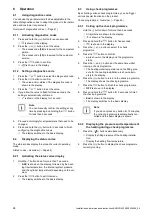
Open the electronics box. (

Page 21)

8.

Observe the routing of the power supply cable

(1)

in the

electronics box in order to guarantee that there is no
strain.

≤ 30 mm

N

L

X1

230V~

RT

9.

Carry out the wiring. (

Page 21)

10. Screw the supplied plug to a three-core power supply

cable that complies with the relevant standards.

11. Connect the plug for the power supply cable.
12. Make sure that access to the power supply is always

available and is not covered or blocked.

13. Close the electronics box. (

Page 21)

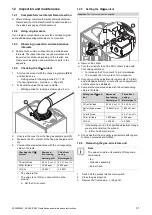
7.9.5

Connecting controls to the electronics

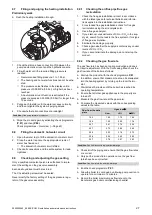
X2

X22

X41

– +

24V=

RT

BUS

Burner

off

X106

BUS

24 V

BUS

RT

B.of

f

B

ur

ner

of

f

R

T

24V

 =

-
+

B

U

S

1

4

3

2

1

Safety thermostat for
floor-standing heater

2

24 V control

3

eBUS control or radio
receiver unit

4

Outdoor temperature
sensor, wired

1.

Open the electronics box. (

Page 21)

2.

Carry out the wiring. (

Page 21)

Содержание EASICOM 3 24c

Страница 1: ...en Installation and maintenance instructions EASICOM 3 24c 28c 0020239562_04 31 07 2020 ...

Страница 2: ...tion for the first time cold 26 9 7 Filling and purging the heating installation 27 9 8 Filling the domestic hot water circuit 27 9 9 Checking and adjusting the gas setting 27 9 10 Thoroughly flushing the heating installation hot 29 9 11 Checking leak tightness 29 10 Adapting the unit to the installation 29 10 1 Setting the burner anti cycling time 29 10 2 Setting the pump output 29 10 3 Setting t...

Страница 3: ... direct use in industrial or commercial processes Any use other than those described in these instructions and any use that goes beyond what is described here 1 2 Qualification The person carrying out the work described here must have completed professional train ing The competent person must demon strably have all of the knowledge skills and capabilities that are required in order to carry out th...

Страница 4: ...cially available soft soap to aid installa tion 1 3 3 Electricity The power supply terminals L and N remain live even if the unit main switch is switched off To prevent electric shocks proceed as fol lows before working on the product Disconnect the product from the power supply by switching off all power supplies at all poles electrical partition with a con tact gap of at least 3 mm e g fuse or c...

Страница 5: ...l the product in rooms prone to frost 1 3 10 Safety devices Install the necessary safety devices in the installation 1 4 Regulations directives laws standards Observe the national regulations stand ards directives ordinances and laws 1 5 List of relevant standards for Great Britain and Ireland You can find a list of relevant standards at https www glow worm co uk standards ...

Страница 6: ...lant group com Spares Enquiries Telephone 01773 881383 To register your Glow worm appliance visit Glow worm is a licensed member of the Benchmark Scheme Benchmark places responsibilities on both manufacturers and installers The purpose is to ensure that customers are provided with the correct equipment for their needs that it is installed commissioned and serviced in accordance with the manufactur...

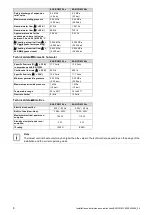
Страница 7: ... C 98 9 99 Nominal efficiency at 50 30 C 104 104 Nominal efficiency in partial load mode 30 at 40 30 C 109 8 108 5 NOx class 5 5 Product dimensions width 418 mm 418 mm Product dimensions depth 300 mm 300 mm Product dimensions height 740 mm 740 mm Net weight 32 kg 32 6 kg Weight when filled with water 36 kg 37 1 kg Technical data G20 power load G20 EASICOM 3 24c EASICOM 3 28c Maximum heat output fa...

Страница 8: ...stic hot water EASICOM 3 24c EASICOM 3 28c Specific flow rate D ΔT 30 K in accordance with EN 13203 11 7 l min 13 6 l min Continuous flow rate ΔT 35 K 602 l h 699 l h Specific flow rate ΔT 35 K 10 0 l min 11 7 l min Minimum permissible pressure 0 03 MPa 0 30 bar 0 03 MPa 0 30 bar Maximum permissible pressure 1 MPa 10 bar 1 MPa 10 bar Temperature range 35 to 60 35 to 60 Flow rate limiter 8 l min 10...

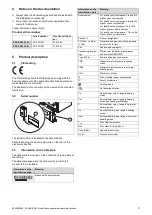
Страница 9: ...ion plate Meaning Barcode with serial number Information on the identification plate Meaning Serial number For quality control purposes 3rd and 4th digits year of production For quality control purposes 5th and 6th digits week of production For identification purposes 7th to 16th digits product article number For quality control purposes 17th to 20th digits place of manufacture Easicom 3 Product d...

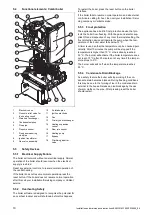
Страница 10: ...lockout and will shutdown before this happens To restart the boiler press the reset button on the boiler interface If the boiler fails to resume normal operation and all external controls are calling for heat then call your Installation Servi cing company or Vaillant service 5 5 3 Frost protection The appliance has a built in frost protection device that pro tects the boiler from freezing With the...

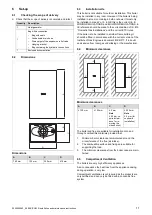
Страница 11: ...nd the current ETCI rules If the boiler is to be installed in a timber frame building it should be fitted in accordance with the current version of the Institute of Gas Engineers document IGE UP 7 If in doubt seek advice from local gas undertaking or the manufacturer 6 4 Minimum clearances C C D A B Minimum clearances A B C D 150 mm 150 mm 0 mm Note 50 mm re quired clear ance for re moving the sid...

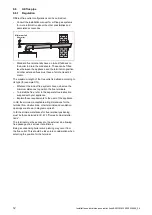
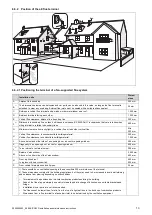
Страница 12: ...ing to its type for example C13 Whatever the kind of flue system chosen observe the minimum distances to position the flue terminals To install the flue refer to the separate flue instruction supplied with your appliance Explain these requirements to the user of the appliance In GB the minimum acceptable siting dimensions for the terminal from obstructions other terminals and ventilation openings ...

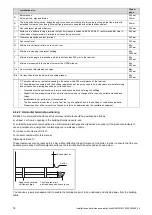
Страница 13: ...arance to noncombustible building material Vertical flue clearance to combustible building material 500 mm 1 500 mm J Above below and either side of an opening door air vent or opening window 300 mm K Diagonally to an opening door air vent or opening window 600 mm L 2 To an internal or external corner 200 mm M Below a Velux window Above or to either side of the Velux window 2 000 mm 600 mm N From ...

Страница 14: ...oid wall staining and nuisance from pluming depending on site conditions Terminals must be positioned so to avoid combustion products entering the building Support the flue at approximately one metre intervals and at a change of direction use suitable brackets and fixings Installations in car ports are not recommended The flue cannot be lower than 1 metre from the top of a lightwell due to the bui...

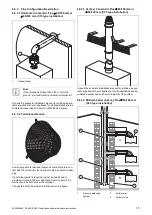
Страница 15: ...ard is required if persons could come into con tact with the terminal or the terminal could be subject to dam age If a terminal guard is required it must be positioned to provide minimum of 50 mm clearance from any part of the terminal and be central over the terminal The guard should be similar to that shown in the figure 6 6 3 3 Vertical Concentric Flue 60 100 mm or 80 125 mm C33 type installati...

Страница 16: ...o install the flue system 6 7 Using the mounting template Use the mounting template to ascertain the locations at which you need to drill holes 6 8 Wall mounting the product A B 1 Check the load bearing capacity of the wall 2 Note the total weight of the product 3 Only use fixing material that is permitted for the wall 4 If required ensure that mounting apparatus on site has sufficient load bearin...

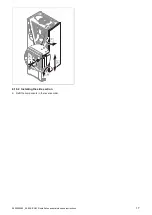
Страница 17: ...0020239562_04 EASICOM 3 Installation and maintenance instructions 17 2x A B C D 6 10 2 Installing the side section Refit the components in the reverse order ...

Страница 18: ...ness of the gas valve assembly using a pressure of 11 kPa 110 mbar 7 2 Descaling the water Scale deposition increases as the water temperature in creases Descale the water as required 7 3 Check compliance with the local gas group The product s combustion has been factory tested and is preset for operation with the gas group indicated on the data plate The product is only authorised to be operated ...

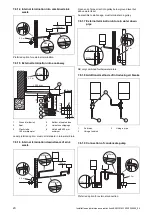
Страница 19: ...uded in the scope of delivery to the drain hose 2 During installation remove all burrs from inside of cut pipe work and avoid excessive adhesive which may trap small pockets of water close to the pipe wall which can freeze and build into a larger ice plug For any installation the condensate must be free flowing and not be possible for air back pressure to prevent wa ter flow As with other pipe wor...

Страница 20: ...ole depth 400 mm minimum Least preferred option must not terminate in rain water drain 7 6 1 6 Internal termination downstream of sink waste 100mm Ø32mm Ø22mm 3 m Open end of pipe direct into gulley below ground level but above water level Susceptible to siphonage must terminate in a gulley 7 6 1 7 External termination into rain water down pipe 3 m Ø22mm Ø 32mm NB only combined foul rainwater drai...

Страница 21: ...ll ation The product must be earthed Danger Risk of death from electric shock The power supply terminals L and N remain live even if the product is switched off Switch off the power supply Secure the power supply against being switched back on 7 9 1 Opening and closing the electronics box B B A 1 To open the electronics box follow the instructions in the specified sequence 2 To close the electroni...

Страница 22: ...wer switches 5 Isolation should preferably be by a double pole switched fused spur box having a minimum contact separation of 3mm on each pole The fused spur box should be readily accessible and preferably adjacent to the boiler It should be identified as to its use 6 Provide one common power supply for the boiler and for the corresponding control Power supply Single phase 230 V 50 Hz Fuse protect...

Страница 23: ... type Condition If installing a multi circuit control Change the pump mode d 18 from Eco intermittent pump operation to Comfort continuous pump opera tion Condition If you are connecting a control 230 V 30 mm N L X1 230V RT Connect the control to the main plug Remove the bridge from the 24V RT plug 4 Close the electronics box Page 21 ...

Страница 24: ...7 seconds S XX is shown on the display followed by the heat ing flow temperature the internal system pressure and the cylinder temperature depending on the ver sion 2 Press the button to exit this menu The display switches to the basic display 8 3 Using check programmes By activating various check programmes you can trigger various special functions on the product Check programmes Overview Page 40...

Страница 25: ... stipulate more stringent requirements the following applies You must treat the heating water in the following cases If the entire filling and supplementary water quantity dur ing the operating life of the system exceeds three times the nominal volume of the heating installation or If the guideline values listed in the following table are not met or If the pH value of the heating water is less tha...

Страница 26: ...s over several storeys higher filling pressures may be required to avoid air entering the heating installation If the water pressure falls below 0 05 MPa 0 5 bar the value flashes in the display If the water pressure falls below 0 03 MPa 0 3 bar the product switches off The display shows 0 0 MPa 0 0 bar Fault F22 will be stored in the fault list Top up the water in the heating installation to star...

Страница 27: ...n is intact in accordance with the latest gas safe technical bulletin and informa tion supplied in the installation instructions 2 For extended flue gas installations check for flue gas recirculation using the air analysis point 3 Use a flue gas analyser 4 If you discover unusual levels of CO or CO 2 in the sup ply air search for the leak in the flue system or for signs of flue gas recirculation 5...

Страница 28: ...eck programme P 01 Allow the boiler to cool down by allowing pump overrun to operate for a minimum of two minutes Close the gas stopcock Remove the pressure gauge and retighten the sealing screw 2 for the measuring nipple Open the gas stopcock 1 Check the test nipple for gas tightness Close the gas stopcock 1 Install the front casing Page 16 Disconnect the product from the power grid You must not ...

Страница 29: ... least 15 minutes 4 Purge the heating installation 5 Activate the display for the current operating mode Page 24 Status codes Overview Page 44 If the product is working correctly the display shows S 04 9 11 2 Checking the domestic hot water generation 1 Activate the domestic hot water mode on the user interface 2 Open a hot water tap completely 3 Activate the display for the current operating mode...

Страница 30: ...57 mol m Domestic hot water temperature 50 3 Descale the water as required 11 Handing over to the end user At the time of commissioning complete all relevant sec tions of the Benchmark commissioning checklist located at the rear of this document For IE Complete a Declaration of Conformity to indicate compliance to I S 813 An example of this is given in the current edition of I S 813 When you have ...

Страница 31: ...itted front casing Natural gas H Natural gas H CO at full load 9 0 1 0 vol 9 2 1 0 vol CO at full load 250 ppm 250 ppm CO CO 0 0031 0 0031 The value is OK The value is not OK you cannot start up the product Set the CO content 12 5 Setting the CO content Condition The CO content must be adjusted 1 A B Remove the sticker Turn the screw 1 to set the CO content value with front casing removed To incre...

Страница 32: ...d ing to the following sections 13 Install the two new burner seals 12 7 Cleaning the heat exchanger 1 1 Protect the open electronics box from spraying water 2 Clean the ribs of the heat exchanger 1 with water The water runs out into the condensate tray 12 8 Checking the burner 1 Check the surface of the burner for possible damage If you see any damage replace the burner 2 Install the two new burn...

Страница 33: ...hon C 2 3 1 A B 1 Unclip the lower section of the siphon 1 from the up per section of the siphon 2 2 Remove the float 3 3 Flush out the float and lower section of the siphon with water 4 Fill the lower section of the siphon with water up to 10 mm below the upper edge of the condensate discharge pipe 5 Re insert the float 3 Note Check whether the float is present in the condensate siphon 6 Clip the...

Страница 34: ...5 bar Top up the expansion vessel in accordance with the static height of the heating installation ideally with ni trogen otherwise with air Check that the drain valve is open when topping up 3 If water escapes from the valve of the expansion vessel you must replace the expansion vessel Page 37 4 Fill and purge the heating installation Page 27 12 17 Completing inspection and maintenance work 1 Fil...

Страница 35: ... conformity of the product and it will therefore no longer comply with the applicable standards We strongly recommend that you use original spare parts from the manufacturer as this guarantees fault free and safe operation of the product To receive information about the available original spare parts contact the contact address provided on the back page of these instructions If you require spare p...

Страница 36: ...our screws 2 1 2 B C A 13 Lift the heat exchanger up slightly and remove it to gether with the condensate tray 14 Remove the ignition transformer 1 15 Remove the ignition electrode 2 16 Use the screws to secure the ignition transformer and the ignition electrode to the new heat exchanger 17 Install the new heat exchanger in reverse order 13 6 5 Replacing the pump head 1 2 1 Disconnect the pump cab...

Страница 37: ...all of the plugs out from the PCB 3 Undo the clips on the PCB 4 Remove the PCB 5 Install the new PCB in such a way that it clicks into the groove at the bottom and into the clip at the top 6 Plug in the PCB plugs 7 Close the electronics box 13 6 8 Replacing the PCB for the user interface B C C D A A 1 Open the electronics box 2 Pull the plug out of the PCB 3 Undo the clips on the PCB 4 Remove the ...

Страница 38: ... new pressure sensor 5 Reattach the clip 1 13 7 Checking the product for leak tightness Check that the product is leak tight Page 29 14 Decommissioning the product Decommission the product Disconnect the product from the power grid Close the gas stopcock Close the cold water stopcock Drain the product Page 34 15 Recycling and disposal Disposing of the packaging Dispose of the packaging correctly O...

Страница 39: ...10 If the gas flow rate lies outside of the tolerances specified in these in structions eliminate the fault in accordance with the regulations and the current technology Annually 11 Check the general condition of the product and if required eliminate any faults that are found Annually 12 Carry out the combustion analysis Measure the CO content CO content and the CO CO ratio For products with a rea...

Страница 40: ...The function is active for 15 minutes P 03 The product runs in heating mode with the maximum heat input set using diagnostics code d 00 P 04 Chimney sweep function If there is a domestic hot water demand the product runs in domestic hot water mode and at maximum heat input If there is no domestic hot water demand the product runs with the partial heat load that is set via diagnostics code d 00 and...

Страница 41: ... temperature for the domestic hot wa ter cylinder Current value Not adjustable d 08 Status of the 230 V ther mostat Current value 0 Room thermostat open no heat requirement 1 Room thermostat closed heat requirement Not adjustable d 09 Heating flow set target temperature that is set on the eBUS room ther mostat Current value Not adjustable d 10 Status of the internal pump in the heating cir cuit Cu...

Страница 42: ...23 Status of the heating demand Current value off Heating off Summer mode on Heating on Not adjustable d 24 Status of the pressure monitor 0 1 off Not switched on Switched Not adjustable d 25 Status of the requirement to reheat the cylinder or for the hot water warm start from the eBUS ther mostat Current value off Function deactivated on Function activated Not adjustable d 27 Function of relay 1 ...

Страница 43: ...ivated 3 Hot water activated min target value 60 C 0 Adjustable d 60 Number of blocks by the temperature limiter Current value Not adjustable d 61 Number of unsuccessful ignitions Current value Not adjustable d 62 Night set back 0 30 1 0 Adjustable d 64 Average burner ignition time Current value s Not adjustable d 65 Maximum burner ignition time Current value s Not adjustable d 66 Activation of th...

Страница 44: ...thermostat Current value off Not connected on Connected Not adjustable d 91 Status DCF77 Current value Not adjustable d 93 Setting the product code 0 99 1 The Device Specific Number DSN can be found on the iden tification plate Adjustable d 94 Delete fault list 0 1 off No on Yes Adjustable d 95 Software versions 1 Main PCB 2 Interface PCB Adjustable d 96 Default setting reset 0 No 1 Yes Adjustable...

Страница 45: ... hot water request blocked S 98 Automatic test programme Return temperature sensor heating and hot water request blocked S 99 Automatic filling active S 108 Purging the combustion chamber fan in operation S 109 Product s standby mode activated E Overview of fault codes Note Since the code table is used for various products some codes may not be visible for the product in question Fault code Meanin...

Страница 46: ...ective F 65 Fault Electronics temperature too high Electronics overheating due to external influences electronics defective F 67 Value sent back by ASIC is incorrect flame signal Implausible flame signal electronics defective F 68 Fault Unstable flame analogue input Air in gas gas flow pressure too low incorrect air ratio incorrect gas in jector ionisation flow interruption cable electrode F 70 In...

Страница 47: ...20 16 1 9 3 15 4 5 10 11 6 13 X51 X35 X20 X40 X51 X30 X2 X21 X41 X22 X14 L N 24V RT BUS Burner off RT 230Vac X1 FUS X106 X32 X90 X12 X35 X1 L N RT 230Vac X35 4 1 3 2 eBUS RT 24V Burner off X106 1 3 4 1 3 3 1 2 M 1 3 4 6 1 2 3 M 5 4 2 1 2 1 2 1 N L L 24V 230V 24V 230V 2 7 8 9 10 12 11 1 4 3 5 6 14 13 1 Main PCB 2 Interface PCB 3 Timer 4 Temperature sensor on the heating flow 5 Temperature sensor on...

Страница 48: ...r and they should be made aware it is ultimately their responsibility to register with the manufacturer within the allotted time period It is essential that the boiler is serviced in line with the manufacturers recommendations at least annually This must be carried out by a competent Gas Safe registered engineer The service details should be recorded on the Benchmark Service and Interim Boiler Wor...

Страница 49: ...left at factory settings Yes No If no what is the maximum central heating output selected kW Dynamic gas inlet pressure mbar C Central heating return temperature C System correctly balanced rebalanced Yes COMBINATION BOILERS ONLY Is the installation in a hard water area above 200ppm Yes No Water scale reducer softener pre existing Fitted Not required Brand Product Yes No If yes DHW expansion vesse...

Страница 50: ...R delete as appropriate Date Engineer name Company name Telephone No Gas Safe registration No Max rate CO ppm CO CO CO Min rate CO ppm CO CO CO undertaken in accordance with manufacturers instructions and readings are correct yes Gas rate m3 h OR ft3 h delete as appropriate Yes No System inhibitor concentration has been checked and appropriate action taken in accordance with BS 7593 and boiler man...

Страница 51: ...R delete as appropriate Date Engineer name Company name Telephone No Gas Safe registration No Max rate CO ppm CO CO CO Min rate CO ppm CO CO CO undertaken in accordance with manufacturers instructions and readings are correct yes Gas rate m3 h OR ft3 h delete as appropriate Yes No System inhibitor concentration has been checked and appropriate action taken in accordance with BS 7593 and boiler man...

Страница 52: ...specify how to set boiler to minimum rate contact Technical Helpline for advice CHECK CO AND COMBUSTION RATIO AT MINIMUM RATE With boiler still set at minimum rate insert analyser probe into flue gas sampling point Allow readings to stabilise before recording NOTE If no flue gas sampling point is present and the correct procedure is not specified in the manual consult boiler manufacturer for guida...

Страница 53: ... Flue pipe removing 31 Frost protection 10 G Garantie 6 Gas Council Number 9 Gas flow rate 27 Gas group checking 18 Gas valve assembly replacing 35 Gas air mixture removing 31 H Handing over to the end user 30 Heat exchanger cleaning 32 I Ignition electrode checking 32 Ignition transformer removing 31 Inspection work 31 Inspection work completing 34 Installation preparations 18 Intended use 3 K Ka...

Страница 54: ......

Страница 55: ......

Страница 56: ... Group UK LTD Nottingham Road Belper Derbyshire DE56 1JQ Telephone 01773 824639 Technical helpline 0330 100 7679 After sales service 0330 100 3142 www glow worm co uk These instructions or parts thereof are protected by copyright and may be reproduced or distributed only with the manufacturer s written consent Subject to technical modifications 0020239562_04 ...

Отзывы: