12 ·
· 13
MANUAL | VA10J&X | VS10C | VA10C | ATEX certified
MANUAL | VA10J&X | VS10C | VA10C | ATEX certified
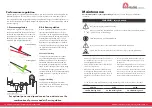
If the silencer becomes dirty this will effect the
performance of the motor. To clean the silencer
follow the next procedure:
Cleaning silencer:
1.
Disconnect airline
2.
Remove the silencer
3.
Clean the silencer
4.
Lubricate the motor with 3-4 drops of oil
5.
Connect the airline
6.
Listen for changes in the sound of the
motor. If the motor runs fine, operation can
continue
7.
If it is not running fine, you should install a
service kit.
Shutdown and long storage
»
You need to take care of the following proce-
dures for a proper shutdown.
»
Wear eye protection. Keep out of the air
steam.
»
Turn off the air supply.
»
Disconnect all air supply and vent all airlines.
»
Disconnect airlines.
»
Disassemble the air motor from its connection.
»
Remove the silencer.
»
Make sure you use clean and dry air to remo-
ve condensation from the inlet port.
»
Use a small amount of oil to lubricate the
motor.
»
Rotate the shaft by hand several times to
distribute the oil.
»
Cap or plug each port of the air motor.
»
Coat output shaft with oil or grease.
»
Store the air motor in a dry environment.
Summary of the hazards with protective means:
Hot surfaces - misalignment
Check for misalignment which can cause heat up of the
bearings.
Hot surfaces - bearings
Bearings shall be inspected and replaced according to
operation and replacement instructions as mentioned in this
manual by authorised staff.
Hot surfaces - deposit
Prior to start up remove all deposit of the surface.
Electrostatic charging
The motor shall be bonded together to other metal parts and
to earth with a earth resistance of maximum 1MΩ.
Electrostatic charging
Before use clean only with damp cloth.
Rebuild instructions
Vane motor maintenance instructions
These motors are made to precise tolerances and it is vital for
efficient operation to achive minimum clearances throughout.
Every clearance represents an air leakage path from inlet to
exhaust, which will detract from the starting and running
characteristics.
The spacing of the rotor is of prime importance in two ways:
1 - rotor to end covers (side clearance) (Cs)
nominally 0.050 mm (0.002")
2 - rotor to body casing (top clearance) (Ct)
nominally 0.050 mm (0.002")
To achieve the side clearance each repair kit has a series of
plastic shims, colour coded to different thicknesses.
Purple = 0.025 mm (0.001")
Blue = 0.050 mm (0.002")
Green = 0.076 mm (0.003")
Orange or Brown = 0.102 mm (0.004")
This range of vane motors has three styles of rotor locations.
V1 rotor location by single row bearing at each end.
V2 - V4 rotor location by one double row bearing in rear cover.
V6 - V8 - V10 rotor location by one double row bearing in front
cover.
Assembly details
All parts must be clean and it is recommended that new
oilseals and blades are fitted as a matter of course.
Press all bearings fully home into their respective covers,
pressing only on the outer track to prevent damaging the
bearings.
On V1, V2, V4 motors fit
oilseal retaining circlip
and a new oilseal.
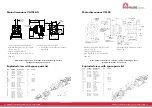
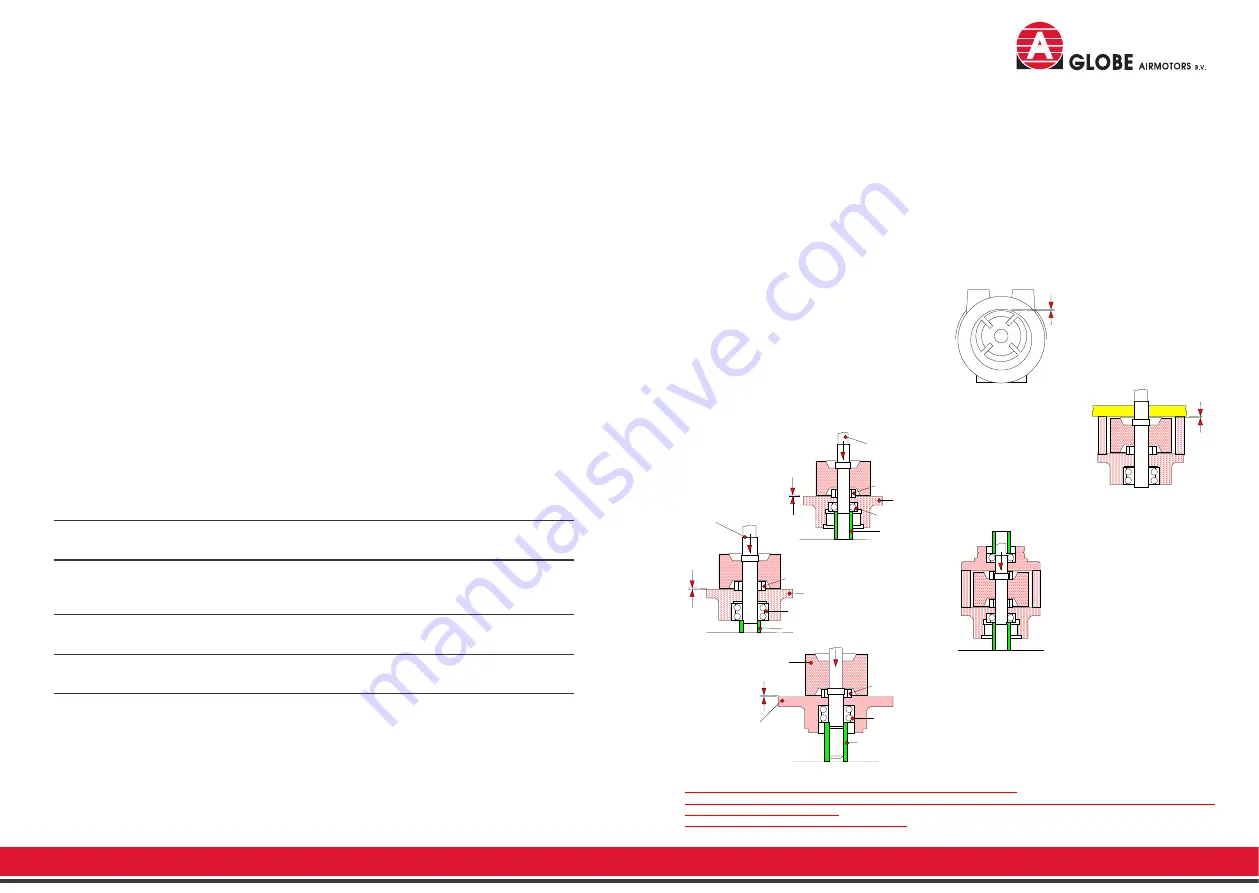
Cs
Rotor / Shaft Assy
Ejection ring
Rear cover
Bearing
Bearing
support
V1 Motor
Cs
Rotor / Shaft Assy
Ejection ring
Rear cover
Bearing
Bearing support
V2 - V4 Motor
Cs
Rotor / Shaft Assy
Ejection ring
Front cover
Bearing
Bearing support
V6 - V8 - V10 Motor
Take the location cover for your particular motor i.e. V2 - V4
rear cover, V6 - V8 - V10 front cover and rear screwed cover for
V1 unit.
Provide a good support on the inner bearing track, as the shaft
fit is very tight, to provide rotor location.
Place blade ejector ring central on cover and press rotor /
shaft assembly down until there is a clearance, Cs of 0.050
mm (0.002") between rotor and cover, check this clearance is
even all around the rotor.
Fit a blue plastic body gasket to the cover, lowering the body
into position over the rotor assembly, locating on the existing
dowels.
NOTE: Ensure the body is the correct way round i.e. port
arrows towards the output shaft.
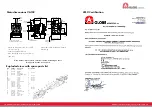
Ct
Fig. 4
Tighten body bolts and check top
clearance, Ct, see Fig No. 4 This
should be 0.050 mm (0.002") if
there is a problem with this then
then reposition and drill for new
dowels. Insert second ejection
ring, fit new blades, it may be
neccessary to work the lower
ejection ring across in order to fit
the opposite blade.
Ct
Fig. 5
Refer to Fig No. 5 (axial end
clerance, Cs). Measure this by
putting a straight edge across
the body, then use feeler gauges
in the gap between rotor and
body face. This should be made
up to 0.050 mm (0.002") or as
close as possible using the
gasket set provided.
Oil inside the motor, ensuring it is free to rotate. On V2 to V10
motors the second cover should slide down into position
easily as the second bearing fit is non locating.
Fig. 6
On V1 motors (see Fig No. 6) this
bearing fit takes up location and
the inner track of both the lower
and upper bearings must be
supported.
Locate cover on dowels and tighten bolts. (V1 fit rear plug).
Check for rotation. The motor may be tight at first due to
hydraulic lock on the oil just used.
On V1 motors only fit front oilseal and circlip if the motor is free
to rotate.
V6, V8, V10 motors - the front oilseal is carried in a separate
housing, this should be fitted next, followed by the rear bearing
cover and its gasket.
V2, V4 motors - the rear bearing cover and ists 'O' ring can
now be fitted.
For trouble free running and long life it is vital that the rotor spacing is correct.
Use only genuine replacement blades as these have a special profile to give correct ejection and contact with the rotor body.
Always ensure adequate lubrication.
Never run motors completely off load at high speed.


