background image


Page 3 of 4 

LIT-181

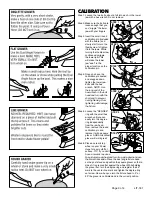
CALIBRATION

Step 1: Loosen the two bolts, about a full turn each, in the lower 

jaw with a hex wrench. Do not remove.

Step 2: Make sure the bolts are 

loose enough that you 

can “wiggle” the lower 

jaw with your fingers.

Step 3: Insert the small round 

calibration pin (included 

with the fixture) and 

slowly start to turn the 

thumbscrew to tighten 

it into the jaws. While 

turning the thumbscrew, 

continuously wiggle 

the lower jaw. This 

will make the lower 

jaw “seat” in the 

proper location on the 

calibration pin.

Step 4: Once you have the 

calibration pin seated 

and snugged down, 

tighten the lower jaw 

bolts with the hex 

wrench. NOTE: Use 

the long end of the 

hex wrench in the bolt 

head and turn with the 

short end to prevent 

over tightening. Over 

tightening will damage 

the fixture.

Step 5: Loosen the “DEGREE” 

ring with the small hex 

wrench until you can 

easily turn the degree 

ring independently 

from the jaw head. 

Now, remove the round 

calibration pin and 

replace it with a square 

graver. A GRS GlenSteel 

graver will work great.

Step 6: Place a ceramic lap 

wheel on your Power 

Hone for a smooth flat 

surface. TIP: If you don’t 

have a ceramic lap use a 

fine grit diamond wheel and turn it up-side-down and use 

the smooth backside. Place the dual angle fixture head 

on the post stand and position the square graver so that a 

side of it is pressed flat against the wheel. While holding 

the graver flat, turn the degree ring and register the 45° 

mark to the center line mark and tighten the degree ring 

set screw. Now, when you turn the fixture head to 0° or 

90° the graver is calibrated and in the correct position.

STEP 1

STEP 2

STEP 3

STEP 4

STEP 5

STEP 6

Содержание GRS 003-570

Страница 1: ...ch grinder or a Power Hone with a 260 grit wheel will work Rough grind with a bench grinder first then true the surface with the Power Hone if you desire When using a bench grinder eye protection MUST BE WORN and a face mask to prevent breathing wheel dust Tools can easily be damaged while grinding Do not let the tool tip get hot and burn Burning means the tool metal will turn blue which takes the...

Страница 2: ...ENING A 90 GRAVER for details With the graver s excess metal removed FIG H 1 mount the tool face angle down in the TOOL DIAL and lock at 0 Set the POST DIAL at 45 or desired face angle and grind the face FIG H 2 Turning the TOOL DIAL around 180 to reference 0 and change the POST DIAL to 2 1 2 halfway between 0 and 5 and lock in position From reference 0 rotate dial clockwise to 30 and grind angle ...

Страница 3: ...vent over tightening Over tightening will damage the fixture Step 5 Loosen the DEGREE ring with the small hex wrench until you can easily turn the degree ring independently from the jaw head Now remove the round calibration pin and replace it with a square graver A GRS GlenSteel graver will work great Step 6 Place a ceramic lap wheel on your Power Hone for a smooth flat surface TIP If you don t ha...

Страница 4: ... TYPE H 002 963 SPRING 003 117 FIXTURE BASE PLATE 003 118 GUIDE POST 003 171 CLAMP 003 173 COVER 003 181 PLASTIC WASHER 003 182 0 RING 003 216 ARM FOR DUAL ANGLE FIXTURE 003 217 LEG FOR DUAL ANGLE FIXTURE 003 292 DEGREE RING FOR DUAL ANGLE FIXTURE 003 293 SLIDING PIVOT FOR DUAL ANGLE FIXTURE 003 294 HOLDER BLOCK FOR ADJUSTABLE DEGREE SCALE 003 295 LOWER JAW FOR DUAL ANGLE FIXTURE 008 507 KNOB THUM...

Отзывы: