INSTALLATION OF THE MIRROR
STEP 3 —
Confirm that installation marks are level.
Inspect the wall for imperfections and determine that
there are no water, drain or vent pipes or electrical wiring
in the areas to be drilled for the wall “Z’” bracket. Measure
the proper location for the “Z” bracket from the base line
mark in accord with the measurements in TABLE 1 on
page 5.
Affix the Shim as supplied
(for Framed Models)
. Hold the
“Z” bracket on the wall with the level and mark the holes.
Wear eye protection, drill the required holes using a
6
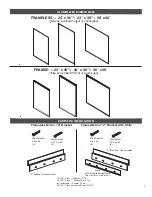
24'' x 30'', net weight of mirror is 7.9kgs / 17.4 lbs
24'' x 36'', net weight of mirror is 9.36kgs / 20.6 lbs
36'' x 36'', net weight of mirror is 13.2kgs / 29.1 lbs
Wall
“Z” Bracket
Wall Shim
FRAMELESS MIRROR
FRAMED MIRROR
Unit Structure
Frame
Hanger
Mirror
Mirror
“Z” Bracket
Unit Structure
Hanger
Wall
Screw into place with Wall Screws
Insert Wall Anchors
Framed Mirror “Z” Bracket with Shim
Attach Shim
with Double Faced Tape
to Z Bracket
Use a Level to position
Mark holes and Drill
Mark Holes and Drill
masonry bit for tile. Install the Wall anchors. Screw into
place with the screws supplied.
Note: the wall anchors and scews are engineered to
hold the weight of the units.
DO NOT SUBSITUTE OTHER PARTS.
Section view showing the “Z” Bracket as
used in the
Frameless
and the
Framed
Models.
The extra thickness of the Frame requires
the Shim to offset the “Z” Bracket to
engage the Hanger that is factory installed
inside the Frame
.


