3
Mar
k
p
e
n
cil li
n
e fo
r
ba
se of the
wa
ll
m
i
rr
o
r
&
m
i
rr
o
r
e
d
c
ab
i
n
ets.
Kee
p
a
m
i
n
i
mum
of
1”
cle
aran
ce
ab
o
v
e f
au
cet.
Mar
k
p
e
n
cil li
n
e fo
r
ce
n
te
r
p
oi
n
t
of the
m
i
rr
o
r
and
the left
and
r
i
g
ht e
dg
e
of the
m
i
rr
o
r
I
n
st
a
ll left c
ab
i
n
et
I
n
st
a
ll
r
i
g
ht c
ab
i
n
et
I
n
st
a
ll ce
n
te
r
m
i
rr
o
r
I
n
st
a
ll the i
n
si
d
e
si
d
e
m
i
rr
o
r
kit
o
n
e
a
ch c
ab
i
n
et
b
efo
r
e
m
o
un
ti
ng
Mar
k
p
e
n
cil li
n
e fo
r
ce
n
te
r
li
n
e
and
b
oth e
dg
es of
m
i
rr
o
r
.
2
” x
2
”
B
l
a
ck
Fo
am
P
ad
s
Fix shelf
w
ith
S
t
a
i
n
less
S
et
S
c
r
e
w
s
G
l
a
ss
S
helf
sli
d
es i
n
to
Cli
p
Hol
d
e
r
s
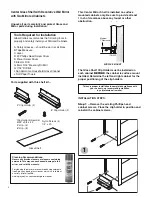
Step 2
-- Measure the overall dimension of both
cabinets and the center mirror.
Mark the center line of the
installation location.
Mark for the center mirror width.
Step 3
-- Install the inside facing
Side Mirror Kit on both Cabinets.
Step 4
-- Follow the GlassCrafters Surface Mount
installation instruction and install the left cabinet
flush to the left side of the mirror position.
Step 5
-- Install the center Mirror using the
installation sheets supplied for reference.
Step 6
-- Install the right medicine cabinet flush to
the right side of the center mirror.
Step 7
-- Carefully slide the 4” or 6” cen-
ter glass shelf in the Clip Holders. Gently
turn the M8 x 1.25 Stainless Set Screws to
hold the Glass Shelf in place.
NOTE: Refer to the installation manuals supplied with
the Mirrored Cabinet and the Decorative Wall Mirror
for complete parts list and step-by-step instructions.


