16
mitgeliefert werden (siehe
Abbildung 24
). Das
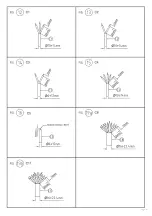
einpolige Erdungskabel “C5” (siehe
Abbildung
16
) durch die Kabelverschraubung “G3” und
unter dem Kabelbaum “S3” durchführen. Den
Erdungsleiter in den zentralen Pol der Erdung
der Klemme “M1“ einsetzen. Den Kabelbaum
“S3“ anziehen.
1.3 Für die Version mit Versorgungsspannung
230V mit Anschluss DALI
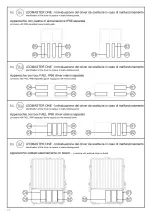
1.3.1 Version mit Stromkabel getrennt
vom Kabel DALI
(siehe
Abbildung
30a
) Das
dreipolige Stromkabel “C1” (Phase, Neutral,
Erdung, siehe
Abbildung
12
) durch die
Kabelverschraubung “G1” und unter dem
Kabelbaum “S1” durchführen. Die Phasenleiter,
Neutralleiter und Erdungsleiter an die Pole L, N
und Erdung in der Klemme “M1“ anschließen.
Den Kabelbaum “S1“ anziehen. Die Schraube
“Y“ der Kabelverschraubung “G2“ lösen und
den entsprechenden Verschluss herausziehen.
Das zweipolige DALI Steuerkabel “C3”
(Phase, Neutral, siehe
Abbildung 14
) durch
die Kabelverschraubung “G2” und unter dem
Kabelbaum “S2” durchführen. Die Leiter des
Steuerkabels DALI an die Pole DA/DA der
Klemme “M2“ anschließen. Den Kabelbaum
“S2“ anziehen.
1.3.2 Version mit 5-poligem Stromkabel
+ Kabel DALI (siehe Abbildung 30a)
Das
5-polige Kabel “C4” (Phase, Neutral, Erdung,
DA, DA, siehe
Abbildung
15
) durch die
Kabelverschraubung “G1” und unter dem
Kabelbaum “S1” durchführen. Die Phasenleiter,
Neutralleiter und Erdungsleiter an die Pole L, N
und Erdung in der Klemme “M1“ und die Leiter
DALI an die Pole DA/DA der Klemme “M2“
anschließen. Den Kabelbaum “S1“ anziehen.
Gemeinsamer Teil für alle oben aufgeführten
Kapitel
Basierend auf der verwendeten
Kabeldurchführung (G1, G2 und/
oder G3): Überprüfen Sie, mit einem
Drehmomentschlüssel, den Anzug des
Gehäuses “X“ (siehe
Abbildung 11
) der
Kabeldurchführung/en mit einem Drehmoment
von 4Nm. Ziehen Sie die Schraube “Y” (siehe
Abbildung 11
) der Kabeldurchführung/en
mit Drehmoment 3.5Nm vorsichtig an. Wenn
das Gerät elektrisch angeschlossen ist, das
elektrische Zubehörfach wieder schließen
indem die 3 Schrauben “V“ (siehe
Abbildung
1a
) aus Edelstahl mit einem Drehmoment von
5Nm angezogen werden, um sicherzustellen,
dass die Dichtung perfekt sitzt. Zu Beginn
die 3 Schrauben “V“ aus Edelstahl teilweise
anziehen und abschließend fest anziehen.
Stellen Sie sicher, dass die Abdeckung perfekt
am elektrischen Zubehörfach anliegt.
2. Gerät mit getrennter
Versorgungseinheit mit
On-Board Verteilerkasten
ASYMMETRISCHE Version
Version verfügbar für Raumtemperatur 50°C
(-30 ÷ +50°C).
a. Versorgungsplatte IP20
b. Versorgungsplatte IP20 DMX
c. Versorgungsplatte IP66
d. Versorgungsplatte Box FAEL IP66 interne
Treiber
e. Versorgungsplatte Box FAEL IP66 externe
Treiber
Für den Anschluss zwischen Scheinwerfer
und getrennter Versorgungseinheit können
Kabel vom Typ FG16R16, oder FG16M16
verwendet werden für Umgebungstemperaturen
zwischen -15°C und +50°C (siehe
Abschnitt
2.1
); Alternativ können ähnliche Kabel
verwendet werden, die mit den nationalen und
internationalen Standards übereinstimmen,
die je nach Installationsumgebung ausgewählt
wurden. Kabel für die feste oder abnehmbare
Installation, für Innen- und Außenbereiche und
Veranstaltungstechnik. Selbstverlöschendes
Kabel, UV-beständig. Für den Anschluss
zwischen Scheinwerfer und getrennter
Versorgungseinheit können Kabel vom Typ
ÖLFLEX CLASSIC 110 black 0,6/1kV verwendet
werden für Umgebungstemperaturen zwischen
-30°C und +50°C (siehe
Abschnitt
2.1
);
Alternativ können ähnliche Kabel verwendet
werden, die mit den nationalen und
internationalen Standards übereinstimmen,
die je nach Installationsumgebung ausgewählt
wurden. Kabel für die feste oder abnehmbare
Installation, für Innen- und Außenbereiche und
Veranstaltungstechnik. Selbstverlöschendes
Kabel, UV-beständig. Ein mehrpoliges Kabel mit
10 Leitern verwenden (siehe
Abschnitt 2.1
).
oder das auf dem Markt leichter erhältliche
mehrpolige Kabel mit 12 Leitern (11 schwarze
Leiter nummeriert von 1 bis 11 + 1 gelb-grüner
Erdungsleiter, siehe
Abschnitt 2.2
).
Abstand: zwischen 0 und 70 Metern: Kabel
mit 1,5 mm2 Leitern verwenden; zwischen 70
nel sacchetto presente all’interno della scatola
dell’apparecchio (vedere
figura 24
). Far passare
il cavo di Terra unipolare “C5” (vedere
figura 16
)
attraverso il pressacavo “G3” e sotto il serracavo
“S3”. Collegare il conduttore di Terra al polo di
Terra del morsetto “M1”. Serrare il serracavo
“S3”.
1.3 Per versione con tensione di
alimentazione 230V con collegamento DALI
1.3.1 Versione con cavo di alimentazione
separato dal cavo DALI
(vedere
figura
30a
)
Far passare il cavo di alimentazione tripolare
“C1” (Fase, Neutro, Terra, vedere
figura
12
) attraverso il pressacavo “G1” e sotto il
serracavo “S1”. Collegare i conduttori di Fase,
Neutro e Terra ai poli L, N e Terra del morsetto
“M1”. Serrare il serracavo “S1”. Allentare la
ghiera “Y” del pressacavo “G2” ed estrarre il
relativo tappo. Far passare il cavo di controllo
DALI bipolare “C3” (DA, DA, vedere
figura
14
)
attraverso il pressacavo “G2” e sotto il serracavo
“S2”. Collegare i conduttori del cavo di controllo
DALI ai poli DA/DA del morsetto “M2”. Serrare il
serracavo “S2”.
1.3.2 Versione con cavo di aliment
cavo DALI pentapolare
(vedere
figura
30a
) Far
passare il cavo pentapolare “C4” (Fase, Neutro,
Terra, DA, DA, vedere
figura
15
) attraverso
il pressacavo “G1” e sotto il serracavo “S1”.
Collegare i conduttori di Fase, Neutro e Terra ai
poli L, N e Terra nel morsetto “M1” e i conduttori
DALI ai poli DA/DA del morsetto “M2”. Serrare il
serracavo “S1”.
Parte comune per tutti i capitoli sopra
In base al pressacavo utilizzato (G1, G2
e/o G3): verificare il serraggio, con chiave
inglese, del corpo “X” (vedere
figura
11
) del/i
pressacavo/i applicando un momento torcente
di 4Nm; serrare con cura e a fondo, con chiave
inglese, la ghiera “Y” (vedere
figura
11
) del/i
pressacavo/i applicando un momento torcente
di 3.5Nm. Una volta collegato elettricamente
l’apparecchio, richiudere il vano accessori
elettrici serrando le 3 viti V” (vedere
figura
1a
)
in acciaio inox applicando un momento torcente
di 5Nm assicurandosi che la guarnizione sia
perfettamente nella sua sede: all’inizio chiudere
parzialmente le 3 viti “V” in acciaio inox ed
infine serrarle definitivamente. Verificare che il
coperchio sia perfettamente in battuta sul vano
accessori elettrici.
2. Apparecchio con
gruppo di
alimentazione separato
con cassetta di
derivazione on board
versione ASIMMETRICA
Versione disponibile per temperatura ambiente
50°C (-30 ÷ +50°C).
a. Piastra di alimentazione IP20
b. Piastra di alimentazione IP20 DMX
c. Piastra di alimentazione IP66
d. Gruppo di alimentazione box FAEL IP66
driver interni
e. Gruppo di alimentazione box FAEL IP66
driver esterni
Per il collegamento tra il proiettore ed il gruppo di
alimentazione separato è possibile utilizzare cavi
tipo FG16R16 o tipo FG16M16 per temperatura
ambiente compresa tra -15°C e +50°C (vedere
paragrafo 2.1
); in alternativa è possibile
utilizzare cavi similari conformi alle normative
nazionali ed internazionali scelti a seconda della
temperatura ambiente di installazione. Cavo
adatto per posa fissa o mobile, per ambienti
interni ed esterni e tecnologia per lo spettacolo.
Cavo di tipo autoestinguente, resistente ai
raggi UV. Per il collegamento tra il proiettore
ed il gruppo di alimentazione separato è
possibile utilizzare cavi tipo ÖLFLEX CLASSIC
110 black 0,6/1kV per temperatura ambiente
compresa tra -30°C e +50°C (vedere
paragrafo
2.1
); in alternativa è possibile utilizzare cavi
similari conformi alle normative nazionali ed
internazionali scelti a seconda della temperatura
ambiente di installazione. Cavo adatto per posa
fissa o mobile, per ambienti interni ed esterni
e tecnologia per lo spettacolo. Cavo di tipo
autoestinguente, resistente ai raggi UV.Utilizzare
cavo multipolare 10 conduttori (vedere
paragrafo 2.1
); oppure utilizzare, più facilmente
reperibile sul mercato, il cavo multipolare a 12
To connect the cable to the single-pole
grounding cable, loosen the nut “Y” of the cable
gland “G3” and remove the related plug. For
cables having diameter ≤ 8mm, use a suitable
grommet supplied in the bag fitted inside the
appliance housing (check the
figure
24
). Pass
the single-pole Ground cable “C5” (check the
figure
16
) through the cable gland “G3” and
under the cable clamp “S3”. Connect the Ground
conductor to the Ground pole of the terminal
“M1”. Tighten the cable clamp “S3”.
1.3 Version supplied 230V voltage with DALI
connection
1.3.1 Version with power cable separated
from the DALI cable
(check the
figure
30a
)
Pass the three-pole power supply cable
“C1”(Phase, Neutral, Ground; check the
figure
12
) through the cable gland “G1” and beneath
the cable clamp “S1”. Connect the Phase,
Neutral and Ground conductors to the L, N and
Ground poles of the terminal “M1”. Tighten the
cable clamp “S1”. Loosen the nut “Y” of the
cable gland “G2” and remove the related plug.
Pass the two-pole control cable DALI “C3” (DA,
DA, check the
figure
14
) through the cable
gland “G2” and beneath the cable clamp “S2”.
Connect the conductors of the DALI control cable
to the DA/DA poles of the terminal “M2”. Tighten
the cable clamp “S2”.
1.3.2 Version with power cable + 5-pole DALI
cable
(check the
figure
30a
)
Pass the 5-pole cable “C4” (Phase, Neutral,
Ground, DA, DA, check the
figure
15
) through
the cable gland “G1” and beneath the cable
clamp “S1”. Connect the Phase, Neutral and
Ground conductors to the L, N and Ground poles
on the terminal “M1” and the DALI conductors
to the DA/DA poles of the terminal “M2”. Tighten
the cable clamp “S1”.
Part shared by all previous chapters
Depending on the cable gland used (G1, G2 and/
or G3): using a spanner, apply a torque 4Nm to
check the tightening of the housing “X” (check
the
figure 11
); use a spanner and apply a torque
of 3.5Nm to tighten carefully and completely
the ring nut “Y” (check the
figure 11
). Once the
appliance is connected, close back the electrical
accessories compartment and tighten the 3
“V” stainless steel screws (check
figure
1a
) by
applying 5Nm torque, making sure the gasket
is perfectly fit: tighten first partially the 3 “V”
stainless steel screws, then tighten completely.
Ensure the cover is perfectly abutted to the
electrical accessories compartment.
2. Projector with
separated power supply
unit with
built-in cables box
ASYMMETRIC version
Version available for ambient temperature 50°C
(-30 ÷ +50°C).
a. IP20 power supply plate
b. IP20 DMX power supply plate
c. IP66 power supply plate
d. IP66 FAEL power supply unit box, internal
drivers
e. IP66 FAEL power supply unit box, external
drivers
The floodlight can be connected to the separate
power supply unit using FG16R16 or FG16M16
cables that are suitable for ambient temperatures
ranging from -15°C to +50°C (see
paragraph
2.1
); alternatively, similar cables, suitable for the
ambient temperature at the place of installation
and made in compliance with applicable national
and international regulations, can be used.
Cable suitable for fixed or mobile installation,
indoor and outdoor use and entertainment
technology. Self-extinguishing, UV-resistant
cable. The floodlight can be connected to the
separate power supply unit using ÖLFLEX
CLASSIC 110 black 0.6/1kV cables that are
suitable for ambient temperatures ranging
from -30°C to +50°C (see
paragraph 2.1
);
alternatively, similar cables, suitable for the
ambient temperature at the place of installation
and made in compliance with applicable national
and international regulations, can be used. Cable
suitable for fixed or mobile installation, indoor
and outdoor use and entertainment technology.
Self-extinguishing, UV-resistant cable. Use a
multi-conductor cable with 10 conductors (see
(voir
figure 24
). Faire passer le câble de Terre
unipolaire “C5” (voir
figure 16
) à travers le
presse-câble “G3” et sous le serre-câbles “S3”.
Brancher le conducteur de Terre au pôle de
Terre de la borne “M1”. Serrer le serre-câbles
“S3”.
1.3 Pour version avec tension d’alimentation
230V avec branchement DALI
1.3.1 Version avec câble d’alimentation
séparé du câble DALI
(voir
figure 30a
)
Faire passer le câble d’alimentation tripolaire
“C1” (Phase, Neutre, Terre, voir
figure
12
) à
travers le presse-câble “G1” et sous le serre-
câbles “S1”. Brancher les conducteurs de
Phase, de Neutre et de Terre aux pôles L et N
et de Terre de la borne “M1”. Serrer le serre-
câbles “S1”.
Desserrer la bague “Y” du presse-câbles “G2” et
en extraire le bouchon.
Faire passer le câble de contrôle DALI bipolaire
“C3” (DE, DE, voir
figure 14
) à travers le presse-
câble “G2” et sous le serre-câbles “S2”.
Brancher les conducteurs du câble de contrôle
DALI aux pôles DE/DE de la borne “M2”. Serrer
le serre-câbles “S2”.
1.3.2 Version avec câble d’alimen
câble DALI pentapolaire
(voir
figure
30a
).
Faire passer le câble d’alimentation “C4” (Phase,
Neutre, Terre, DE, DE, voir
figure
15
) à travers le
presse-câble “G1” et sous le serre-câbles “S1”.
Brancher les conducteurs de Phase, Neutre et
Terre aux pôles L, N et Terre de la borne “M1
et les conducteurs DALI aux pôles DE/DE de la
borne “M2”. Serrer le serre-câbles “S1”.
Partie commune à tous les chapitres ci-
dessus
Selon le presse-câbles utilisé (G1, G2 et/ou
G3): Vérifier le serrage du corps “X” (voir
figure
11
) du/des serre-câbles avec une clé anglaise,
en appliquant un moment de torsion de 4Nm.
Toujours avec la clé anglaise, serrer bien à fond
le collier de serrage “Y” (voir
figure
11
) du/
des serre-câbles en appliquant un moment de
torsion de 3.5Nm. Après avoir branché l’appareil
électriquement, refermer le compartiment des
accessoires électriques en serrant les 3 vis V”
en acier inox (voir
figures
1a
) en appliquant un
moment de torsion de 5Nm et en contrôlant que
la garniture est parfaitement logée dans son
emplacement: au début, ne fermer les 3 vis “V”
que partiellement puis les serrer définitivement.
Vérifier que le couvercle est parfaitement en
butée sur le compartiment des accessoires
électriques.
2. Appareil avec groupe
d’alimentation séparé
avec boite de dérivation
on board
version ASYMÉTRIQUE
Version disponible pour température ambiante
de 50°C (-30 ÷ +50°C).
a. Plaque d’alimentation IP20
b. Plaque d’alimentation IP20 DMX
c. Plaque d’alimentation IP66
d. Groupe d’alimentation box FAEL
IP66 drivers internes
e. Groupe d’alimentation box FAEL
IP66 drivers externes
Pour brancher le projecteur et le groupe
d’alimentation séparé, il est possible d’utiliser
des câbles de type FG16R16, ou de type
FG16M16 pour température ambiante comprise
entre -15°C et +50°C (voir
paragraphe
2.1
); en
alternative, il est possible d’utiliser des câbles
similaires, conformes aux réglementations
nationales et internationales, à choisir en
fonction de la température ambiante du lieu
d’installation. Câble adapté pour pose fixe
ou mobile, pour environnements intérieurs et
extérieurs et technologie pour le spectacle.
Câble de type auto-extinguible, résistant
aux rayons UV. Pour brancher le projecteur
et le groupe d’alimentation séparé, il est
possible d’utiliser des câbles de type ÖLFLEX
CLASSIC 110 black 0,6/1kV pour température
ambiante comprise entre -30°C et +50°C (voir
paragraphe 2.1
); en alternative, il est possible
d’utiliser des câbles similaires, conformes aux
réglementations nationales et internationales, à
choisir en fonction de la température ambiante
du lieu d’installation. Câble adapté pour pose
fixe ou mobile, pour environnements intérieurs
et extérieurs et technologie pour le spectacle.
Câble de type auto-extinguible, résistant aux
19
Содержание 514084500
Страница 1: ...Glamox O92 O93 ASY User manual ...
Страница 6: ...3 3 6 ...
Страница 7: ...4 7 ...
Страница 8: ...5 5 8 ...
Страница 14: ...11 14 ...
Страница 16: ...13 13 16 ...
Страница 17: ...14 17 ...
Страница 18: ...15 18 ...
Страница 20: ...17 20 ...
Страница 22: ...19 22 ...
Страница 24: ...21 24 ...
Страница 26: ...23 26 ...
Страница 28: ...25 28 ...
Страница 31: ...28 31 ...
Страница 32: ...29 32 ...
Страница 33: ...30 33 ...
Страница 35: ...32 35 ...
Страница 36: ...33 36 ...
Страница 38: ...35 Note 38 ...
Страница 39: ...39 ...


