background image

 6
 

Installation (continued)

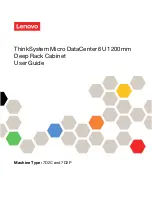
Connecting the straight tube to the 

top shelf assembly


Place the straight tube (with spring packed inside) (B)  
on top of the long tapered tube (C).   

Preparing the 1/2 in. tube for 

installation


Slide the plastic end cap with hole (CC) on the 1/2 in. 
tube (A). 


Place a T-cap (BB) on each end of the 1/2 in. tube (A).

spring packed inside straight tube (B)

top shelf assembly

BB

BB

CC

B

C

A

Содержание 1000 017 283

Страница 1: ...igned to enhance your home Visit us online to see our full line of products available for your home improvement needs Thank you for choosing Glacier Bay USE AND CARE GUIDE POLE CADDY Questions problems missing parts Before returning to the store call Glacier Bay Customer Service 8 a m 6 p m EST Monday Friday 1 855 HD GLACIER HOMEDEPOT COM Item 1000 017 283 Model 2132HBHD ...

Страница 2: ...WHAT IS NOT COVERED All costs of removing and reinstalling the product are the purchaser s responsibility Any alteration of this product or use of this product in any manner other than its intended use is not covered by this warranty The manufacturer assumes no responsibility whatsoever for product installation during the limited one year warranty The manufacturer disclaims any and all warranties ...

Страница 3: ... pieces before you begin When laying out the parts place them on a soft surface to prevent scratching TOOLS REQUIRED Hacksaw HARDWARE INCLUDED NOTE Hardware shown to actual size AA BB DD CC EE Pre Installation Part Description Quantity AA Wedge 4 BB Plastic T cap 2 CC Plastic end cap with hole 1 DD Soft vinyl end cap 1 EE Tape strips 3 ...

Страница 4: ... continued PACKAGE CONTENTS Part Description Quantity A 1 2 in diameter tube 1 B Straight tube with spring packed inside 1 C Long tapered tube 2 D Short tapered tube 1 E Shelf 3 F Shelf with towel bar 1 D A B C C F E E E ...

Страница 5: ...the short tapered tube D in place of the second long tapered tube C NOTE Shelves E and F can be adjusted by moving the wedges AA up or down Place a wedge AA tapered or rounded end up on one of the long tapered tubes C approximately half way down Slide the shelf with towel bar F down the tube and fit over the wedge AA Place a wedge AA tapered or rounded end up on the long tapered tube C Slide a she...

Страница 6: ...ight tube with spring packed inside B on top of the long tapered tube C 4Preparing the 1 2 in tube for installation Slide the plastic end cap with hole CC on the 1 2 in tube A Place a T cap BB on each end of the 1 2 in tube A spring packed inside straight tube B top shelf assembly BB BB CC B C A ...

Страница 7: ...cation Move the bottom end into place on the tub ledge so that the unit is in a vertical position Place the tape strips EE around the seams of the tubes 6Preparing the bottom shelf assembly for tub ledge installation NOTE For shower stall preparation see step 8 Place the soft vinyl end cap DD on the bottom of the assembly tube C 5Inserting the 1 2 in tube into the straight tube Place the 1 2 in tu...

Страница 8: ...wer stall Compress the top of the unit against the ceiling at the desired location Move the bottom end into place on the shower floor so that the unit is in a vertical position Place the tape strips EE around the seams of the tubes 8Preparing the bottom shelf assembly for shower stall installation NOTE For tub ledge preparation see step 6 Slip the tapered end of the short tapered tube D into the u...

Страница 9: ...th Do not use strong detergents or abrasive cleaners they may damage the surface of this product Troubleshooting If needed the height may be reduced by carefully cutting the long tapered tube C or the short tapered tube D Remove 1 in for each inch that your ceiling is lower than 7 ft 8 in Ceiling Height Remove 7 ft 7in 1 in 7 ft 6in 2 in 7 ft 5in 3 in 7 ft 4in 4 in 7 ft 3in 5in 7 ft 2in 6in 7 ft 1...

Страница 10: ...Questions problems missing parts Before returning to the store call Glacier Bay Customer Service 8 a m 6 p m EST Monday Friday 1 855 HD GLACIER HOMEDEPOT COM Retain this manual for future use IS02132 I ...

Страница 11: ...u hogar Visítenos en línea y vea nuestra línea completa de productos para realizar mejoras en su hogar Gracias por elegir Glacier Bay GUÍA DE USO Y CUIDADO BARRA ORGANIZADORA Tiene preguntas problemas le faltan piezas Antes de regresar a la tienda llame al Servicio al Cliente de Glacier Bay de 8 a m 6 p m Hora Estándar del Este de lunes a viernes 1 855 HD GLACIER HOMEDEPOT COM Item N 1000 017 283 ...

Страница 12: ...CUBRE Los costos de retirar y reinstalar el producto son responsabilidad del comprador No están cubiertos por esta garantía la modificación de este producto ni el uso del mismo de una manera que no sea la debida El fabricante no asume responsabilidad alguna por la instalación del producto durante la garantía limitada de un año El fabricante no se hace responsable de ninguna garantía La duración de...

Страница 13: ...arcir las partes colóquelas sobre una superficie suave para evitar que se rayen HERRAMIENTAS NECESARIAS Sierra para metales ELEMENTOS INCLUIDOS NOTA La tornillería se ilustra en su tamaño real AA BB DD CC EE Pre instalación Pieza Descripción Cantidad AA Calce 4 BB Tapón de plástico 2 CC Cubierta terminal de plástico con orificio 1 DD Cubierta terminal suave de vinilo 1 EE Tiras de cinta 3 ...

Страница 14: ...ENIDO DEL PAQUETE Pieza Descripción Cantidad A Tubo de 1 2 pulg de diámetro 1 B Tubo recto con resorte embutido en su interior 1 C Tubo largo ahusado 2 D Tubo corto ahusado 1 E Repisa 3 F Repisa con barra para toalla 1 D A B C C F E E E ...

Страница 15: ... del segundo tubo largo ahusado C NOTA Las repisas E y F se pueden ajustar desplazando los calces AA hacia arriba o hacia abajo Coloque un calce AA ahusado o con el extremo redondeado hacia arriba sobre uno de los tubos largos ahusados C aproximadamente por el centro Deslice la repisa con la barra para toalla F por el tubo y colóquela sobre la cuña AA PColoque un calce AA ahusado o con el extremo ...

Страница 16: ...or B sobre la parte superior del tubo largo ahusado C 4Preparación para instalación del tubo de 1 2 pulgada Deslice la cubierta terminal de plástico con orificio CC sobre el tubode 1 2 pulgada A Coloque un tapón BB en cada extremo del tubo de 1 2 pulgada A resorte embutido dentro del tubo recto B ensamble de repisa superior BB BB CC B C A ...

Страница 17: ...ior a su lugar sobre el reborde de la bañera de manera que la unidad esté en posición vertical Coloque las tiras de cinta EE alrededor de las uniones de los tubos 6Preparación del ensamble de repisa inferior para instalación en reborde de la bañera NOTA Vea el paso 8 para preparar el cubículo de la ducha Coloque la cubierta terminal suave de vinilo DD en la parte inferior del tubo del ensamble C 5...

Страница 18: ...ma la parte superior de la unidad contra el cielo raso en el lugar deseado Desplace el extremo inferior a su lugar en el piso de la ducha de manera que la unidad esté en posición vertical Coloque las tiras de cinta EE alrededor de las uniones de los tubos 8Preparación del ensamble de repisa inferior para instalación en cubículo de la ducha NOTA Vea el paso 6 para preparar el reborde de la bañera D...

Страница 19: ... limpiadores abrasivos pueden dañar la superficie de este producto Solución de problemas Si fuese necesario se puede reducir la altura cortando con cuidado el tubo largo ahusado C o el tubo corto ahusado D Corte una pulgada por cada pulgada que su cielo raso tenga por debajo de 7 pies 8 pulg Altura del cielo raso Cortar 7 pies 7 pulg 1 pulg 7 pies 6pulg 2 pulg 7 pies 5pulg 3 pulg 7 pies 4pulg 4 pu...

Страница 20: ...s le faltan piezas Antes de regresar a la tienda llame al Servicio al Cliente de Glacier Bay de 8 a m 6 p m Hora Estándar del Este de lunes a viernes 1 855 HD GLACIER HOMEDEPOT COM Conserve este manual para uso futuro IS02132 I ...

Отзывы: