

PLEASE INSPECT YOUR GIO ELECTRIC PEAK E-BIKE UPON
ARRIVAL AND REPORT ANY DAMAGES THAT MAY HAVE
OCCURRED DURING SHIPPING
ATTENTION
The following owners manual is a guide to assist you. This
manual is not a complete document on all aspects of the
maintenance and repair of your electric bicycle, or e-bike for
short. Your GIO Electric Peak is not a complex object, however it
is recommended that you consult an e-bike repair specialist if
you have concerns as to your ability to assemble, repair, or
maintain this product.
It is important for you to understand your new e-bike. By
reading this manual completely before the first ride, you will get
better performance and enjoyment from this product; also it's
helpful to extend the life of your e-bike.
Table of Contents
Introduction
0
2
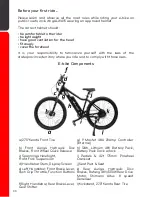
E-bike Components
0
3
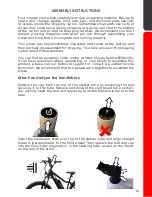
Assembly Instructions
0
4
E-bike Operations
09
Care and Maintenance
14
Warranty Information
18
01