background image

3

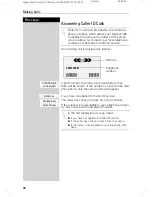
Setting Up the Telephone

Gigaset 4010 Comfort, CHIN eng, A31008-G4010-

vorberei.fm

25.09.0

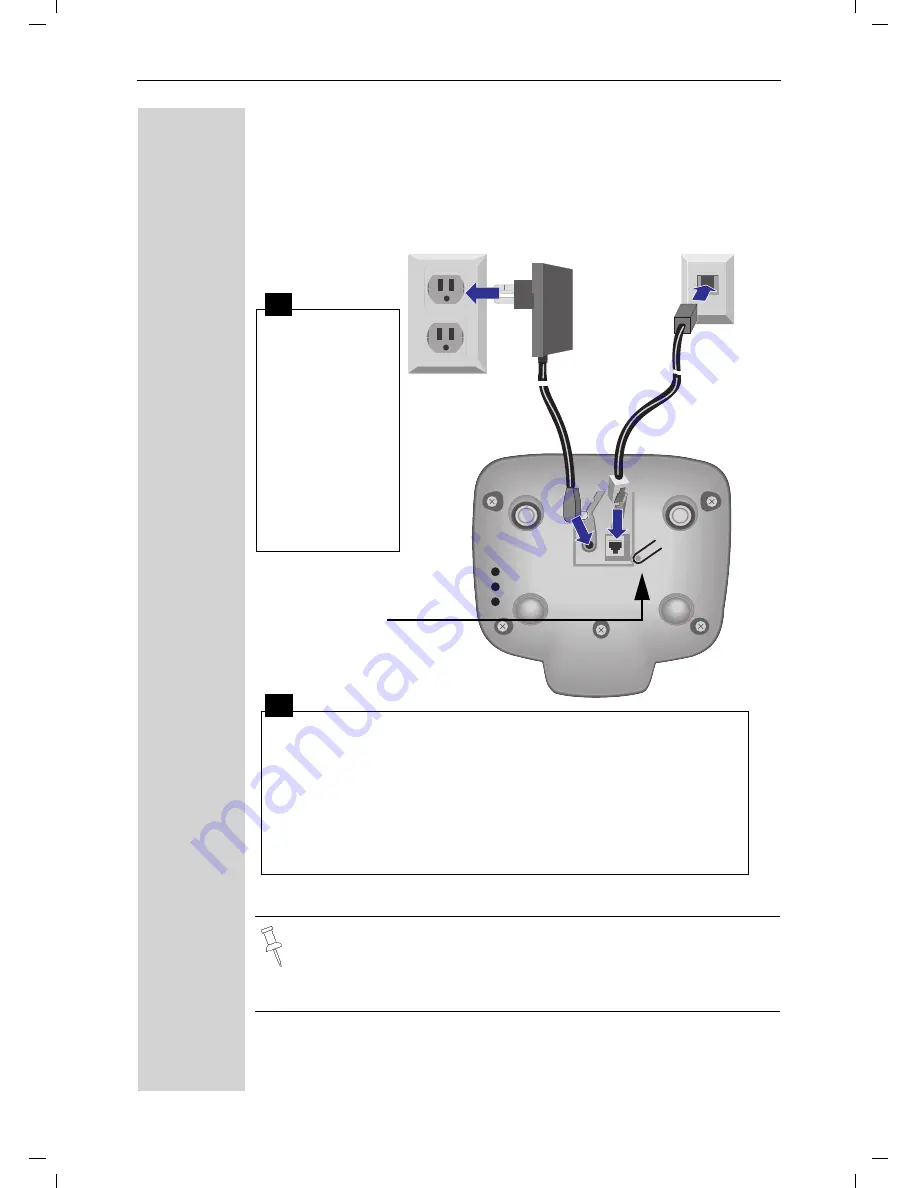
Connecting the Base Station

Only use the power supply unit included as indicated on the 

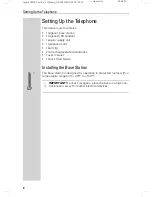
underside of the base.

Use the telephone cord supplied. Do not use any old cords.

Do not use an outlet controlled by a wall switch.

Power supply unit 

with cord

(110 VAC/60 Hz)

Insert the 

small plug on 

cord into pho-

ne jack

Place cord in 

the base cable 

channel,

insert power 

supply unit 

into wall out-

let.

Insert plug on the telephone cord into telephone jack on 

base unit (clicks into place),

Place cord in cable channel on the bottom of the base,

Insert other end of plug into telephone jack on the wall.

The installation of the base unit should allow at least 8 inches 

between the base and persons to be in compliance with FCC 

RF exposure guidelines

Telephone jack with telephone cord

Key to register 

additional 

handsets/Page 

handsets.

1

2

Содержание Gigasrt S 88

Страница 1: ...Gigaset 4010 Comfort CHIN eng A31008 G4010 C102 1 umschl_v fm 25 09 0 Gigaset S 88 Be inspired User Manual and Safety Precautions ...

Страница 2: ...lations on your purchase of the Siemens Gigaset telephone system This phone s 2 4 GHz frequency and high speed digital voice encoding provide reception and voice clarity that is superior to other cordless phones And its digital spread spec trum technology will provide you with secure private conversations ...

Страница 3: ...ry see page 20 D o Name if necessary D c or D c Setting the handset volume see page 40 MENU D DF or G Save Making an Internal call to a spe cific handset F and Dto select internal user c Making an Internal call to a all handsets see page 8 F and D c Transferring a call to another handset F and D to select internal user a Making a consultation call F and Dto select internal user end End Setting the...

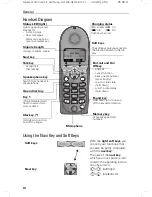
Страница 4: ...arging status empty e 1 3 U full V 2 3 flashes when low Signal strength strong medium weak Navi key Status LED light Soft keys The soft keys give you access to the function shown in the dis play Lights up during a call Flashes for Incoming calls New messages Alarm calls appoint ments anniversaries Key 1 Programmable Hold down to select telco voice mailbox Microphone Pound key Hold down to turn on ...

Страница 5: ... menu Select entry OK Cursor to the right F Open the list of inter nal users One menu level back cancel Cursor to the left Soft keys Meaning MENU Menu button Activate the general menu when telephone is idle Z Confirm menu function and select End and save the setting W Delete key Backspace Delete entries from right to left Automatic redial key Open the list of the last 5 numbers dialed I Displays i...

Страница 6: ...VI Gigaset 4010 Comfort CHIN eng A31008 G4010 C102 1 umschl_v fm 25 09 0 General ...

Страница 7: ...tents Setting Up the Telephone 2 Date and Time 7 Making Calls 8 Enhanced Telephone Features 13 Handset Operation 29 Customizing Handset Settings 40 Base Station Settings 44 Advanced Settings 46 Appendix 49 Safety Precautions 51 Limited Warranty 52 Menu table 54 Index 56 ...

Страница 8: ...1 Gigaset S 88 handset 1 power supply unit 1 telephone cord 1 belt clip 2 AA rechargeable NiCd batteries 1 user manual 1 Quick Start Guide Installing the Base Station The base station is designed for operation in protected rooms with a temperature range from 40 F to 100 F IMPORTANT For best reception place the base in a high cen tral location away from other electrical devices F ...

Страница 9: ...ert the small plug on cord into pho ne jack Place cord in thebasecable channel insert power supply unit into wall out let Insert plug on the telephone cord into telephone jack on base unit clicks into place Place cord in cable channel on the bottom of the base Insert other end of plug into telephone jack on the wall The installation of the base unit should allow at least 8 inches between the base ...

Страница 10: ...y then place it in the base station with the display facing upward toward you After about one minute the handset s internal number will appear on the display for example INT 1 Successful registration is signaled by a confir mation beep crescendo tone sequence The display is protected by a plastic film Remove the protective plastic film Use only AA rechargeable NiCd or NiMH batteries Do not use Alk...

Страница 11: ...rmation beep Ý Batteries empty symbol flashes Û Batteries 2 3 charged Ü Batteries 1 3 charged Ú Batteries fully charged Once the initial charging operation is completed you can re place your handset into the base station or charger after each call Charging is controlled electronically This ensures opti mum charging and prolongs battery life The batteries heat up during charging This is normal and ...

Страница 12: ...om accidental key presses If there is an incom ing call the key lock is automatically turned off and turned back on af ter the call has ended c Accepting a call Press the Talk key ª To turn on off hold down the keypad lock hold down the pound key you will hear the confirmation beep1 1 Confirmation beep rising tone sequence Error beep falling tone sequence Note 911 Emergency calls can not be made w...

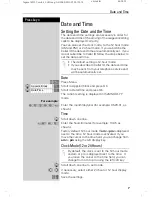
Страница 13: ...d press OK The current setting is displayed in theMM DD YY mode For example Þ ŸÞÞ Enter the month day year for example 05 20 01 as shown Time D Scroll down one line Þ Enter the hours minutes for example 10 05 as shown Factory default 12 hour mode If am or pm is displayed next to the time 12 hour mode is activated If you move the cursor to the time field you can change from am to pm using the left ...

Страница 14: ...om Call Intercom calls are calls to other registered handsets and do not tie up your telephone line for example calls within your home from the kitchen to the living room For example F Press INT on the navi key Your own handset is identi fied by D E c Scroll to the handset you want to call and press the Talk key or e g Ÿ Simply enter the number of the handset you want to call Paging All Handsets F...

Страница 15: ...ss the END key to end the call Answering a Call Your handset rings ringer and the status LED flashes c u Press the TALK or speakerphone u key or With the Auto Answer feature you may answer a call by simply removing the handset from the base station or charger for instructions on how to turn on the Auto Answer feature see page 43 ...

Страница 16: ...åååååååååååååååååå Private Call The caller has chosen to block his or her number åååååååååååååååååååååååååååå Out of Area If the number is not available to your telephone compa ny Out of Area will be displayed instead Caller ID is a service provided by the local tele phone company which allows your Gigaset S88 to display the name and number of the person who is calling you Contact your local telep...

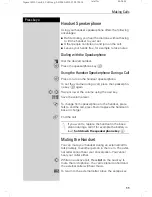
Страница 17: ... the speakerpho ne key u again F G Raise or lower the volume using the navi key Save Save the volume level c To change from speakerphone to the handset press Talk to end the call press End or replace the handset in base or charger a End the call Muting the Handset You can mute your handset during an external call to talk privately to another person in the room The exter nal caller cannot hear your...

Страница 18: ...NU Press Menu åååååååååååååååååååååååååååååååå D Answering M Scroll to Ans Machine and press OK åååååååååååååååååååååååååååååååå D Set Key 1 Select to Set Key 1 and press OK åååååååååååååååååååååååååååååååå D Voice Mail Set the Voice Mail o Dial the voice mail access number MENU Press Menu åååååååååååååååååååååååååååååååå Save Entry Scroll to Save Entry and press OK Once you have entered the voice...

Страница 19: ...ial The Gigaset S88 can automatically redial a telephone number ten times with an interval of 20 seconds in each case The speakerphone key flashes and the speaker is active during this operation This function turns itself off after 10 unsuccessful tries To cancel automatic redial press or any key The person you called is not available z Press the Redial soft key D Scroll to the desired telephone n...

Страница 20: ...and press OK Copying the Redial Number to the Directory z Press the Redial soft key D Scroll to desired telephone number MENU Press Menu åååååååååååååååååååååååååååååååå D Send to Dir Scroll to Send to Dir and press OK The telephone number is already entered o If desired edit the name and number and if appropria te an anniversary see page 23 MENU Press Menu åååååååååååååååååååååååååååååååå Save En...

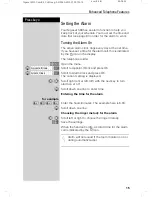
Страница 21: ...åååååååååååååååååååååååååååå D Appoint Clock Scroll to Appoint Clock and press OK åååååååååååååååååååååååååååååååå D Alarm Clock Scroll to Alarm Clock and press OK The current setting is displayed F G Scroll right on or left off with the navi key to turn alarm on or off D Scroll down one line to enter time Entering the time for the alarm for example Þ Þ Þ Enter the hours minutes The example here i...

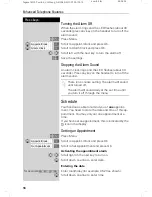
Страница 22: ...the alarm sound Schedule Your handset is able to remind you of one appoint ment You need to store the date and time of this ap pointment You may only set one appointment at a time If you have set an appointment this is indicated by the icon in the display Setting an Appointment MENU Press Menu åååååååååååååååååååååååååååååååå D Appoint Clock Scroll to Appoint Clock and press OK ååååååååååååååååååå...

Страница 23: ...splay key to change from am to pm D Scroll down one line to choose ringer melody Choosing the ringer melody for the appointment alarm F G Scroll with the navi key to choose the ringer melody Save Save the settings Turning off the Appointment Alarm An appointment alarm sounds the same way as an in coming call The handset rings and the status LED flas hes approx 30 sec Press any key to turn off the ...

Страница 24: ...w an new unanswered appointment Press the right soft key to show the list of events Then select OK Proceed as follows to display the appointment MENU Press Menu åååååååååååååååååååååååååååååååå D Appoint Clock Scroll to Appoint Clock and press OK åååååååååååååååååååååååååååååååå D Dates Scroll to Dates and press OK D Select a missed appointment The information on the missed appointment is displaye...

Страница 25: ...y pressing OK Copying a Telephone Number to the Directory During a Call You are conducting an external call MENU Press Menu åååååååååååååååååååååååååååååååå D Send to Dir Scroll to Save to Dir and press OK A menu opens in which you can enter the telephone number and the name of the caller If the number has been transmitted it automatically appears in the menu o Enter the name of the caller if desi...

Страница 26: ...Editing a Directory Entry D Open the Directory list by pressing the bottom of the navi key D Scroll to desired name Display Press Display If desired you can change the telephone number name Edit Press Edit to open the menu for making changes o If desired change the telephone number D o Scroll to the name field and if desired change the name D o Scroll to the anniversary field and if desired change...

Страница 27: ...ååååååååååååååå D Delete Log Scroll to Delete Log and press OK Yes Confirm to delete all entries by pressing Yes A confir mation beep sounds as the log is deleted Copying an Entry to Another Handset You can copy an entry to another Gigaset S88 handset to save yourself time and effort D Open the Directory list by pressing the bottom of the navi key D Scroll to desired name MENU Press Menu ååååååååå...

Страница 28: ...s the log is sent Receiving the Telephone Book Once a log has been sent the display shows how many entries have been received by the telephone Entries with identical numbers are not overwritten For this re ason the number of stored entries can differ from the number of transmitted entries The transmission will be interrupted if the memory of the receiving handset is full the last entry is displaye...

Страница 29: ...ld Edit Press Edit o Enter or change the date Do Scroll down one line and enter the time and select am pm If am or pm is displayed in addition to the time the 12 hour mode is on If you move the cursor into this field you can use the left display key to toggle between 12 hour mode and 24 hour mode D Scroll down one line and choose a visual reminder or melody F G Choosing the indicator for the alarm...

Страница 30: ... Memory Dial Entry C Press the MEM key åååååååååååååååååååååååååååååååå New Entry Scroll to New Entry and press OK o Enter the telephone number max 32 digits D o Scroll to the name field and use the keypad to first sel ect a quick access key then enter the name Example 3 ERIC 4x 3 2x E 3x R 3x I 3x Ÿ C Optionally you can enter the anniversary where appli cable see page 23 MENU Press Menu ååååååååå...

Страница 31: ...l to the name field and if necessary change the name MENU Press Menu åååååååååååååååååååååååååååååååå Save Entry Scroll to Save Entry and press OK Deleting a Single Entry from the Memory Dial List C Press the MEM key D Scroll to desired number MENU Press Menu åååååååååååååååååååååååååååååååå D Delete Entry Scroll to Delete Entry and press OK A confirmation beep sounds as the entry is deleted Refer...

Страница 32: ...to Call Log and press OK åååååååååååååååååååååååååååååååå Missed Calls Scroll to Missed calls and press OK or åååååååååååååååååååååååååååååååå D All Calls Scroll to All Calls and press OK Requires a subscription to Caller ID from your local telephone com pany Calls picked up on the first ring will not be saved in the Call Log Call Waiting calls are included in the Call Log if you have subscribed t...

Страница 33: ...Scroll to the desired number c Press Talk to dial the number The number is copied to the redialing list Status of the entry The call is new in the list The call is old in the list The call has been answered With the key you can open the following lists Message list of the Telco Voice Mail Call Log If there is only one list that contains new messa ges or calls you are taken directly to this list af...

Страница 34: ... to Calls and press OK E D Scroll to the desired number MENU Press Menu åååååååååååååååååååååååååååååååå D Send to Dir Scroll to Send to Dir and press OK D o Scroll to the name field and enter a name MENU Press Menu åååååååååååååååååååååååååååååååå Save Entry Scroll to Save Entry and press OK Deleting the Call Log Press the Mailbox Key åååååååååååååååååååååååååååååååå D Calls Scroll to Calls and p...

Страница 35: ...Turn the handset off by holding down the End key Place the handset in the base station with the display facing toward you The handset will turn on once it is placed into the base After approximately one minute the handset s inter com number is shown for example INT1 The handset is now registered and ready for use Up to three additional handsets may be added to the system for a total of four handse...

Страница 36: ...OK åååååååååååååååååååååååååååååååå D Reg Handset Scroll to Reg Handset and press OK D Select the base station is recommended un less you are registering your handset to an additional base o Enter the PIN factory setting 0000 Step 2 Underside of the base station Hold down the Page Registration key on the underside of the base station for approximately 5 seconds until a signal tone is heard at the ...

Страница 37: ...N factory setting 0000 and press OK Yes a Confirm by pressing Yes Switching Base Stations Prerequisite The handset is registered at more than one base stations The handset can be set to a certain base station e g at home or in the office or set to and it is automatically switched to the base station with the best reception MENU Press Menu åååååååååååååååååååååååååååååååå D H Set Settings Scroll to...

Страница 38: ...change the number of a handset F Press left on the navi key INT and the list of handsets is displayed MENU Press Menu åååååååååååååååååååååååååååååååå Assign Number Scroll to Assign Number and press OK All registered handsets are displayed E D Select the desired handset o Enter an available intercom number If necessary E D o Scroll to a different intercom and change it first Press OK to save chang...

Страница 39: ... e g Ÿ Simply enter the number of the handset you wish to call and you are automatically connected End the call a Press End Call Forwarding You can forward an external call to another handset F Press INT on the navi key left side and the list of hand sets is displayed Your own handset is identified by E D Scroll to the handset you wish to call c Press Talk When the other handset answers announce t...

Страница 40: ...Talk Ending the Consultation Call End Press the End softkey You are now reconnected to the external call or a Press the End key and the call is transferred to the con sulted handset Accepting or Rejecting a Waiting Call If you receive an external call during an internal call you will hear the call waiting tone if you subscribe to this feature from your local telephone company Accept Press Accept T...

Страница 41: ...mobilt_an fm 25 09 03 Paging all Handsets from the Base Locating Handsets Press the Page Registration buttons on the bottom side of the base station very briefly All handsets ring at the same time To End Paging Press the Page Registration button again or c Press the Talk key on a handset ...

Страница 42: ...The number you store can be An internal number An additional registered hand set required An external number A cell phone number or another fixed network number where you can be contacted i e your neighbor s home number Incoming Calls on the Handset Set to Room Monitor Incoming calls on the handset being used as the room monitor Signaled without the ringer The call is only displayed The keypad and...

Страница 43: ... Off the room monitor feature D Edit Scroll down one line to Set No and press Edit If the Set No line has an existing external number you can overwrite it with X first You can delete a preset internal telephone number with Yes Press Edit and enter the required telephone number F Press INT D E Scroll to desired internal number and press OK D Scroll down one line to Set Level F G Press left or right...

Страница 44: ...ber with Yes Press Edit and enter the required telephone number o Enter the desired external phone number or D Open the directory D Select the desired number MENU Press Menu åååååååååååååååååååååååååååååååå Save Entry Scroll to Save Entry and press OK D Scroll down one line to Set Level F G Press left or right on the navi key to set the sensitivity level to high or low Save Press Save The room mon...

Страница 45: ...set to its factory default settings The Directory the Memory Dial list and the Call Log are not deleted when you re set the handset Registration at the base station is not affected either MENU Press Menu åååååååååååååååååååååååååååååååå D H Set Settings Scroll to H Set Settings and press OK åååååååååååååååååååååååååååååååå D Default Sett Scroll to Default Sett and press OK Yes Press Yes to confirm...

Страница 46: ...guage and press OK the current langua ge is marked with a check 9 D Scroll to the desired language and press OK Changing Volumes Melodies and Tones Handset and Speakerphone Volume You can set the handset volume to one of three levels and you can set the speakerphone to one of five levels MENU Press Menu åååååååååååååååååååååååååååååååå D Sound Settings Scroll to Sound Settings and press OK ååååååå...

Страница 47: ...right on the navi key to turn the volume of the ringer up or down D Scroll down one line F G Press left or right on the navi key to chose the ringer melody Save Press Save Setting the Time for Ringer Volume You can set a different ringer volume for a certain peri ods of time e g lower volume at night time MENU Press Menu åååååååååååååååååååååååååååååååå D Sound Settings Scroll to Sound Settings an...

Страница 48: ...vi key to turn the volume up or down Save Press Save D Save Store the time control settings Save or a Press Save Attention Tone All tones are turned off if you activate the attention to ne If there is an incoming call a short tone attention tone is generated and the status light and the speaker phone key flash to signal a call To turn on the attention tone Hold down the key To turn off the attenti...

Страница 49: ...åå D Alarm Tones Scroll to Alarm Tones and press OK F G Press left or right on the navi key to turn the key tones on or off D Scroll down one line F G Press left or right on the navi key to turn the confirma tion tones on or off D Scroll down one line F G Press left or right on the navi key to turn the low battery tone on off or Dur Call only Save Press Save Turning On and Off Auto Answer When Aut...

Страница 50: ...åååååååååååååååå System PIN Scroll to System PIN and press OK System PIN Enter the current system PIN and press OK default 0000 o Enter the new system PIN 4 digits D Scroll down one line o Re Enter the new system PIN Press OK to save the new PIN Resetting the Base Station to the Default Settings Resetting the base station does not affect the system PIN or handset registration Voice patterns are de...

Страница 51: ...ååååååå D Spec Functions Scroll to Spec Functions and press OK åååååååååååååååååååååååååååååååå D Emergency No Scroll to Emergency No and press OK System PIN Enter the system PIN and press OK If an emergency number is already saved it is displayed and can be changed o Enter desired emergency number MENU Press Menu åååååååååååååååååååååååååååååååå Save Entry Scroll to Save Entry and press OK Displa...

Страница 52: ... press OK åååååååååååååååååååååååååååååååå D Spec Functions Scroll to Spec Functions and press OK åååååååååååååååååååååååååååååååå Dial Mode Scroll to Dial Mode and press OK E D Press up or down on the navi key to select desired mode and press OK selected mode is marked with a check Setting the Flash Time Certain networks may require a flash time different from the factory default setting MENU Pre...

Страница 53: ... number up to 3 digits MENU Press Menu åååååååååååååååååååååååååååååååå Save Entry Scroll to Save Entry and press OK Switching To Temporary Tone Dialing If your network operates with pulse dialing but tone di aling DTMF is required for example to check the mailbox you must switch to tone dialing DTMF dur ing the call Prerequisite You are conducting a call MENU Press Menu åååååååååååååååååååååååååå...

Страница 54: ...e for the MEM Key With this feature you can set the length of the pause that is inserted after holding down the C key MENU Press Menu Ÿ Enter 8 9 1 2 e g Enter the pause length None 1 800 ms 2 1600 ms 3 3200 ms 4 The setting is saved Pause after Access Code Prerequisite you have saved an access code and want to change the pause The base station always automatically inserts this pau se after the pr...

Страница 55: ... of the directory for example sEric 1 x 2 x 3 x 4 x 5 x 6 x 7 x 8 x 9 x 10 x 11x 12x 13x 14x s 1 â Ÿ a b c 2 ä á à â ã ç d e f 3 ë é è ê g h i 4 ï í ì î j k l 5 m n o 6 ö ñ ó ò ô õ p q r s 7 ß t u v 8 ü ú ù û w x y z 9 ÿ ý æ ø å a A Þ 0 _ ª The first letter of the name is automatically written in upper case also af ter punctuation marks the letters immediately afterwards are written in lo wer case...

Страница 56: ...andset page 29 Base station not activated Check the connector at base station page 3 Handset that is in the base station is not charging Line seized by a second handset for a long period Maximum charging power is only possible while nobody is making calls Handset does not ring Ringer off Activate the ringer Hold down the key You cannot hear The key F was pressed the microphone is muted Press Î to ...

Страница 57: ...ct 11 To reduce the risk of electric shock or burns do not disassemble this product Take it to a qualified service center when service is required Opening or removing covers may expose you to dangerous voltages dangerous electrical current or other risks Incorrect reassembly can cause electric shock when the appliance is subsequently used 12 Unplug the product from the wall outlet and refer servic...

Страница 58: ...ct will be warranted for either a 90 days or b the remainder of the original one 1 year warranty period whichever is longer Batteries are warranted to be free from defects at the time of purchase This warranty does not apply to defects outside of our control including but not limited to acts of God fire flood damage while in transit to service facility We do not warranty that the product will be c...

Страница 59: ...out Siemens Gigasets or for technical assistance with your Gigaset visit our web site at or please call Siemens Cordless Products Siemens is a registered trademark of Siemens AG Siemens Cordless Products is a division of Siemens Information and Communication Mobile LLC Information subject to change since Siemens reserves the right without notice to make changes in equipment design or components as...

Страница 60: ...tment entry 4 2 Alarm Clock entry 4 3 Dates entry 4 4 Date Time entry 5 Sound Settings 5 1 Handset Volume entry 5 2 Set Ring Tone entry 5 3 Alarm Tones entry 6 Not Available 7 H Set Settings 7 1 Auto Answer 7 2 Language list 7 3 Reg Handset list 7 4 Select Base list 7 5 Default Sett 8 Base Settings 8 2 System PIN entry 8 3 Default Settings 8 4 Spec Functions 8 4 1 Dial Mode 8 4 1 1 Tone 8 4 1 2 Pu...

Страница 61: ...n entry and pressing MENU the following menu functions are available Messages Press to open the list with the messages The following menu functions are now available 1 Edit Entry 2 Delete Entry 3 Send Entry 5 Delete Log 6 Send Log 7 Available Memory 1 Not Available 3 VM 4 Calls 4 1 Save to Dir 4 2 Del Call Log 4 3 Call Log 4 3 1 Missed Calls 4 3 2 All Calls ...

Страница 62: ...necting 33 D Date setting 7 Deactivating handset 5 keypad protection 6 warning and signal tones 43 De registering handsets 31 Dialing modes 46 Directory 19 24 changing an entry 20 copying an entry 21 copying the directory 22 deleting all entries 21 deleting an entry 21 dialing a number 20 displaying an entry 20 entering names 49 storing a telephone number 24 storing an entry 19 Display keys IV Dis...

Страница 63: ...all displaying and changing an entry 20 storing an entry 19 P Paging 35 PBX storing the pause after the prefix 48 storing the prefix 47 switching to tone dialing 47 Picking up a call 12 PIN changing 44 Preparing the telephone 2 Protective plastic film 4 R Redial automatic 13 manual 13 Registering handsets 29 Ringer volume setting 41 Room monitor 36 S Saving emergency numbers 45 system PIN 44 Sched...

Отзывы: